One of the things that I see many people struggling with is file uploads. How do we upload a file in Laravel? What is the best way to upload a file? In this tutorial, I will walk through from a basic version using blade and routes, getting more advanced, and then how we might handle it in Livewire too.
To begin with, let's look at how we might do this in standard Laravel and Blade. There are a few packages that you can use for this - however, I am not a fan of installing a package for something as simple as uploading a file. However, suppose you want to upload a file and associate it with a model and have different media collections for your model. In that case, Spatie has a great package called MediaLibrary and MediaLibrary Pro, which takes a lot of the hassle out of this process for you.
Let's assume we want to do this ourselves and not lean on a package for this. We will want to create a form that allows us to upload a file and submit it - and a controller will accept this form, validate the input and handle the upload.
Before that, however, let us create a database table in which we can store our uploads. Imagine a scenario where we want to upload and attach files to different models. We wish to have a centralized table for our media that we can attach instead of uploading multiple versions for each model.
Let's create this first using the following artisan command:
php artisan make:model Media -mThis will create the model and migration for us to get started. Let's take a look at the up method on the migration so we can understand what we will want to store and understand:
Schema::create('media', function (Blueprint $table) { $table->id(); $table->string('name'); $table->string('file_name'); $table->string('mime_type'); $table->string('path'); $table->string('disk')->default('local'); $table->string('file_hash', 64)->unique(); $table->string('collection')->nullable(); $table->unsignedBigInteger('size'); $table->timestamps();});Our media will require a name so that we can pull the client's original name from the upload. We then want a file name, which will be a generated name. Storing uploaded files using the original file name can be a significant issue regarding security, especially if you are not validating strongly enough. The mime type is then required so that we can understand what was uploaded, whether it was a CSV or an image. The path to the upload is also handy to store, as it allows us to reference it more easily. We record the disk we are storing this on so that we can dynamically work with it within Laravel. However, we might be interacting with our application. We store the file hash as a unique column to ensure we do not upload the same file more than once. If the file changes, this would be a new variation and ok to upload again. Finally, we have collection and size, where we can save a file to a collection such as "blog posts", creating a virtual directory/taxonomy structure. Size is there for informational purposes mainly but will allow you to ensure that your digital assets aren't too large.
Now we know where we want to store these uploads, we can look into how we want to upload them. We will start with a simple implementation inside a route/controller and expand from there.
Let's create our first controller using the following artisan command:
php artisan make:controller UploadController --invokableThis will be where we route uploads to, for now, an invokable controller that will synchronously handle the file upload. Add this as a route in your web.php like so:
Route::post('upload', App\Http\Controllers\UploadController::class)->name('upload');Then we can look at how we want this process to work. To start with, like all other endpoints - we want to validate the input early on. I like to do this in a form request as it keeps things encapsulated nicely. You can do this part however you feel appropriate; I will show you the rules below I use:
use Illuminate\Validation\Rules\File; return [ 'file' => [ 'required', File::types(['png', 'jpg']) ->max(5 * 1024), ]];So we must send a file across in our request, and it must be either a PNG or JPG and not be any bigger than 5Gb. You can use configuration to store your default rules for this if you find it more accessible. However, I usually create a Validator class specific for each use case, for example:
class UserUploadValidator{ public function avatars(): array { return [ 'required', File::types(['png', 'jpg']) ->max(5 * 1024), ]; }}Once you have your validation in place, you can handle this in your controller however you need to. Assume that I am using a Form Request and injecting this into my controller, though. Now we have validated, we need to process. My general approach to controllers is:
- Validate
- Process
- Respond
In an API, I process in the background, which usually means dispatching a job - but on the web, that isn't always convenient. Let's look at how we might process a file upload.
class UploadController{ public function __invoke(UploadRequest $request) { Gate::authorize('upload-files'); $file = $request->file('file'); $name = $file->hashName(); $upload = Storage::put("avatars/{$name}", $file); Media::query()->create( attributes: [ 'name' => "{$name}", 'file_name' => $file->getClientOriginalName(), 'mime_type' => $file->getClientMimeType(), 'path' => "avatars/{$name}", 'disk' => config('app.uploads.disk'), 'file_hash' => hash_file( config('app.uploads.hash'), storage_path( path: "avatars/{$name}", ), ), 'collection' => $request->get('collection'), 'size' => $file->getSize(), ], ); return redirect()->back(); }}So what we are doing here is first ensuring that the logged-in user is authorized to upload files. Then we want to get the file uploaded and the hashed name to store. We then upload the file and store the record in the database, getting the information we need for the model from the file itself.
I would call this the default approach to uploading files, and I will admit there is nothing wrong with this approach. If your code looks something like this already, you are doing a good job. However, we can, of course, take this further - in a few different ways.
The first way we could achieve this is by extracting the upload logic to an UploadService where it generates everything we need and returns a Domain Transfer Object (which I call Data Objects) so that we can use the properties of the object to create the model. First, let us make the object we want to return.
class File{ public function __construct( public readonly string $name, public readonly string $originalName, public readonly string $mime, public readonly string $path, public readonly string $disk, public readonly string $hash, public readonly null|string $collection = null, ) {} public function toArray(): array { return [ 'name' => $this->name, 'file_name' => $this->originalName, 'mime_type' => $this->mime, 'path' => $this->path, 'disk' => $this->disk, 'file_hash' => $this->hash, 'collection' => $this->collection, ]; }}Now we can look at the upload service and figure out how we want it to work. If we look at the logic within the controller, we know we will want to generate a new name for the file and get the upload's original name. Then we want to put the file into storage and return the Data Object. As with most code I write, the service should implement an interface that we can then bind to the container.
class UploadService implements UploadServiceContract{ public function avatar(UploadedFile $file): File { $name = $file->hashName(); $upload = Storage::put("{$name}", $file); return new File( name: "{$name}", originalName: $file->getClientOriginalName(), mime: $file->getClientMimeType(), path: $upload->path(), disk: config('app.uploads.disk'), hash: file_hash( config('app.uploads.hash'), storage_path( path: "avatars/{$name}", ), ), collection: 'avatars', ); }}Let us refactor our UploadController now so that it is using this new service:
class UploadController{ public function __construct( private readonly UploadServiceContract $service, ) {} public function __invoke(UploadRequest $request) { Gate::authorize('upload-files'); $file = $this->service->avatar( file: $request->file('file'), ); Media::query()->create( attributes: $file->toArray(), ); return redirect()->back(); }}Suddenly our controller is a lot cleaner, and our logic has been extracted to our new service - so it is repeatable no matter where we need to upload a file. We can, of course, write tests for this, too, because why do anything you cannot test?
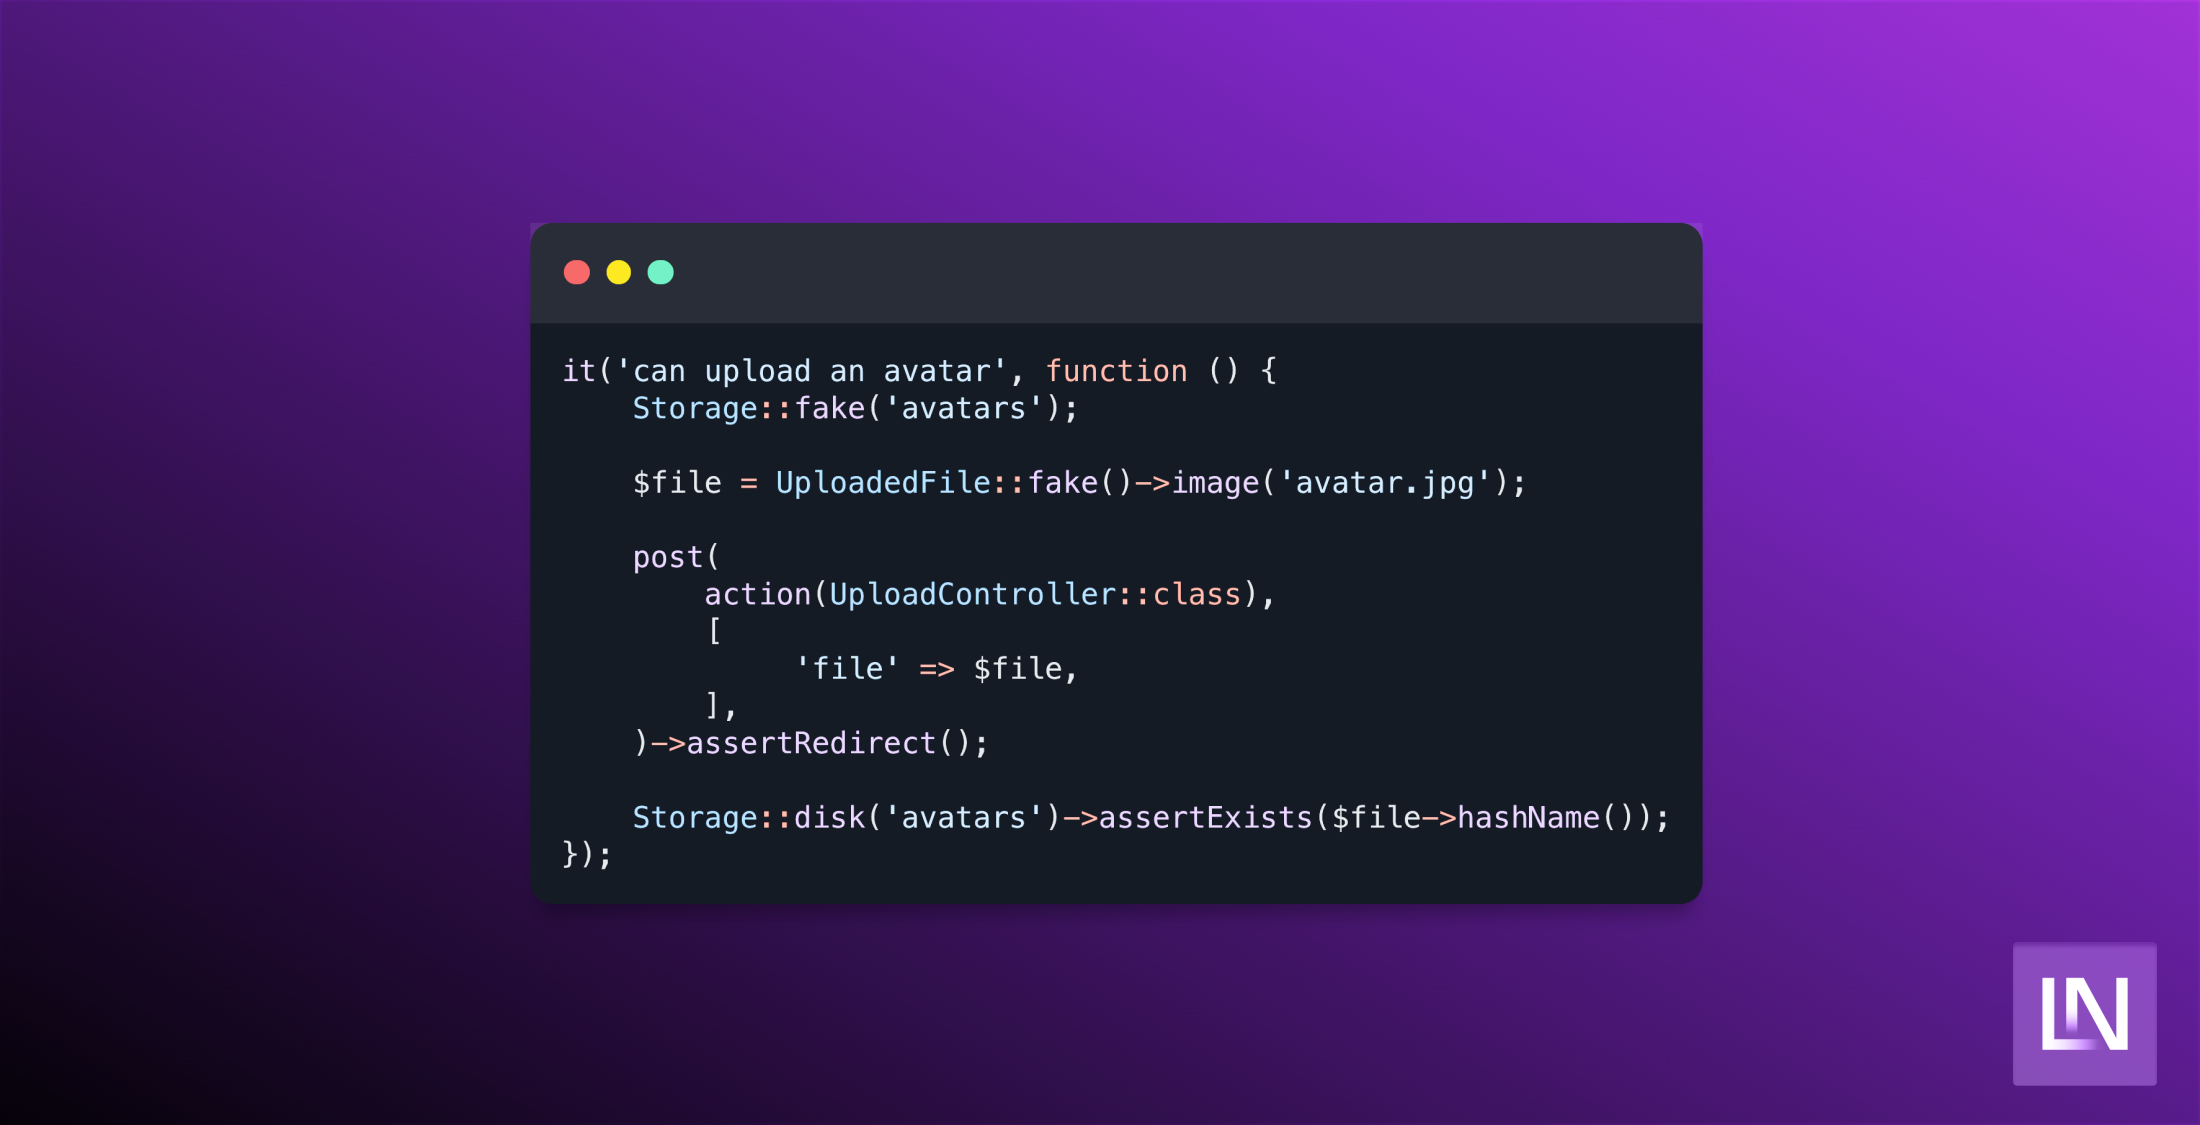
it('can upload an avatar', function () { Storage::fake('avatars'); $file = UploadedFile::fake()->image('avatar.jpg'); post( action(UploadController::class), [ 'file' => $file, ], )->assertRedirect(); Storage::disk('avatars')->assertExists($file->hashName());});We are faking the storage facade, creating a fake file to upload, and then hitting our endpoint and sending the file. We then asserted that everything went ok, and we were redirected. Finally, we want to assert that the file now exists on our disk.
How could we take this further? This is where we are getting into the nitty gritty, depending on your application. Let's say, for example, that in your application, there are many different types of uploads that you might need to do. We want our upload service to reflect that without getting too complicated, right? This is where I use a pattern I call the "service action pattern", where our service calls an action instead of handling the logic. This pattern allows you to inject a single service but call multiple actions through it - keeping your code clean and focused, and your service is just a handy proxy.
Let us first create the action:
class UploadAvatar implements UploadContract{ public function handle(UploadedFile $file): File { $name = $file->hashName(); Storage::put("{$name}", $file); return new File( name: "{$name}", originalName: $file->getClientOriginalName(), mime: $file->getClientMimeType(), path: $upload->path(), disk: config('app.uploads.disk'), hash: hash_file( config('app.uploads.hash'), storage_path( path: "avatars/{$name}", ), ), collection: 'avatars', size: $file->getSize(), ); }}Now we can refactor our service to call the action, acting as a useful proxy.
class UploadService implements UploadServiceContract{ public function __construct( private readonly UploadContract $avatar, ) {} public function avatar(UploadedFile $file): File { return $this->avatar->handle( file: $file, ); }}This feels like over-engineering for a minor application. Still, for more extensive media-focused applications, this will enable you to handle uploads through one service that can be well-documented instead of fragmented knowledge throughout your team.
Where can we take it from here? Let's step into user-land for a moment and assume we are using the TALL stack (because why wouldn't you!?). With Livewire, we have a slightly different approach where Livewire will handle the upload for you and store this as a temporary file, which gives you a somewhat different API to work with when it comes to storing the file.
Firstly we need to create a new Livewire component that we can use for our file upload. You can create this using the following artisan command:
php artisan livewire:make UploadForm --testNow we can add a few properties to our component and add a trait so that the component knows it handles file uploads.
final class UploadForm extends Component{ use WithFileUploads; public null|string|TemporaryUploadedFile $file = null; public function upload() { $this->validate(); } public function render(): View { return view('livewire.upload-form'); }}Livewire comes with a handy trait that allows us to work with File uploads straightforwardly. We have a file property that could be null, a string for a path, or a Temporary File that has been uploaded. This is perhaps the one part about file uploads in Livewire that I do not like.
Now that we have a basic component available, we can look at moving the logic from our controller over to the component. One thing we would do here is to move the Gate check from the controller to the UI so that we do not display the form if the user cannot upload files. This simplifies our component logic nicely.
Our next step is injecting the UploadService into our upload method, which Livewire can resolve for us. Alongside this, we will want to handle our validation straight away. Our component should not look like the following:
final class UploadForm extends Component{ use WithFileUploads; public null|string|TemporaryUploadedFile $file; public function upload(UploadServiceContract $service) { $this->validate(); } public function rules(): array { return (new UserUploadValidator())->avatars(); } public function render(): View { return view('livewire.upload-form'); }}Our validation rules method returns our avatar validation rules from our validation class, and we have injected the service from the container. Next, we can add our logic for actually uploading the file.
final class UploadForm extends Component{ use WithFileUploads; public null|string|TemporaryUploadedFile $file; public function upload(UploadServiceContract $service) { $this->validate(); try { $file = $service->avatar( file: $this->file, ); } catch (Throwable $exception) { throw $exception; } Media::query()->create( attributes: $file->toArray(), ); } public function rules(): array { return (new UserUploadValidator())->avatars(); } public function render(): View { return view('livewire.upload-form'); }}We need minimal changes to how our logic works - we can move it almost straight into place, and it will work.
This is how I find uploading files works for me; there are, of course, many ways to do this same thing - and some/most of them are a little simpler. It wouldn't be a Steve tutorial if I didn't go a little opinionated and overboard, right?
How do you like to handle file uploads? Have you found a way that works well for your use case? Let us know on Twitter!

Technical writer at Laravel News, Developer Advocate at Treblle. API specialist, veteran PHP/Laravel engineer. YouTube livestreamer.