In this quick tutorial by Phil Leggetter, we’ll cover how you can both send and receive SMS from your Laravel application. We’ll do this using Nexmo, a cloud communications platform that offers APIs for provisioning phone numbers, sending and receiving SMS (which is handy since we’ll use that), making and receiving phone calls and more.
Prerequisites
You’ll need a Nexmo account, the Nexmo CLI (Command Line Interface) installed and setup, and your standard prerequisites for a Laravel app. You’ll also need a localtunnel option so that the Nexmo service can make an HTTP request to your local web server. We recommend ngrok.
Getting Started
With that in place let’s create our Laravel SMS application:
composer create-project --prefer-dist laravel/laravel laravel-smscd laravel-smsNext, let’s add the Nexmo Laravel package to composer.json.
"require": { ..., "nexmo/laravel": "dev-master as 1.0", "nexmo/client": "dev-master as 1.0"},Note that when these packages come out of beta, you’ll only need to include the nexmo/laravel package and nexmo/client will be brought in as a dependency.
Add the Nexmo Service Provider to your app.php config:
'providers' => [ ..., Nexmo\Laravel\NexmoServiceProvider::class]Note: that you can also add to aliases if you want to use the facade.
Install the packages and copy over the Nexmo configuration file:
› composer updatephp artisan vendor:publishFinally, add your Nexmo API Key and API Secret to /config/nexmo.php, updating the API_KEY and API_SECRET values based on the those found in the API settings in the Nexmo Dashboard.
'api_key' => 'API_KEY','api_secret' => 'API_SECRET',Note: you can obviously set these value from your .env and env(...) if you prefer.
Sending an SMS
Note: for simplicity we’ll add all functionality directly to the app/Http/routes.php file.
Add the following route to app/Http/routes.php:
Route::get('/sms/send/{to}', function(\Nexmo\Client $nexmo, $to){ $message = $nexmo->message()->send([ 'to' => $to, 'from' => '@leggetter', 'text' => 'Sending SMS from Laravel. Woohoo!' ]); Log::info('sent message: ' . $message['message-id']);});You’ll notice that in the above code the from value is set to a string with the value of @leggetter. This will work in the UK, but may not work in other countries. It really depends on the country.
For those of you that need to use a real number here, and for everybody else who’ll need a real number for the next step, let’s look at either using an existing number or buying one.
Listing, Searching and Renting Numbers
One of the prerequisites for the tutorial was the Nexmo CLI. We can use this to do a whole bunch of things including working with phone numbers (Virtual Numbers to be precise) that are associated with our account. If you haven’t already done so you should install and setup the CLI where API_KEY and API_SECRET should be replaced with the API credentials you used earlier:
› npm install -g nexmo-clinexmo setup API_KEY API_SECRETWe can now list numbers that we’re already renting, search for numbers that are available to rent, rent those numbers or cancel the rental. Let’s start by seeing if we have any numbers associated with our account:
› nexmo number:list14155550123In the above example, I have a number. If you don’t have a number, you can search for numbers to rent. All you need to know to do that is the two character ISO 3166-1 alpha-2 country code. It’s easier than it sounds. For example, for Great Britain it’s GB and for the United States it’s US. Let’s search for a number to rent in the US:
› nexmo number:search US141555501111415555022214155550333If you don’t have a number, you should buy one so that you can send an SMS in countries that require a real outbound number and so that we can also receive SMS later on.
› nexmo number:buy 14155550111 --confirmNumber purchased: 14155550111Really Sending an SMS
Now if you update your code to use the number you’ve just purchased. Replace the from value with the real number you’ve just purchased or load the number in using env('NEXMO_NUMBER') as we have below:
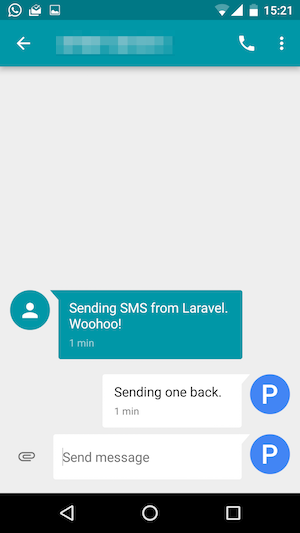
Route::get('/sms/send/{to}', function(\Nexmo\Client $nexmo, $to){ $message = $nexmo->message()->send([ 'to' => $to, 'from' => env('NEXMO_NUMBER'), 'text' => 'Sending SMS from Laravel. Woohoo!' ]); Log::info('sent message: ' . $message['message-id']);});Then start the server:
› php artisan serveLaravel development server started on http://localhost:8000/And navigate to http://localhost:8000/sms/send/YOUR_NUMBER where YOUR_NUMBER should be replaced with your real number including the country code in a e.164 format, the same format that has been shown in all the examples above.
If you check storage/logs/laravel.log you will see a log entry related to the message that has just been sent with a unique message-id at the end of the log entry e.g.
[2016-08-02 13:45:01] local.INFO: sent message: 03000000068F5D97Receiving an Inbound SMS
For the Laravel application to receive an SMS we need to do a few things:
- Ensure our application is reachable by Nexmo using a localtunnel
- Create a route to be called when receiving an SMS
- Disable CSRF for our SMS receiving route
- Inform Nexmo where to make a webhook call to when a message is received
Let’s start by making our application reachable by the Nexmo platform. Assuming you’re using ngrok and your Laravel web server is listening on port 8000 you can do this as follows:
› ngrok http 8000ngrok by @inconshreveable (Ctrl+C to quit) Tunnel Status onlineVersion 2.1.3Region United States (us)Web Interface http://127.0.0.1:4041Forwarding http://814882e9.ngrok.io -> localhost:8000Forwarding https://814882e9.ngrok.io -> localhost:8000 Connections ttl opn rt1 rt5 p50 p90 0 0 0.00 0.00 0.00 0.00As you can see from the above output from ngrok, a subdomain on ngrok has been created, and any requests to that will now be forwarded on to localhost:8000.
With the localtunnel in place we should now create a route to receive the SMS in routes.php:
Route::post('/sms/receive', function(\Nexmo\Client $nexmo){});By default, Laravel won’t allow POST requests to this route without a CSRF token. Since the request to this route will be made by Nexmo, which won’t have a token, we’ll disable CSRF for this route. Add this in App/Http/Middleware/VerifyCsrfToken.php:
protected $except = [ '/sms/receive'];Finally, let’s inform Nexmo where to make the webhook call to when an SMS is received on our number. We can do this using the Nexmo CLI. When executing the following command you should use the phone number you have rented from Nexmo and your ngrok subdomain:
› nexmo link:sms 14155550111 https://814882e9.ngrok.io/sms/receiveNumber updatedWhen you execute this command, the Nexmo service will attempt to call your /sms/receive route, and you should see those requests in your ngrok terminal.
HTTP Requests------------- POST /sms/receive 200 OKIf you see anything other than a 200 response, then you’ll need to fix that for the number and webhook association to successfully complete.
The Nexmo PHP Client library provides a way of easily capturing the HTTP parameters that have been sent by Nexmo to the Laravel application and creating an InboundMessage message object that we can work with. Update the /sms/receive code as follows:
Route::post('/sms/receive', function(\Nexmo\Client $nexmo){ $message = \Nexmo\Message\InboundMessage::createFromGlobals(); Log::info('got text: ' . $message->getBody());});Then send an SMS to your rented number and check storage/logs/laravel.log where you will see your message body logged.
[2016-08-02 13:45:01] local.INFO: sent message: 03000000068F5D97[2016-08-02 14:20:50] local.INFO: sent message: 0300000006917797[2016-08-02 14:21:17] local.INFO: got text: Sending one back.
Auto-Replying to an Inbound SMS
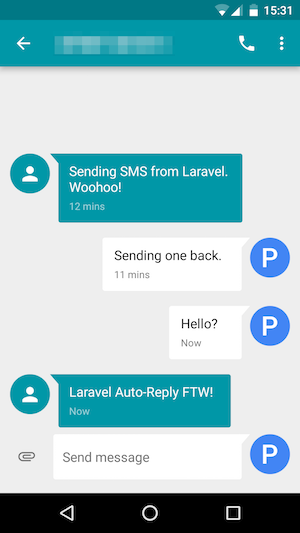
Finally, let’s create an auto-responder to the inbound message. The Nexmo PHP Client provides a nice way of doing that using the InboundMessage->createReply function:
Route::post('/sms/receive', function(\Nexmo\Client $nexmo){ $message = \Nexmo\Message\InboundMessage::createFromGlobals(); Log::info('got text: ' . $message->getBody()); $reply =$nexmo->message()->send($message->createReply('Laravel Auto-Reply FTW!')); Log::info('sent reply: ' . $reply['message-id']);});Send a message to your rented number and you’ll get an auto-reply. It’s not quite magic, but it’s pretty close!
Conclusion
In this tutorial, we’ve covered everything you need to know to add sending and receiving SMS, and even auto-replying, to your Laravel application using the Nexmo cloud communications platform.
You can find the code for this sample via github.com/nexmo-community/laravel-sms.
Please don’t hesitate to get in touch with any thoughts or feedback. You can get in touch via email using devrel@nexmo.com or contact me on Twitter via @leggetter.
If you do follow this tutorial through and would like some addition credit, please drop us an email with your Nexmo API Key (not secret), tell us you saw this on Laravel News, and we’ll add some more credit to your account.
Many thanks to Nexmo for sponsoring Laravel News this week and for sharing this tutorial on how to get started using their service.