In this tutorial, I am going to walk through how to build a custom flash message component using Vue.js and TailwindCSS. I’ll be making it inside a brand-new Laravel 5.8 project, but you can adapt it for use in any project running Vue.js and TailwindCSS.
The component we build will have a “danger” theme and a “success” theme. You can choose to extend it with a “warning” theme or any other themes you see fit.
Prerequisites
This is an intermediate tutorial, so I am not going to cover the basics of Vue.js and TailwindCSS or how to set them up in your project. I will assume you have already done that following their documentation. I have also removed all the boilerplate JavaScript in the resources/js/app.js file except the following:
window.Vue = require('vue'); const app = new Vue({ el: '#app',});In my routes/web.php file, I am starting with:
<?php Route::view('/', 'welcome');In my welcome view (resources/views/welcome.blade.php), I am starting with:
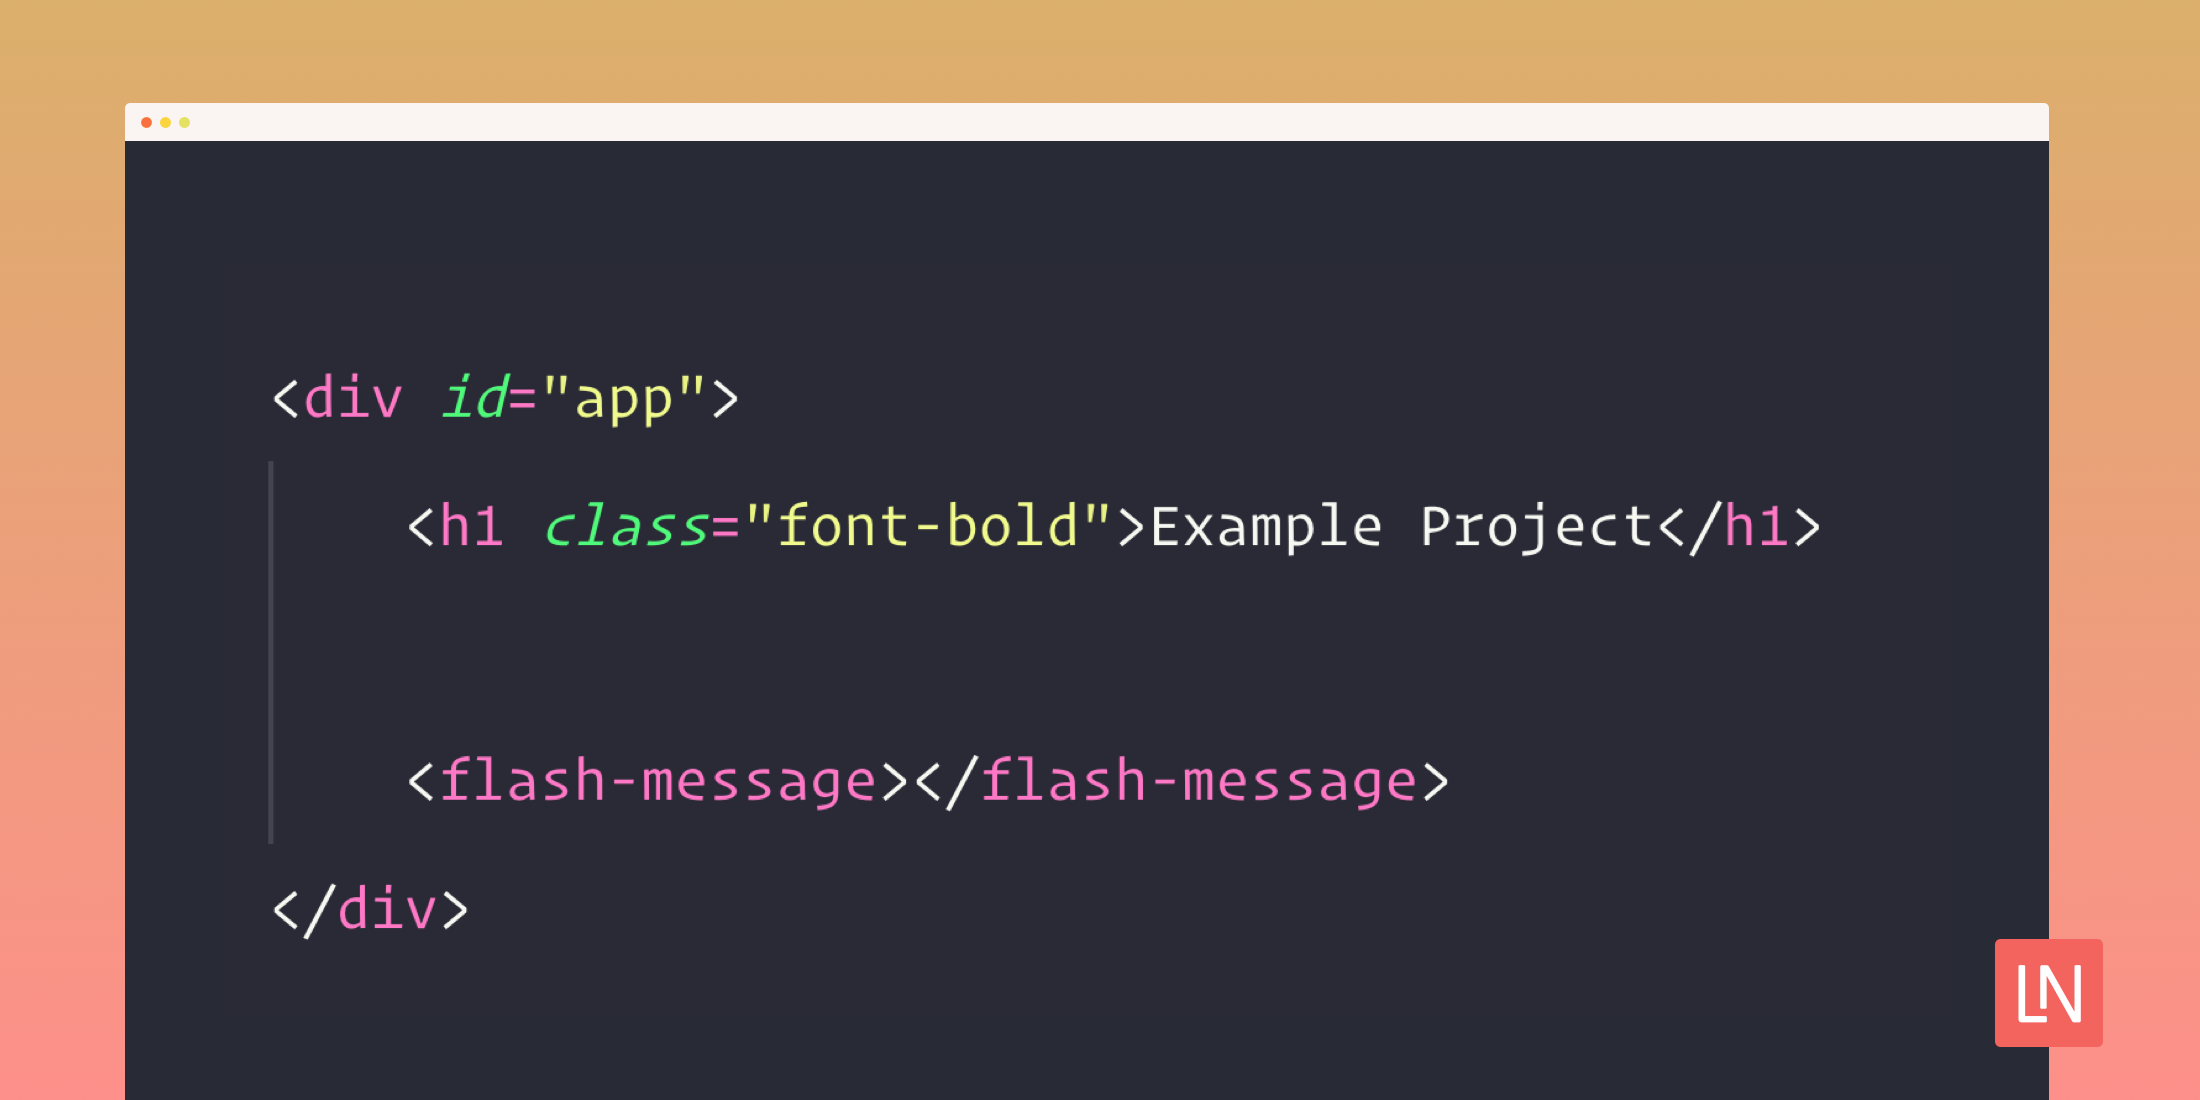
<html lang="{{ str_replace('_', '-', app()->getLocale()) }}"><head> <meta charset="utf-8"> <meta name="viewport" content="width=device-width, initial-scale=1"> <title>{{ config('app.name', 'Laravel') }}</title> <script src="{{ asset('js/app.js') }}" defer></script> <link href="{{ asset('css/app.css') }}" rel="stylesheet"></head><body> <div id="app"> <h1 class="font-bold">Example Project</h1> </div></body></html>Let’s get started
To get started, let’s create our flash-message component and register it in our resources/js/app.js file.
window.Vue = require('vue'); Vue.component('flash-message', require('./components/FlashMessage.vue').default); const app = new Vue({ el: '#app',});Next, we need to include the component in our welcome view so that it will show up on the page. I usually insert it near the bottom of the #app div. We will want this component mounted on any page that might use it.
<div id="app"> <h1 class="font-bold">Example Project</h1> <flash-message></flash-message></div>Styling the component
Let’s get some basic styling done using TailwindCSS. While styling the component, I will use a static message and our “danger” theme, but later there will be variable options. The following markup will place the component in the top right of the screen, add a close icon in the top right of the component, and provide some decent styling.
<template> <div class="fixed top-0 right-0 m-6"> <div class="bg-red-200 text-red-900 rounded-lg shadow-md p-6 pr-10" style="min-width: 240px" > <button class="opacity-75 cursor-pointer absolute top-0 right-0 py-2 px-3 hover:opacity-100" > × </button> <div class="flex items-center"> Oops! Something terrible happened... </div> </div> </div></template>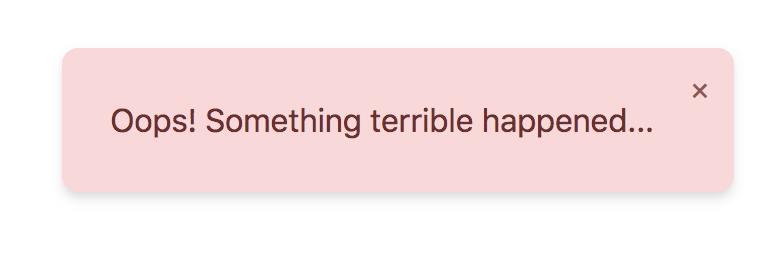
Making the classes and text dynamic
If you replace the bg-red-200 text-red-900 classes with bg-green-200 text-green-900, you’ll see our basic “success” styling. Let’s make the classes and message text change based on a message property on our component. We’ll need to add the following to the bottom of the component:
<template> <div class="fixed top-0 right-0 m-6"> <div :class="{ 'bg-red-200 text-red-900': message.type === 'error', 'bg-green-200 text-green-900': message.type === 'success', }" class="rounded-lg shadow-md p-6 pr-10" style="min-width: 240px" > <button class="opacity-75 cursor-pointer absolute top-0 right-0 py-2 px-3 hover:opacity-100" > × </button> <div class="flex items-center"> {{ message.text }} </div> </div> </div></template> <script>export default { data() { return { message: { text: 'Hey! Something awesome happened.', type: 'success', }, }; },};</script>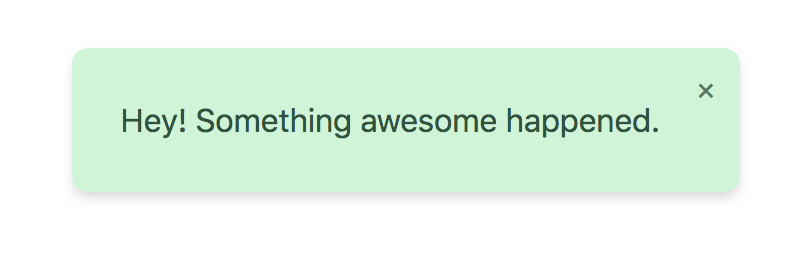
Communicating with the component
Now, I’d like to find a way to set the message from outside the component. I think a simple Vue event bus will work great for this purpose. To set that up, we need to update our resources/js/app.js file to the following:
window.Vue = require('vue');window.Bus = new Vue(); Vue.component('flash-message', require('./components/FlashMessage.vue').default); const app = new Vue({ el: '#app',});You may have used custom events in your Vue components before. We will be using a similar syntax to emit and listen to events on a global level: Bus.$emit('flash-message') and Bus.$on('flash-message'). Now that we have the event bus set up let’s make the component conditionally render based on the message property. We can do that by adding a v-if to the flash-message and setting the default message property to null.
<template> <div class="fixed top-0 right-0 m-6"> <div v-if="message" :class="{ 'bg-red-200 text-red-900': message.type === 'error', 'bg-green-200 text-green-900': message.type === 'success', }" class="rounded-lg shadow-md p-6 pr-10" style="min-width: 240px" > <button class="opacity-75 cursor-pointer absolute top-0 right-0 py-2 px-3 hover:opacity-100" > × </button> <div class="flex items-center"> {{ message.text }} </div> </div> </div></template> <script>export default { data() { return { message: null, }; },};</script>When you load the page, you shouldn’t see anything. Just for an example, let’s add a trigger-form component that we can use to demonstrate how to send events with different options to the flash-message component. Start by creating the component at resources/js/TriggerForm.vue and registering it in the resources/js/app.js file and adding the component to the welcome view.
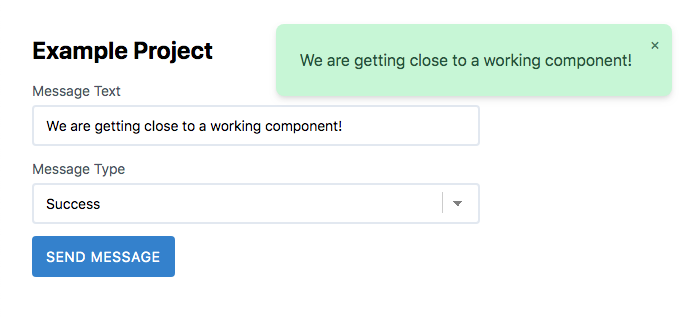
// ...Vue.component('flash-message', require('./components/FlashMessage.vue').default);Vue.component('trigger-form', require('./components/TriggerForm.vue').default);//...<div id="app"> <h1 class="font-bold">Example Project</h1> <trigger-form></trigger-form> <flash-message></flash-message></div>Inside the form component, we will need to add inputs, a button, and data properties bound to inputs.
<template> <form class="max-w-md" @submit.prevent="sendMessage"> <label for="message-text" class="block mb-1 text-gray-700 text-sm" > Message Text </label> <input id="message-text" v-model="message.text" type="text" class="input mb-3" /> <label for="message-type" class="block mb-1 text-gray-700 text-sm" > Message Type </label> <select id="message-type" v-model="message.type" class="input mb-3"> <option value="success"> Success </option> <option value="error"> Error </option> </select> <button class="btn btn-blue"> Send Message </button> </form></template> <script>export default { data() { return { message: { text: 'Hey! Something awesome happened.', type: 'success' } }; }, methods: { sendMessage() { // ... } }};</script>Inside the sendMessage method, we will need to use the event bus to emit an event to the flash-message component listener. When emitting an event from a Vue component, the first argument is the name of the event, and the second argument is any data the event listener will need. Here, we will pass ‘flash-message’ as the event name and this.message as the second argument. We will also reset the message after emitting the event.
sendMessage() { Bus.$emit('flash-message', this.message); this.message = { text: null, type: 'success', }}Inside our flash-message component, we need to set up a listener for this event and a callback to handle it. Let’s start by adding a mounted method. Initially, all we need to do is set the message inside the component equal to the message that was passed with the event.
mounted() { Bus.$on('flash-message', (message) => { this.message = message; });}Now when we submit the form, the message component should appear with the text and theme we selected in the form.
Making the component disappear
To make our close button work, we need to add an event handler to the button.
<button class="opacity-75 cursor-pointer absolute top-0 right-0 py-2 px-3 hover:opacity-100" @click.prevent="message = null">Next, we’ll make the component automatically disappear after a few seconds. We can accomplish this pretty easily using the setTimeout function.
After we handle setting the message in our mounted function, we can use setTimeout to clear the message after 5 seconds. If you want yours to disappear faster or slower, you can change that value.
mounted() { Bus.$on('flash-message', (message) => { this.message = message; setTimeout(() => { this.message = null; }, 5000); });}Initially, this solution may seem like it works fine, but if you submit the form twice within 5 seconds, the message will still disappear 5 seconds from when the first event was triggered. To solve that, we need to save the timer that’s returned from the call to setTimeout and make sure to reset it when the next event comes in. We can easily do that by updating our code to the following.
mounted() { let timer; Bus.$on('flash-message', (message) => { clearTimeout(timer); this.message = message; timer = setTimeout(() => { this.message = null; }, 5000); });}Transitioning the component in and out
Next, we will use Vue’s <Transition> component to slide the component in and out. First, we need to add a <style> tag to the bottom of the component. We’ll add the CSS classes necessary for the transitions there.
<style scoped>.slide-fade-enter-active,.slide-fade-leave-active { transition: all 0.4s;}.slide-fade-enter,.slide-fade-leave-to { transform: translateX(400px); opacity: 0;}</style>Inside our template, we need to wrap the flash-message in a Transition element and pass it a name.
<template> <div class="fixed top-0 right-0 m-6"> <Transition name="slide-fade"> <div v-if="message" :class="{ 'bg-red-200 text-red-900': message.type === 'error', 'bg-green-200 text-green-900': message.type === 'success' }" class="rounded-lg shadow-md p-6 pr-10" style="min-width: 240px" > <button class="opacity-75 cursor-pointer absolute top-0 right-0 py-2 px-3 hover:opacity-100"> × </button> <div class="flex items-center"> {{ message.text }} </div> </div> </Transition> </div></template>In conclusion
If you’d like to add additional options like a message.delay property that specifies when the message will be cleared, feel free to do so. I’d love to see the different ways you take this example and make it better.
To view the full source code including the CSS for the form components, go here, and if you have any questions feel free to contact me at Jason Beggs