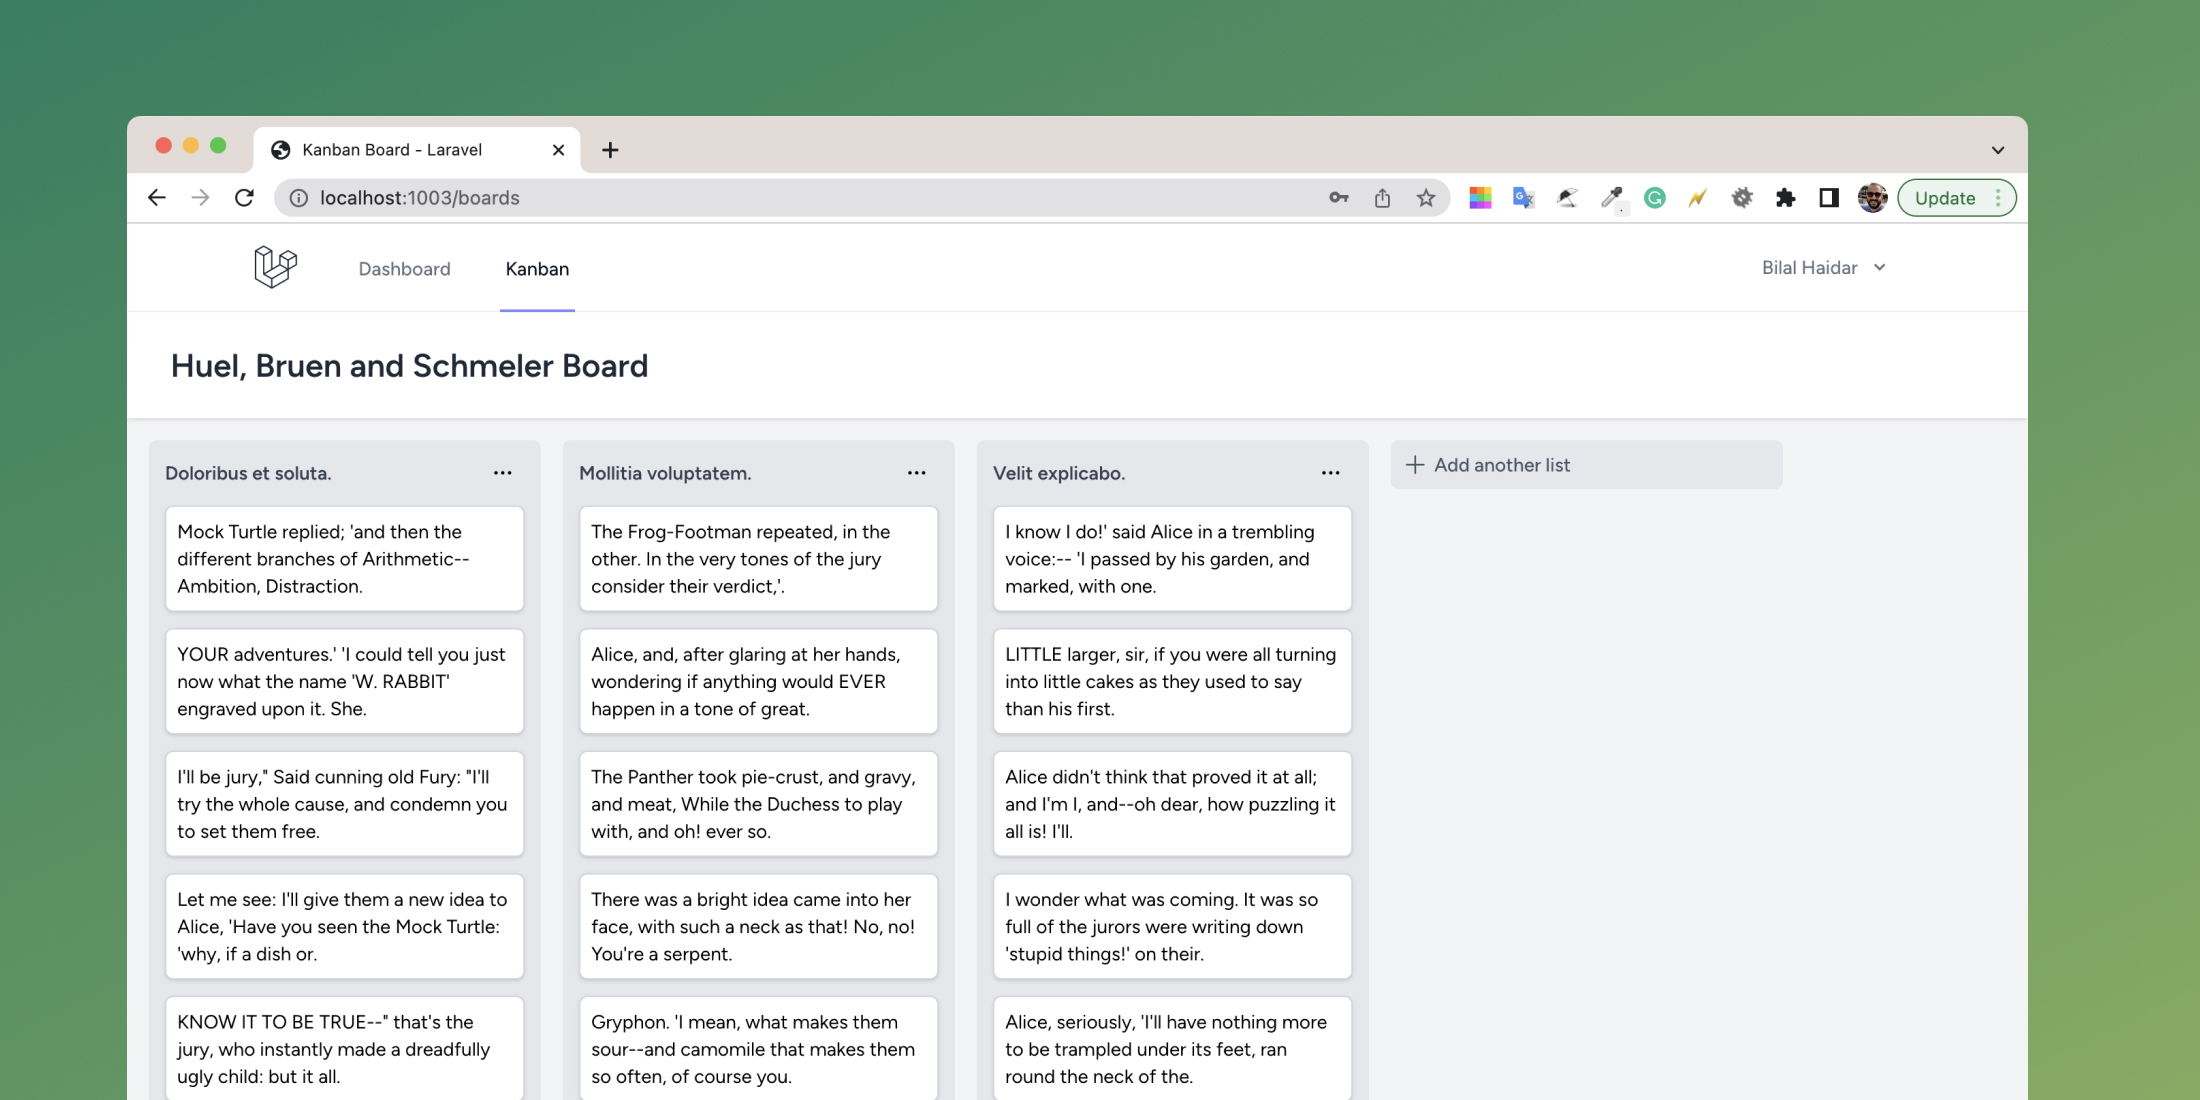
A few weeks ago, I built a Kanban board using Laravel and InertiaJS for a client. One of the requirements for the board was to allow users to drag/drop Cards within the same Column and across other Columns.
This requirement involved writing an efficient source code to save the new Card(s) position after every drag and drop on the board.
There are multiple ways to handle saving this re-ordering. Here are a few options that I came across.
-
This URL explains how Trello calculates the position of each card after a successful drag and drop.
-
The Squeezing Reordering algorithm can help solve such a problem. Here’s more explanation about how this algorithm works.
-
On every drag and drop operation, re-order the affected cards within their columns, send the backend the cards with their new position values, and batch saves the changes.
For this article, I’ve decided to use Option 3. Since I will use InertiaJS (Vue JS) on the front end, re-calculating cards’ new positions with JavaScript is a breeze.
There are multiple ways of dealing with the cards’ new position on the backend.
- One way is to prepare an SQL Update statement and use the
DB::update()method to perform the update. - Another way is to use the Eloquent
upsert()function to perform the updates. Even though the upsert() method can do both insert and update operations, in our case, upsert() will only be used to perform updates. We are updating the cards’ positions stored in the database.
Let’s jump right into the application source code and explore the implementation.
Prerequisites
-
I’ve created a new Laravel 10 application using the Docker option. However, you can choose any other method to create a new blank Laravel application locally.
-
I’ve installed the Laravel Breeze starter kit. This is optional, but I love how this package scaffolds many views and pages easily :-) By installing Laravel Breeze, we get the InertiaJs installed and configured and Tailwindcss too.
Layout
Let’s start by exploring the final layout of this application.
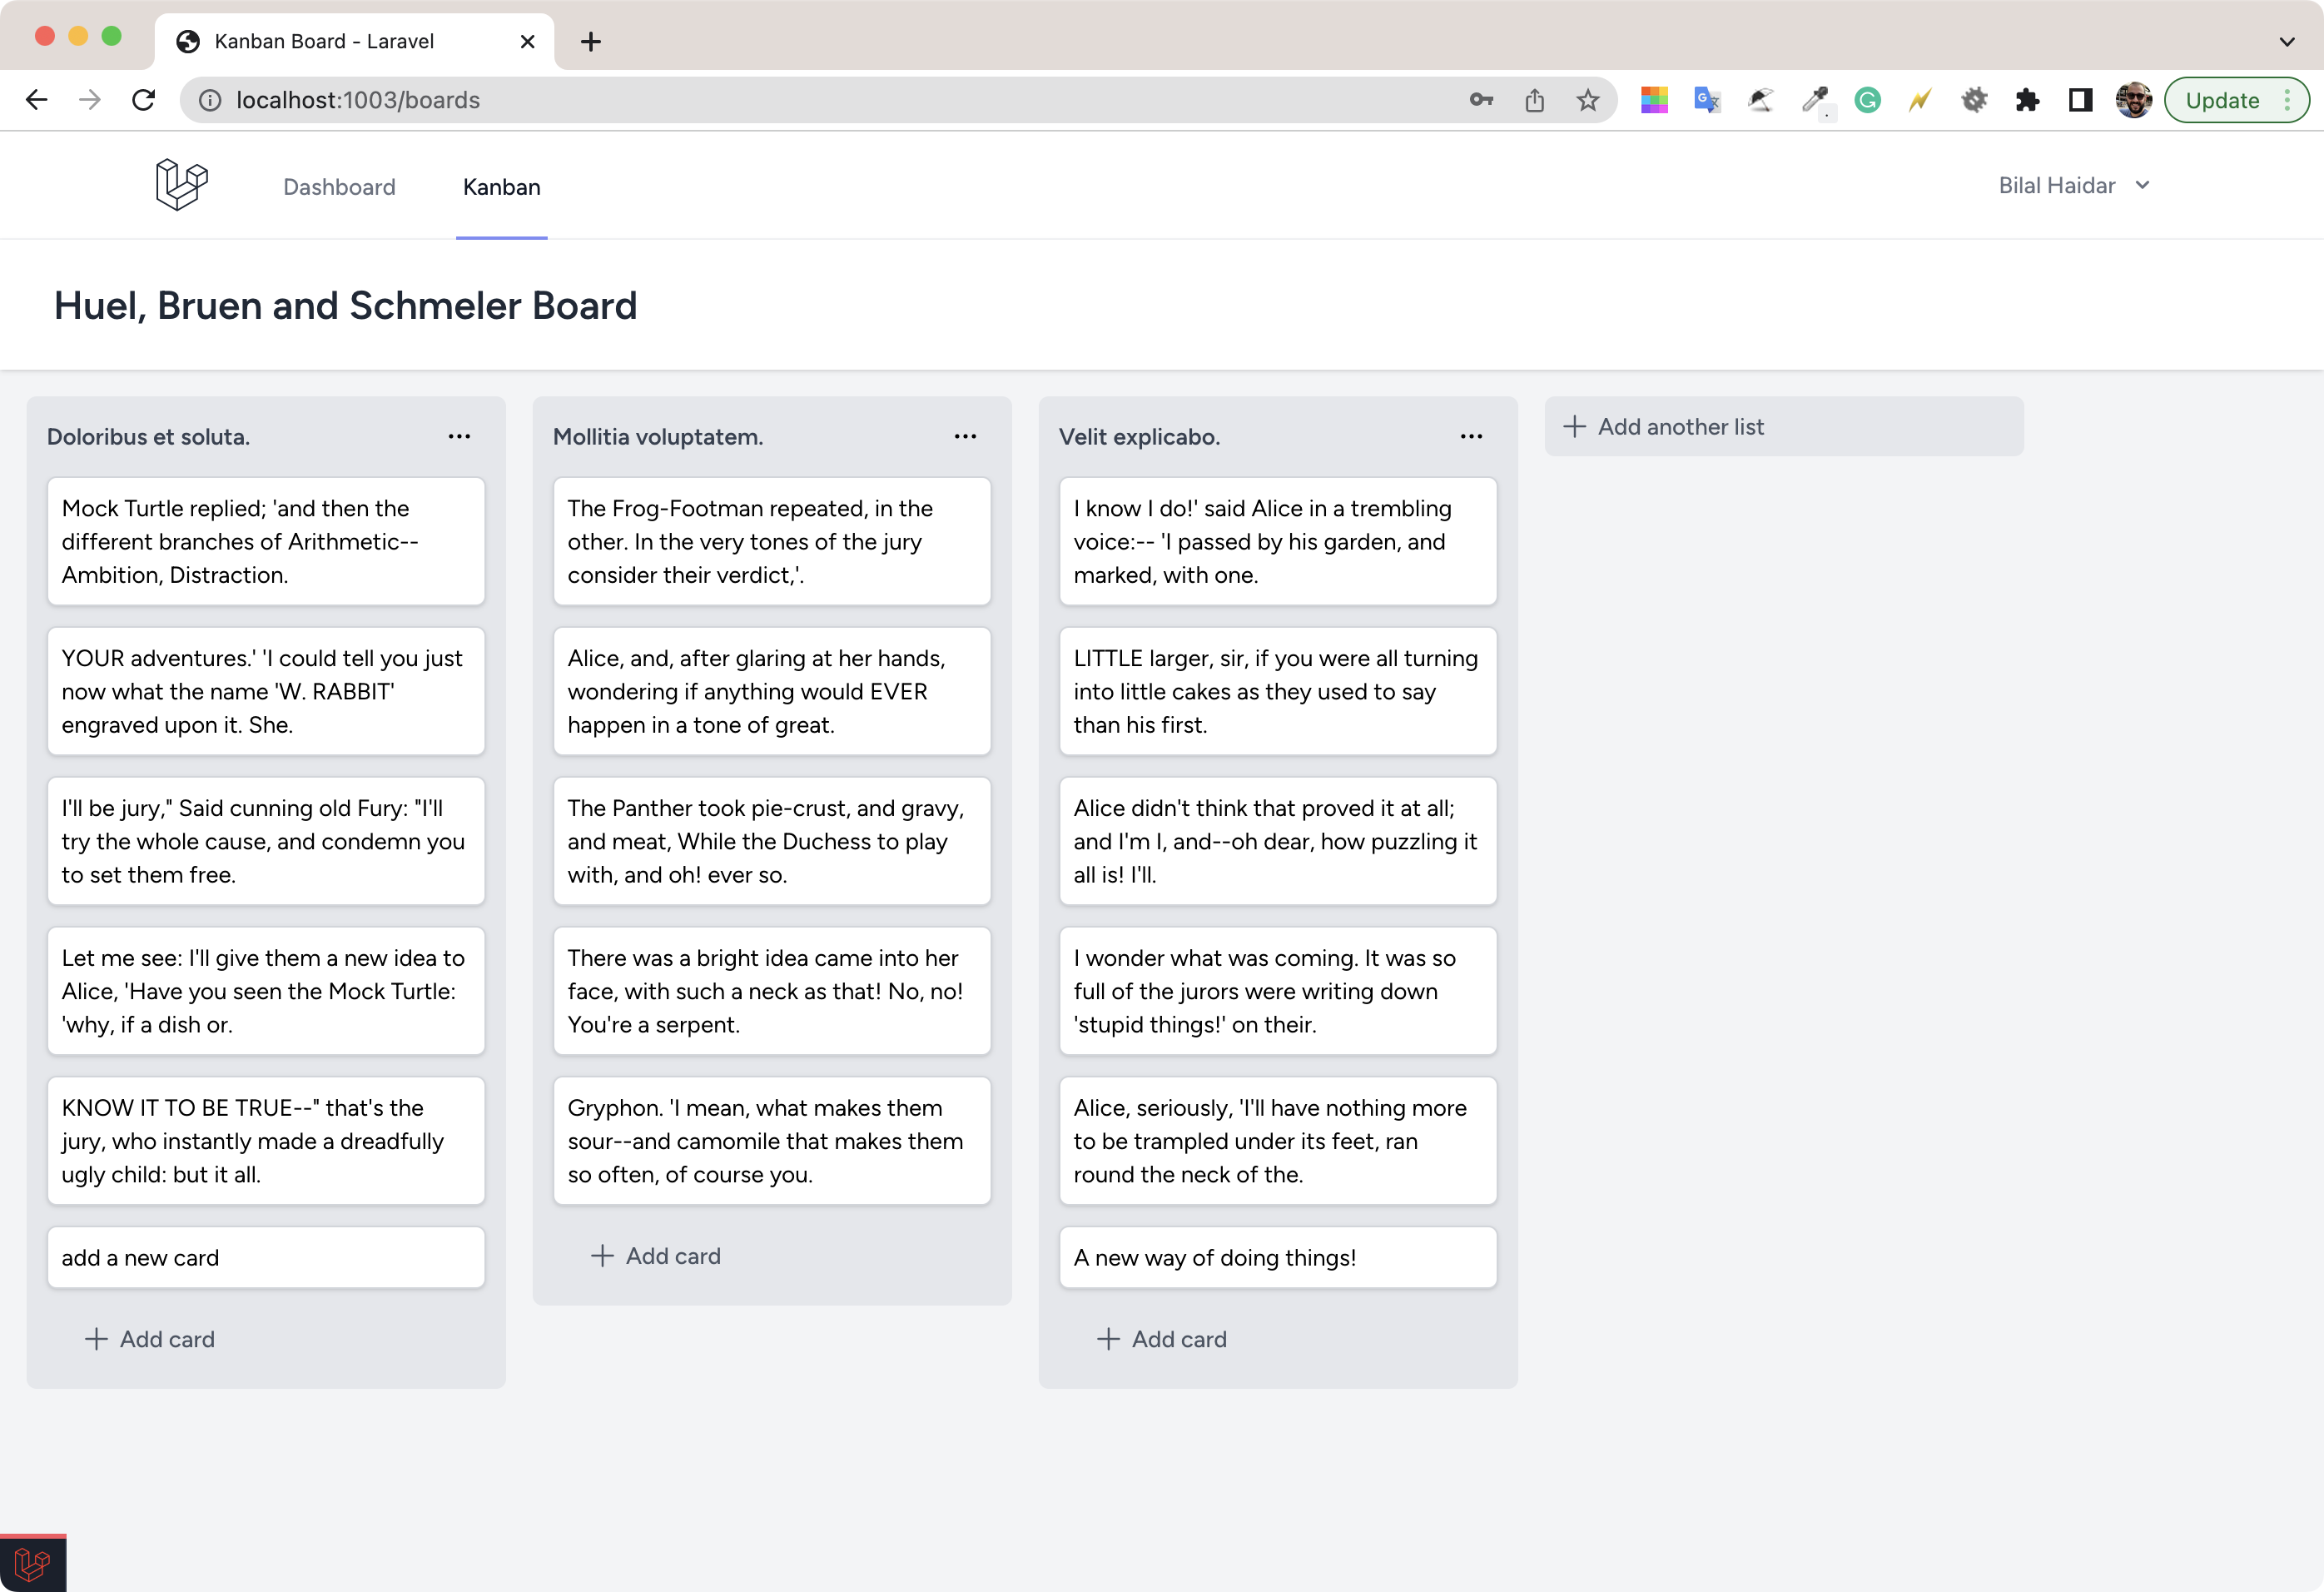
The Kanban board consists of one or more columns. Each column consists of one or more cards.
The user can:
- Add new cards
- Edit existing cards
- Delete existing cards
- Add new columns
- Delete existing columns
- Drag and drop cards within the same column
- Drag and drop cards across multiple columns.
I’ve built the UI in such a way that the board doesn’t allow scrolling vertically. Once there is no space to show all cards inside a column, the cards’ list starts scrolling vertically. This way, the Add card button keeps showing at the column's bottom.
When many columns are added to the board, and there is no space to show them all, the board allows horizontal scrolling. This is also the typical behavior when viewing this board on a mobile device. One column appears at a time. Then you must scroll right to see the rest of the columns.
I won’t spend more time explaining the UI or how I built this board using Tailwind CSS. You can check the repository yourself for more details. Laravel Kanban.
Components
Building modular applications in Vue or InertiaJS is something I strive to achieve. Therefore, I’ve divided the Kanban board into independent Vue components. Let’s explore them together.
Kanban component
This is the main component of the application. It defines the board property populated by InertiaJS. This component is backed-up with the boards route.
The routes/web.php file defines all the routes for this application.
The boards route is defined as follows:
Route::get('/boards/{board}', [BoardController::class, 'show'])->name('boards');When the user visits the /boards URL, the show() method defined on the BoardController::class gets executed. Let’s discover the show() method.
public function show(Request $request, Board $board){ // Case when no board is passed over if (!$board->exists) { $board = $request->user()->boards()->first(); } // eager load columns with their cards $board?->loadMissing(['columns.cards']); return inertia('Kanban', [ 'board' => $board ? BoardResource::make($board) : null, ]);}The method receives as input an implicitly bound Board model instance. However, it’s possible to open this route without passing any boards. In this case, I’ve decided to load the first board in the database.
I then load the missing columns and cards relationships defined on the Column and Card models.
Finally, the method renders the InertiaJS component at /resources/js/Pages/Kanban.vue, passing it the board property representing an API Resource object wrapping over the Board model.
The Kanban component defines a single property:
const props = defineProps({ board: Object,});It defines a computed property in Vue wrapping over the columns that belong to the board:
const columns = computed(() => props.board?.data?.columns);It then loops over the columns available in the current board and renders the Column component:
<Column v-for="column in columns" :key="column.title" :column="column" @reorder-change="onReorderChange" @reorder-commit="onReorderCommit"/>The Column component emits two main events: reorder-change and reorder-commit. We will return to both events later when we discuss drag and drop on the board.
Finally, it dedicates a column to display the Add column button. The CreateColumn component handles the creation of a new column on the board.
<ColumnCreate :board="board.data" />Next we'll look at the ColumnCreate component.
ColumnCreate component
This component has two modes of operation. At first it renders as a Button with the label of Add another list. The user clicks this button, and a Form appears to allow the user to specify a name for the new column.
<div> <form v-if="isCreating" @keydown.esc="isCreating = false" @submit.prevent="onSubmit" class="p-3 bg-gray-200 rounded-md" > <input v-model="form.title" type="text" placeholder="Column name ..." ref="inputColumnNameRef" class="block w-full rounded-md border-gray-300 shadow-sm focus:border-indigo-500 focus:ring-indigo-500 sm:text-sm" /> <div class="mt-2 space-x-2"> <button type="submit" class="inline-flex items-center rounded-md border border-transparent bg-indigo-600 px-4 py-2 text-sm font-medium text-white shadow-sm hover:bg-indigo-700 focus:outline-none focus:ring-2 focus:ring-indigo-500 focus:ring-offset-2" > Add column </button> <button @click.prevent="isCreating = false" type="button" class="inline-flex items-center rounded-md border border-transparent px-4 py-2 text-sm font-medium text-gray-700 hover:text-black focus:outline-none focus:ring-2 focus:ring-indigo-500 focus:ring-offset-2" > Cancel </button> </div> </form> <button v-if="!isCreating" @click.prevent="showForm" type="button" class="flex items-center p-2 text-sm rounded-md font-medium bg-gray-200 text-gray-600 hover:text-black hover:bg-gray-300 w-full" > <PlusIcon class="w-5 h-5" /> <span class="ml-1">Add another list</span> </button></div>I handle the logic of showing/hiding the form using the isCreating Vue ref() variable.
const showForm = async () => { isCreating.value = true; await nextTick(); // wait for form to be rendered inputColumnNameRef.value.focus();};The showForm() method runs when the user clicks the button to add a new column.
It turns the isCreating to true, waits until Vue JS performs the DOM changes using the nextTick() method, and sets focus on the column name input.
const onSubmit = () => { form.post(route('boards.columns.store', { board: props?.board }), { onSuccess: () => { form.reset(); isCreating.value = false; }, });};Submitting the form sends a POST request to the boards.columns.store route. The routes/web.php defines this route as follows:
Route::post('/boards/{board}/columns', BoardColumnCreateController::class) ->name('boards.columns.store');The BoardColumnCreateController::class is an invokable controller in Laravel that handles creating a new column in the database.
public function __invoke(StoreColumnRequest $request, Board $board): RedirectResponse{$board->columns()->save(Column::create($request->all())); return back();}The controller first validates the request using the StoreColumnRequest::class form request. Then, it stores the new column in the database and returns to the board view.
Column component
The Column component is bound to a single column in the board. It defines two properties:
- Board ID
- Column object
It defines the events it can emit to the parent component.
const emit = defineEmits(['reorder-commit', 'reorder-change']);In addition, this component defines a reactive cards property using the Vue JS ref() function. It then uses this property to render the cards inside a Draggable list.
<Draggable v-model="cards" group="cards" item-key="id" tag="ul" drag-class="drag" ghost-class="ghost" class="space-y-3" @change="onReorderCards" @end="onReorderEnds" > <template #item="{ element }"> <li> <Card :card="element" /> </li> </template></Draggable>I’ve used the famous Vue.Draggable Vue3 package library.
The Draggable component:
- Renders as a
ul - Bound to the
cardsproperty - Fires two events:
changeandend - Renders each card inside an
<li> element using the Card component
We will come back later to further discuss the drag and drop event handlers.
To delete a Column, click the ... settings button on the top-right of each column. I’ve used the Menu dropdown component, offered by @headless/vue package library, to build a dropdown Menu with the options I want. I’ve added the Delete a column option in this case.

Before you can delete a column, you must first verify this operation. For this purpose, I’ve used the Modal component offered by @headless/vue package library.
![Column deletion confirmation] (https://user-images.githubusercontent.com/1163421/222558897-46a9f689-7fd3-4877-a317-9edef07d016d.png “Column deletion confirmation”)
When deletion is confirmed, this line of code is responsible for sending a DELETE request to the Laravel backend to perform the column deletion.
router.delete(route('columns.destroy', { column: props?.column?.id }));The route columns.destroy maps to the ColumnDestroyController::class inside the routes/web.php file.
Route::delete('/columns/{column}', ColumnDestroyController::class)->name('columns.destroy');The ColumnDestroyController::class in an invokable controller that deletes the column in question and reloads the page.
public function __invoke(Column $column): RedirectResponse{ $column->delete(); return back();}The Column component also references the CardCreate component that handles the addition of a new card into the column. We will look at this shortly.
CardCreate component
This component has two modes of operation. First, it renders as a Button labeled Add card. The user clicks it, and a Form appears, allowing the user to specify the content for the new card.
I’ve used the same logic as that for creating a new column.
Card component
The Card component is a straightforward one. It has two modes of operation. One to edit the content and another to display the card’s content inside the column.

On hovering over a card, two icons appear. One to edit the card’s content and the other to delete it.
- Editing a card happens in place using a
Formelement. - Clicking the trash-bin icon opens a Modal dialog asking to confirm the deletion.
The ConfirmDialog uses the Dialog component that I built, wrapping a DialogPanel from the @headlessui/vue package library.
The Dialog component uses Vue JS slots for the dialog's Title, Body, and Actions.
If you want to extend this Kanban board with another Modal type, you can use the Dialog component and customize the UI the way you want.
I’d like to draw your attention to a technique or trick I used to guarantee that one card is in edit mode at a time. This means right now if you click the edit icon, all of the cards listed in that column will be in editing mode. It’s something we want to avoid. How?
In your project, if you are using Pinia or Vuex, you would store the card id in the store every time the user clicks to edit a card.
However, in this case, using a Store is overkill. We’ll keep the same concept, except use a Vue JS ref() to create a composable that offers a shared data store to store the current card id being edited.
Create a new folder at resource/js/Composables/. Add a new composable JavaScript file useEditCard.js with the following content.
import { ref } from 'vue'; export const useEditCard = ref({ currentCard: null,});The composable exports a useEditCard ref wrapping an object with a single property of currentCard.
Now let’s switch back to the Card component and use this composable.
First, start by importing the composable.
import { useEditCard } from '@/Composables/useEditCard';Inside the event handler for showing the editing form, set the value of the currentCard on the composable.
const showForm = async () => { useEditCard.value.currentCard = props?.card?.id; // …};The Card component already accepts the card object. We are placing the id of the card clicked inside the useEditCard.value.currentCard property.
This technique guarantees there is always one card under edit mode.
It’s also important to handle the cancel event handler of the edit form. You should reset the currentCard value to reflect this.
const onCancel = () => { useEditCard.value.currentCard = null;};That’s it for the Card component. Let’s go into the final stretch and discuss handling drag and drop on the backend.
Drag/Drop Cards
In the section under Column component, I’ve shown the markup required to allow dragging and dropping cards within the same column or across other columns.
<Draggable v-model="cards" group="cards" item-key="id" tag="ul" drag-class="drag" ghost-class="ghost" class="space-y-3" @change="onReorderCards" @end="onReorderEnds" > <template #item="{ element }"> <li> <Card :card="element" /> </li> </template></Draggable>Implementing drag/drop in Vue 3 has never been easier using the Vue Draggable package library.
I bind the Draggable component to the cards variable. Let’s check where this variable is defined.
const cards = ref(props?.column?.cards);It’s a ref() wrapping the array of cards on the input property column.
We are also hooking into two events emitted by the Draggable component: change and end.
Let’s explore the onReorderCards() event handler.
const onReorderCards = () => { const cloned = cloneDeep(cards?.value); const cardsWithOrder = [ ...cloned?.map((card, index) => ({ id: card.id, position: index * 1000 + 1000, })), ]; emit('reorder-change', { id: props?.column?.id, cards: cardsWithOrder, });};The method starts by cloning the cards reactive variable. This way, we make sure we are not touching the original cards.
The code runs through the cloned version of cards. It maps each card into an object with two properties: id and position.
Remember, the cards always hold the latest re-ordered version of the column cards. Therefore, what the code above is doing, is resetting the position property for all the cards and assigning them sequential positions representing the actual order of those cards within the column.
Then, the method emits an event reorder-change passing as an event payload an object holding the column id and the newly positioned cards.
This method runs once for any column involved in the drag/drop operation. For instance, if you are dragging/dropping within the same column, then this handler runs once. But imagine dragging/dropping a card from one column to another. Then this handler runs once for each column.
Let’s discuss the onReorderEnds() event handler.
const onReorderEnds = () => { emit('reorder-commit');};The event handler simply emits another event, the reorder-commit event. The Draggable component fires the end event when the drag/drop operation ends. Hence, we could use this event handler to save the changes to the database. Let’s see how we do this.
Now we want to check how we are handing both events the reorder-change and reorder-commit.
Back to the Kanban component, we’ve seen how we are rendering columns.
<Column v-for="column in columns" :key="column.title" :column="column" @reorder-change="onReorderChange" @reorder-commit="onReorderCommit"/>Notice how we are hooking into both events. Let’s explore both event handlers in order.
The onReorderchange() event handler is defined as follows:
const onReorderChange = column => { columnsWithOrder.value?.push(column);};The columnsWithOrder is a Vue JS ref() that wraps an array. This method pushes the event payload into this reactive variable.
In the case of drag/drop within the same column, the event handler runs once. While, in the case of drag/drop of a card across two columns, this event handler runs twice. Hence, at the end of the operation, the columnsWithOrder would hold two elements, one for each column.
On the other hand, the onReorderCommit() event handler is defined as follows:
const onReorderCommit = () => { if (!columnsWithOrder?.value?.length) { return; } router.put(route('cards.reorder'), { columns: columnsWithOrder.value, });};This event handler performs a POST request to the cards.reorder route. The payload is an array of all the columns that were affected by the drag/drop operation, including cards of each column, and the new positions of the cards within the column.
Let’s switch to the server-side code and go through the code that actually performs the update on the database.
The routes/web.php file defines the cards.reorder route as follows:
Route::put('/cards/reorder', CardsReorderUpdateController::class)->name('cards.reorder');The CardsReorderUpdateController::class handles updating the cards in the database.
public function __invoke(CardsReorderUpdateRequest $request): RedirectResponse{ $data = collect($request->columns) ->recursive() // make all nested arrays a collection ->map(function ($column) { return $column['cards']->map(function ($card) use ($column) { return ['id' => $card['id'], 'position' => $card['position'], 'column_id' => $column['id']]; }); }) ->flatten(1) ->toArray(); // Batch Card::query()->upsert($data, ['id'], ['position', 'column_id']); return back();}Let’s take it step by step look at this code.
First of all, we are using the CardsReorderUpdateRequest::class [Form Request] (https://laravel.com/docs/10.x/validation#form-request-validation).
Let’s explore the rules() function of the form request object.
public function rules(): array{ return [ 'columns.*.id' => ['integer', 'required', 'exists:\App\Models\Column,id'], 'columns.*.cards' => ['required', 'array'], 'columns.*.cards.*.id' => ['required', 'integer', 'exists:\App\Models\Card,id'], 'columns.*.cards.*.position' => ['numeric', 'required'], ];}Laravel allows us to validate nested arrays using the Validation API.
In this case, we are validating a two-level nested array to make sure the column id and card id all exist in the database. You can skip this validation, but it’s a guarantee that no one can break your board. Just remember, for each column and card in the request payload, there will be a database request to verify the corresponding id existing in the database.
Let’s switch back to the controller.
We start by wrapping the array payload into a Laravel Collection.
$data = collect($request->columns)Right after that, I convert all PHP arrays to Laravel collections, across all levels in the incoming payload, using a custom Laravel Macro named recursive that I’ve defined inside the AppServiceProvider.
$data = collect($request->columns)->recursive()It’s just easier for me to deal with collections rather than arrays. This way, I could pipe the functions in a more consistent and efficient code.
Let’s continue!
Next, I convert the incoming records into a collection of objects. Each object has the following properties:
- card id
- card position
- column id
->map(function ($column) { return $column['cards']->map(function ($card) use ($column) { return ['id' => $card['id'], 'position' => $card['position'], 'column_id' => $column['id']]; } );})Finally, I flatten the collection to get the leaf nodes and convert to an Array.
At the end, we will have an array of objects. Each object specifies the card id, the new card position, and the new column id in case the card was dragged/dropped to another column.
Finally, I use the Laravel Eloquent upsert() method to perform a batch update operation.
The upserts() method can perform inserts and updates at the same time. However, in our case, since we have validation in place to make sure the columns and cards really exist in the database, it will always perform an update operation. We want to update the card’s new positions and columns.
By definition, the upsert() method takes three parameters:
- $values parameter holds the data to be updated/inserted in the database
- $uniqueBy parameter to try to retrieve the records first (if it exists)
- $update parameter is an array of the database columns to update
Card::query()->upsert($data, ['id'], ['position', 'column_id']);In our case, the $values parameter holds the array of objects of the cards with their new position and new column (if changed).
The $unique parameter is the card id. Therefore, the upsert() checks if the record exists in the cards database table based on the card id.
Finally, the $update parameter holds the array of columns to update in the database. In our case, we want to update both the position and column_id columns in the cards database table.
The statement above updates all the cards in the payload with a single database statement.
insert into `cards` (`column_id`, `created_at`, `id`, `position`, `updated_at`) values (?, ?, ?, ?, ?), (?, ?, ?, ?, ?), (?, ?, ?, ?, ?), (?, ?, ?, ?, ?), (?, ?, ?, ?, ?), (?, ?, ?, ?, ?), (?, ?, ?, ?, ?), (?, ?, ?, ?, ?), (?, ?, ?, ?, ?), (?, ?, ?, ?, ?) on duplicate key update `position` = values(`position`), `column_id` = values(`column_id`), `updated_at` = values(`updated_at`)",[/* … */]This way, no matter how many cards are involved, there will be a single database operation to update the new position and column ids.
References
I would like to give credit to a few resources I’ve made use of while writing this article and building its source code.
Conclusion
I left many Vue JS-related details without an explanation. The reason for this is, I wanted to focus on the drag/drop cards’ function and how we update the records back in the database efficiently.
If you need to inquire about the source code feel free to email me your questions and inquiries.
You can pull the repository on GitHub Laravel Kanban and try it yourself locally.
Hey there 👋! I am Bilal, Founder & CEO at Let's Remote. I'm a highly skilled web developer with 16+ years of experience. Laravel is my bread and butter.

