In the last part of the series, we finished up building the Laravel Translation package. With this completed, we are ready to start thinking about releasing the it to the world. However, before we do, there are few important steps we need to take.
Documentation
It is really important to give users of the package a clear set of instructions of how it should be used. The scope of this documentation will depend on the size and complexity of the package you are creating. At the very minimum, I would suggest adding a README.md file to the root of the project detailing how to install and get started with the project. You can see the README.md for the Laravel Translation package here.
Good documentation will ease your user’s barrier to entry which means they are more likely to use it and recommend it to others. It also comes with the added benefit of reducing the number of issues being added to your repository as users will be more likely to find the answer to their issue.
I cannot highlight enough the importance of good documentation. If you have issues arising as a result of missing documentation, make a point of adding it to prevent the issue arising again.
Contribution guidelines
Once you have released your package, you will very likely get helpful members of the community wanting to assist in making the package even better. This might be fixing open issues, adding to documentation, or even adding brand new features.
These contributions will come in the form of pull requests which you will need to review to decide if you want to accept or reject, or inform the contributor of changes you would like made before it is ready to merge.
To make your life easier, it is a good idea to add a CONTRIBUTING.md file which outlines a set of guidelines a contributor should follow.
This can include things like the code style which should be adopted, branching and git strategy, testing requirements and anything else you would like your contributors to follow.
Issue templates
I recently found out about issue templates on GitHub which provide a nice way for you to outline to your users the information you require from them when they submit an issue to your project.
Out of the box, GitHub has support for bugs reports and feature requests, but you are free to add your own custom templates.
I have applied the default options setup on Laravel Translation project. Now when a user attempts to raise an issue, they are asked to choose whether it’s a bug report or new feature request.

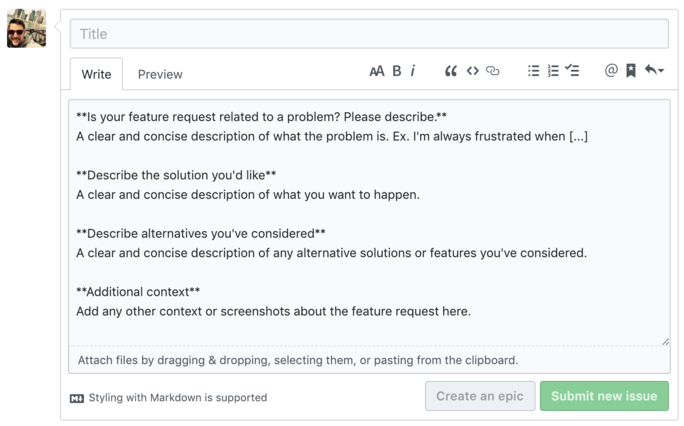
When they select one of these options, they are presented with a template detailing the information they should provide.
For a bug report, this includes steps to reproduce the issue along with details such as screenshots and affected browser and operating system.
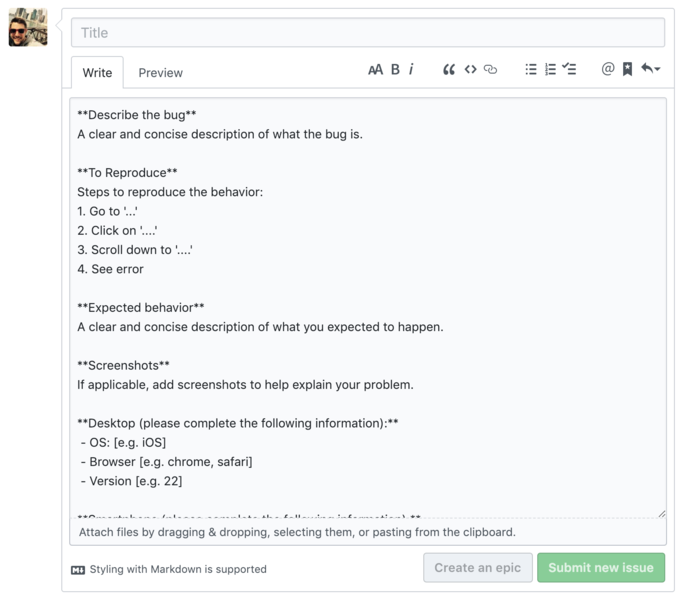
For a feature request, it’s more about what the feature is and why you want it.
I’m not suggesting you have to use this feature. However, making you have all the information you need to understand the issue without a lengthy back and forth with the user is always helpful.
License
An open source package needs an open source license to protect its maintainers, contributors, and users.
There are many different license types from which to choose. Which one you end up picking will depend on how you want your package to be used, modified, and shared.
GitHub have created a site to help open source maintainers choose an open source license for their project. By their own admission, it’s not a fully comprehensive directory but highlights those most likely to be suitable and points you in the direction of others should their recommendation not be sufficient.
Continuous integration
There is a huge number of continuous integration tools out there that can help with things like ensuring your code is not deployed when tests are failing, automatically fixing code style issues, measuring the quality of your code, and a myriad of others.
These tools integrate directly with GitHub and can be triggered to automatically run when code is committed to the repository.
This means when a contributor issues a new pull requests to the project, you already have insight about its overall quality before even looking at the code.
What’s more, most of these tools have a free tier for open source projects.
Below are some that I personally recommend.
Travis CI
When code is committed to your repository, GitHub triggers Travis to build and test your code. You’ll be notified within minutes whether or not everything looks healthy. It works with pull requests too, so you can see if contributors have added any issues to your codebase.
Scrutinizer
Scrutinizer will analyse your code to see if you are using any unsafe language features. It also has features such as code browsing which provides IDE-like features when reviewing code.
StyleCI
StyleCI allows you to define your preferred code style. When code is committed to the repository, it will automatically check it against your guidelines for errors and automatically fix them by providing a pull request to the repository with recommended changes. This gives you the peace of mind that your code will never be breaking the style guidelines of the project.
Integration is usually straight forward and involves logging into the service, integrating with GitHub, and adding a configuration file to the root of your project. Once you are setup, they will just run as required when code is committed to the repository.
With all these things in place, we are just about ready to launch. Join me in the next article where I talk you through the process of making your package available for others to use. As always, if you have any questions, contact me on Twitter.

