I’ve written console commands in many different languages, including Node.js, Golang, PHP, and straight up bash. In my experience, the Symfony console component is one of the best-built console libraries in existence—in any language.
Laravel’s artisan command line interface (CLI) extends Symfony’s Console component, with some added conveniences and shortcuts. Follow along if you want to learn how to create some kick-butt custom commands for your Laravel applications.
Overview
Laravel ships with a bunch of commands that aim to make your life as a developer easier. From generating models, controllers, middleware, test cases, and many other types of files for the framework.
The base Laravel framework Command extends the Symfony Command class.
Without Laravel’s console features, creating a Symfony console project is pretty straightforward:
#!/usr/bin/env php<?php// application.php require __DIR__.'/vendor/autoload.php'; use Symfony\Component\Console\Application; $application = new Application(); // ... register commands$application->add(new GenerateAdminCommand()); $application->run();You would benefit from going through the Symfony console component documentation, specifically creating a command. The Symfony console component handles all the pain of defining your CLI arguments, options, output, questions, prompts, and helpful information.
Laravel is getting base functionality from the console component, and extends a beautiful abstraction layer that makes the building consoles even more convenient.
Combine the Symfony console with the ability to create a shippable phar archive—like composer does—and you have a powerful command line tool at your disposal.
Setup
Now that you have quick intro and background of the console in Laravel let’s walk through creating a custom command for Laravel. We’ll build a console command that runs a health check against your Laravel application every minute to verify uptime.
I am not suggesting you ditch your uptime services, but I am suggesting that artisan makes it super easy to build a quick-and-dirty health monitor straight out of the box that we can use as a concrete example of a custom command.
An uptime checker is just one example of what you can do with your consoles. You can build developer-specific consoles that help developers be more productive in your application and production-ready commands that perform repetitive and automated jobs.
Alright, let’s create a new Laravel project with the composer CLI. You can use the Laravel installer as well, but we’ll use composer.
composer create-project laravel/laravel:~5.4 cli-democd cli-demo/# only link if you are using Laravel valetvalet linkcomposer require fabpot/goutteDo you want to know what the beauty of that composer command was? You just used a project that relies on the Symfony console. I also required the Goutte HTTP client that we will use to verify uptime.
Registering the Command
Now that you have a new project, we will create a custom command and register it with the console. You can do so through a closure in the routes/console.php file, or by registering the command in the app/Console/Kernel.php file’s protected $commands property. Think of the former as a Closure-based route and the latter as a controller.
We will create a custom command class and register it with the Console’s Kernel class. Artisan has a built-in command to create a console class called make:command:
php artisan make:command HealthcheckCommandThis command creates a class in the app/Console/Commands/HealthcheckCommand.php file. If you open the file, you will see the $signature and the $description properties, and a handle() method that is the body of your console command.
Adjust the file to have the following name and description:
<?php namespace App\Console\Commands; use Illuminate\Console\Command; class HealthcheckCommand extends Command{ /** * The name and signature of the console command. * * @var string */ protected $signature = 'healthcheck {url : The URL to check} {status=200 : The expected status code}'; /** * The console command description. * * @var string */ protected $description = 'Runs an HTTP healthcheck to verify the endpoint is available'; /** * Create a new command instance. * * @return void */ public function __construct() { parent::__construct(); } /** * Execute the console command. * * @return mixed */ public function handle() { // }}Register the command in the app/Console/Kernel.php file:
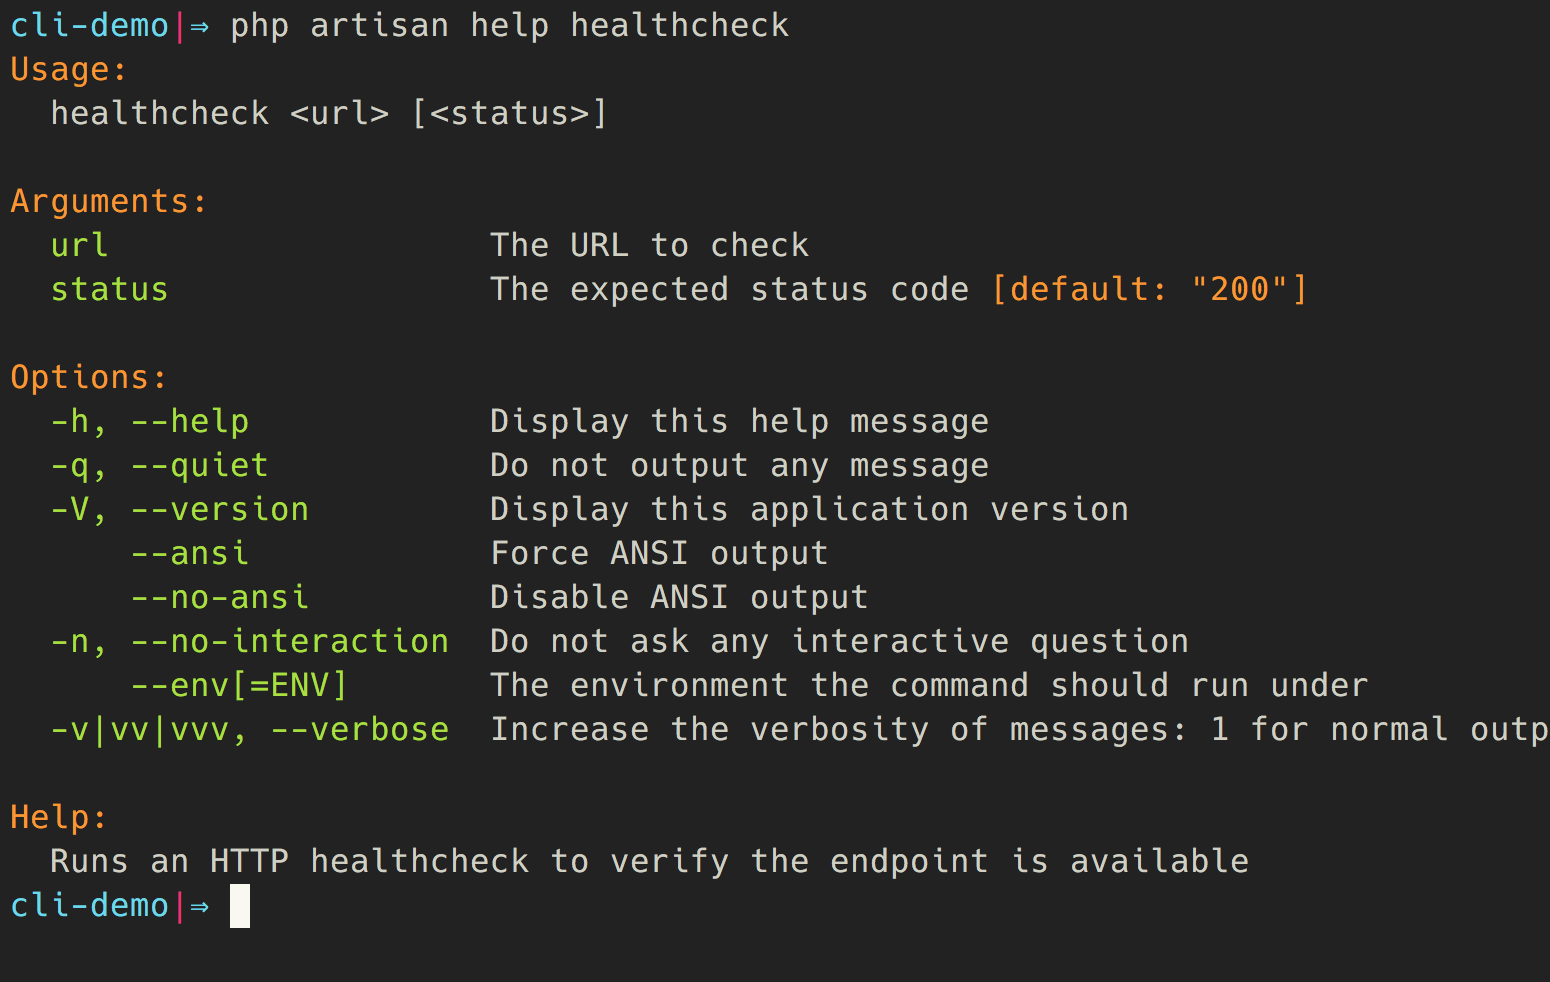
protected $commands = [ Commands\HealthcheckCommand::class,];If you run php artisan help healthcheck you should see something like the following:

Setting up the HTTP Client Service
You should aim to make your console commands “light” and defer to application services to accomplish your tasks. The artisan CLI has access to the service container to inject services, which will allow us to inject an HTTP client in the constructor of our command from a service.
In the app/Providers/AppServiceProvider.php file, add the following to the register method to create an HTTP service:
// app/Providers/AppServiceProvider.php public function register(){ $this->app->singleton(\Goutte\Client::class, function ($app) { $client = new \Goutte\Client(); $client->setClient(new \GuzzleHttp\Client([ 'timeout' => 20, 'allow_redirects' => false, ])); return $client; });}We set up the Goutte HTTP crawler and set the underlying Guzzle client with a few options. We set a timeout (that you could make configurable) and we don’t want to allow the client to follow redirects. We want to know the real status of an HTTP endpoint.
Next, update the HealthcheckCommand::__construct() method with the service you just defined. When Laravel constructs the console command, the dependency will be resolved out of the service container automatically:
use Goutte\Client; // ... /** * Create a new command instance. * * @return void */public function __construct(Client $client){ parent::__construct(); $this->client = $client;}The Health Check Command Body
The last method in the HealthcheckCommand class is the handle() method, which is the body of the command. We will get the {url} argument and status code to check that the URL returns the expected HTTP status c
Let’s flesh out a simple command to verify a healthcheck:
/** * Execute the console command. * * @return mixed */public function handle(){ try { $url = $this->getUrl(); $expected = (int) $this->option('status'); $crawler = $this->client->request('GET', $url); $status = $this->client->getResponse()->getStatus(); } catch (\Exception $e) { $this->error("Healthcheck failed for $url with an exception"); $this->error($e->getMessage()); return 2; } if ($status !== $expected) { $this->error("Healthcheck failed for $url with a status of '$status' (expected '$expected')"); return 1; } $this->info("Healthcheck passed for $url!"); return 0;} private function getUrl(){ $url = $this->argument('url'); if (! filter_var($url, FILTER_VALIDATE_URL)) { throw new \Exception("Invalid URL '$url'"); } return $url;}First, we validate the URL argument and throw an exception if the URL isn’t valid. Next, we make an HTTP request to the URL and compare the expected status code to the actual response.
You could get even fancier with the HTTP client and crawl the page to verify status by checking for an HTML element, but we just check for an HTTP status code in this example. Feel free to play around with it on your own and expand on the healthcheck.
If an exception happens, we return a different status code for exceptions coming from the HTTP client. Finally, we return a 1 exit code if the HTTP status isn’t valid.
Let’s test out our command. If you recall, I linked my project with valet link:
$ php artisan healthcheck http://cli-demo.devHealthcheck passed! $ php artisan healthcheck http://cli-demo.dev/exampleHealthcheck failed with a status of '404' (expected '200')$ echo $?1The healthcheck is working as expected. Note that the second command that fails returns an exit code of 1. In the next section, we’ll learn how to run our command on a schedule, and we will force a failure by shutting down valet.
Running Custom Commands on a Schedule
Now that we have a basic command, we are going to hook it up on a scheduler to monitor the status of an endpoint every minute. If you are new to Laravel, the Console Kernel allows you to run Artisan commands on a schedule with a nice fluent API. The scheduler runs every minute and checks to see if any commands need to run.
Let’s set up this command to run every minute:
protected function schedule(Schedule $schedule){ $schedule->command( sprintf('healthcheck %s', url('/')) ) ->everyMinute() ->appendOutputTo(storage_path('logs/healthcheck.log'));}In the schedule method, we are running the command every minute and sending the output to a storage/logs/healthcheck.log file so we can visually see the results of our commands. Take note that the scheduler has both an appendOutputTo() method and a sendOutputTo() method. The latter will overwrite the output every time the command runs, and the former will continue to append new items.
Before we run this, we need to adjust the URL. By default, the url('/') function will probably return http://localhost unless you’ve updated the .env file already. Let’s do so now so we can fully test out the healthcheck against our app:
# .env fileAPP_URL=http://cli-demo.devRunning the Scheduler Manually
We are going to simulate running the scheduler on a cron that runs every minute with bash. Open a new tab so you can keep it in the foreground and run the following infinite while loop:
while true; do php artisan schedule:run; sleep 60; doneIf you are watching the healthcheck.log file, you will start to see output like this every sixty seconds:
tail -f storage/logs/healthcheck.logHealthcheck passed for http://cli-demo.dev!Healthcheck passed for http://cli-demo.dev!Healthcheck passed for http://cli-demo.dev!If you are following along with Valet, let’s shut it down, so the scheduler fails. Shutting down the web server simulates an application being unreachable:
valet stopValet services have been stopped. # from the healthcheck.logHealthcheck failed with an exceptioncURL error 7: Failed to connect to cli-demo.dev port 80: Connection refused (see http://curl.haxx.se/libcurl/c/libcurl-errors.html)Next, let’s bring our server back and remove the route so we can simulate an invalid status code.
valet startValet services have been started.Next, comment out the route in routes/web.php:
// Route::get('/', function () {// return view('welcome');// });If you aren’t running the scheduler, start it back up, and you should see an error message when the scheduler tries to check the status code:
Healthcheck failed for http://cli-demo.dev with a status of '404' (expected '200')Don’t forget to shut down the infinite scheduler tab with Ctrl + C!
Further Reading
Our command simply outputs the result of the healthcheck, but you could expand upon it by broadcasting a failure to Slack or logging it to the database. On your own, try to set up some notification when the healthcheck fails. Perhaps you can even provide logic that it will only alert if three subsequent fails happen. Get creative!
We covered the basics of running your custom command, but the documentation has additional information we didn’t cover. You can easily do things like prompt users with questions, render tables, and a progress bar, to name a few.
I also recommend that you experiment with the Symfony console component directly. It’s easy to set up your own CLI project with minimal composer dependencies. The documentation provides knowledge that will also apply to your artisan commands, for example, when you need to customize things like hiding a command from command list.
Conclusion
When you need to provide your custom console commands, Laravel’s artisan command provides nice features that make it a breeze to write your own CLI. You have access to the service container and can create command-line versions of your existing services. I’ve built CLI tools for things like helping me debug 3rd party APIs, provide formatted details about a record in the database, and perform cache busting on a CDN.


