Every application that gets built deals with data on some scale. Whether the data is a few markdown files in a GitHub repository or millions of rows in a multi-terabyte database system, the users who interact with our applications every day do so to see and manipulate that data.
When applications are small in size and (usually) relatively new, data entry looks an awful lot like how forms work in Filament. If you want to add new data to the system, you navigate to the relevant form, fill out the fields, and submit. If you want to add more, you repeat the process. There's nothing intrinsically wrong with this! For most data entry, this is a great solution! However, what happens when you want to add a lot of data all at once without having to spend the time clicking around a form hundreds of times? You spend a lot of time clicking through the same form, that's what. But there's a better way! Enter CSV uploads.
Using a CSV to upload bulk data is a method used by all sorts of applications to give their users an easy way to upload lots of data. They're easy to generate from a spreadsheet program like Excel and adding data to them is simple, so users love them! The problem is that even though CSVs are easy to deal with in code, writing the code to import specific CSV files into specific database tables can be repetitive and time-consuming. Thankfully, Filament now makes that process quick and easy with the new “Import Action”.
What you'll need
- A Laravel application with Filament installed
- A Filament Resource and its corresponding Model that will be created from the CSV
- An
Importerclass (more on that later)
Setting up the application
Getting the context
Let's get started by providing a bit of background for the application that we'll be working on throughout this article.
We are working on an application that allows users to log into the panel and document all the books that they have in their collection. Some users only have a handful of books, but others have entire libraries that they want to onboard into our app, so we have been tasked with creating a system that allows those bulk users to upload their entire collection at once.
Let's assume that the application has the following Book model and that we already have a
BookResource created with a form() and table() method:
Book
- ID
- User ID
- Title
- Author
Setting up CSV importer prerequisites
Before we can start writing code to implement our importer, we need to set up a few prerequisites. Under the hood, Filament's CSV import system uses two underlying Laravel systems: job batches and database notifications. In addition, it also uses a new table provided by Filament to manage and store information about the imports themselves. We can set these up with four simple commands:
php artisan queue:batches-tablephp artisan notifications:tablephp artisan vendor:publish --tag=filament-actions-migrations php artisan migrateOnce these commands have run successfully and each underlying system has been set up, we're ready to start building our import!
The codebase that we are talking about in the article can be found here if you want to work alongside the article or see the final product. Each commit in the repository corresponds with one of the following sections of the article. If you want to find the code for a specific section, each commit message will include the name of the section it corresponds to.
Importing CSVs
Adding the ImportAction
After the prerequisite steps are taken care of, the first step in setting up CSV imports in Filament
is to add the ImportAction somewhere in your interface. Typically, this button is placed in a page's
header section or in the header of a table. For our example, we'll add our ImportAction to the
header of our ListBooks page so our users have the option to upload their CSV when in the context of
the “Books” section of our panel.
With our ImportAction added, our ListBooks.php file should look like this:
<?php namespace App\Filament\Resources\BookResource\Pages; use App\Filament\Imports\BookImporter;use App\Filament\Resources\BookResource;use Filament\Actions;use Filament\Resources\Pages\ListRecords; class ListBooks extends ListRecords{ protected static string $resource = BookResource::class; protected function getActions(): array { return [ Actions\ImportAction::make() ->importer(), Actions\CreateAction::make(), ]; }}If you're following along, and you drop the above code into your editor of choice, you might notice
that the ->importer() method is throwing an "Expected 1 argument. Found 0" error. This is because,
even though we've set up the ImportAction to run when the button is interacted with, we haven't
told the action how to import the data yet. That is the job of the Importer class.
Adding the Importer
First and foremost, what is an Importer?
In Filament, Importer classes contain the logic that tells Filament what columns to expect from an
uploaded CSV file and how to handle them. These classes define their column expectations in a very
similar way to how Resource classes define table columns, so as long as you've worked with Filament
Resource classes before, you'll feel right at home here.
We can create an importer, like most other files within Filament, with a simple artisan command:
php artisan make:filament-importer Bookor, if we want to generate the columns from our existing database schema (and who wouldn't want
to do that!), we can add the --generate flag like so:
php artisan make:filament-importer Book --generateOnce run, these commands will generate and place your Importer class in the app/Filament/Imports
directory. If we run the make:filament-importer command (without the --generate flag, for the sake
of example) in our project, we will now have a file called app/Filament/Imports/BookImporter.php.
Let's quickly step through the important sections of this file:
<?php namespace App\Filament\Imports; use App\Models\Book;use Filament\Actions\Imports\ImportColumn;use Filament\Actions\Imports\Importer;use Filament\Actions\Imports\Models\Import; class BookImporter extends Importer{ protected static ?string $model = Book::class; public static function getColumns(): array { return [ // ]; } public function resolveRecord(): ?Book { // return Book::firstOrNew([ // // Update existing records, matching them by `$this->data['column_name']` // 'email' => $this->data['email'], // ]); return new Book(); } public static function getCompletedNotificationBody(Import $import): string { $body = 'Your book import has completed and ' . number_format($import->successful_rows) . ' ' . str('row')->plural($import->successful_rows) . ' imported.'; if ($failedRowsCount = $import->getFailedRowsCount()) { $body .= ' ' . number_format($failedRowsCount) . ' ' . str('row')->plural($failedRowsCount) . ' failed to import.'; } return $body; }}First and foremost, we have the model property. The Importer uses this to know what model to save
the uploaded CSV data to! It's a small piece, but it's important!
<?php namespace App\Filament\Imports; use App\Models\Book;use Filament\Actions\Imports\ImportColumn;use Filament\Actions\Imports\Importer;use Filament\Actions\Imports\Models\Import; class BookImporter extends Importer{ protected static ?string $model = Book::class; public static function getColumns(): array { return [ // ]; } public function resolveRecord(): ?Book { // return Book::firstOrNew([ // // Update existing records, matching them by `$this->data['column_name']` // 'email' => $this->data['email'], // ]); return new Book(); } public static function getCompletedNotificationBody(Import $import): string { $body = 'Your book import has completed and ' . number_format($import->successful_rows) . ' ' . str('row')->plural($import->successful_rows) . ' imported.'; if ($failedRowsCount = $import->getFailedRowsCount()) { $body .= ' ' . number_format($failedRowsCount) . ' ' . str('row')->plural($failedRowsCount) . ' failed to import.'; } return $body; }}The getColumns() method is where you'll be spending most of your time within your Importer class.
It has a very similar-feeling API to the form() and table() method on the Resource class, but
instead of defining fields and columns to appear in the Filament interface, it defines the columns to
expect from the uploaded CSV and describes how to handle the data within them. We'll touch more
on this later, but for now, just know that any data you want to import from the CSV will need to
be present in some form in this method.
<?php namespace App\Filament\Imports; use App\Models\Book;use Filament\Actions\Imports\ImportColumn;use Filament\Actions\Imports\Importer;use Filament\Actions\Imports\Models\Import; class BookImporter extends Importer{ protected static ?string $model = Book::class; public static function getColumns(): array { return [ // ]; } public function resolveRecord(): ?Book { // return Book::firstOrNew([ // // Update existing records, matching them by `$this->data['column_name']` // 'email' => $this->data['email'], // ]); return new Book(); } public static function getCompletedNotificationBody(Import $import): string { $body = 'Your book import has completed and ' . number_format($import->successful_rows) . ' ' . str('row')->plural($import->successful_rows) . ' imported.'; if ($failedRowsCount = $import->getFailedRowsCount()) { $body .= ' ' . number_format($failedRowsCount) . ' ' . str('row')->plural($failedRowsCount) . ' failed to import.'; } return $body; }}Next, we have the resolveRecord() method. This method is called for each row in the CSV and is
responsible for returning a model instance to be filled with data from the CSV. By default,
it will create a new record, but we can change the logic in this method to update existing
records instead. A quick and easy way to make this change is to uncomment the Book::firstOrNew()
block, which will search for the existing record and update if it is found. Otherwise, it will create
a new record from this row in the CSV.
<?php namespace App\Filament\Imports; use App\Models\Book;use Filament\Actions\Imports\ImportColumn;use Filament\Actions\Imports\Importer;use Filament\Actions\Imports\Models\Import; class BookImporter extends Importer{ protected static ?string $model = Book::class; public static function getColumns(): array { return [ // ]; } public function resolveRecord(): ?Book { // return Book::firstOrNew([ // // Update existing records, matching them by `$this->data['column_name']` // 'email' => $this->data['email'], // ]); return new Book(); } public static function getCompletedNotificationBody(Import $import): string { $body = 'Your book import has completed and ' . number_format($import->successful_rows) . ' ' . str('row')->plural($import->successful_rows) . ' imported.'; if ($failedRowsCount = $import->getFailedRowsCount()) { $body .= ' ' . number_format($failedRowsCount) . ' ' . str('row')->plural($failedRowsCount) . ' failed to import.'; } return $body; }}Lastly, we have the getCompletedNotificationBody() method. This method determines what text is
shown in the Filament notification body when the CSV import is completed. You'll likely very rarely
need to change what is here, outside adjusting the model name on occasion.
Now that we've added our new BookImporter class, we need to go back and ensure that we've added it
to our ImportAction from earlier. We can simply update the ImportAction like so:
<?php namespace App\Filament\Resources\BookResource\Pages; use App\Filament\Imports\BookImporter; use App\Filament\Resources\BookResource; use App\Filament\Imports\BookImporter; use Filament\Actions; use Filament\Resources\Pages\ListRecords; class ListBooks extends ListRecords { protected static string $resource = BookResource::class; protected function getActions(): array { return [ Actions\ImportAction::make()- ->importer(), + ->importer(BookImporter::class), Actions\CreateAction::make(), ]; } }Defining Importer Columns
So far, we have added an Action button to trigger our import, and we've defined a BookImporter to
be used by the ImportAction, but we haven't yet told Filament what types of data to expect from
our CSV file. To do that, we need to return an array of ImportColumn objects from within our
getColumns() method. We'll go ahead and assume that every property on our Book model (except
for timestamps) will have a corresponding column in our CSV. That means we need an ImportColumn
for the user_id, title, and author.
Let's start by just adding the ImportColumn objects to the getColumns() method. For the rest
of this section, I'll remove the methods and namespace declarations that aren't relevant, but they
are still present in the actual class.
<?php // Namespaces class BookImporter extends Importer{ protected static ?string $model = Book::class; public static function getColumns(): array { return [ ImportColumn::make('user_id'), ImportColumn::make('title'), ImportColumn::make('author'), ]; } // Other methods}Once you have added these three ImportColumn objects to yourgetColumns() method, you are ready
to import your first CSV! In whatever way you prefer, create a small CSV file to test the upload. I
recommend having a single row with data that looks something like this:
| user_id | title | author |
|---|---|---|
| 1 | test | John Doe |
When you have that CSV file created, navigate to the Book table view within Filament and click on
the Import Book action that we created earlier. You will be greeted by a Filepond file uploader.
Once the CSV file has been processed in the Filepond file uploader, you will see a fieldset of “Columns”
appear in the modal. These select fields are the “mappers” for the import process. Each field's label
corresponds to one of the ImportColumn objects we created earlier. The select field that is alongside
each label corresponds to which of the uploaded CSV's columns will have its data mapped into the model
for each row that Filament processes during the import. This can be particularly helpful if your users
will be uploading CSVs with correct data listed underneath headers that aren't exactly what you were
expecting. For example, if a User uploaded a CSV with User instead of user_id, they could still
manually map that column to the user_id property on the Book model.
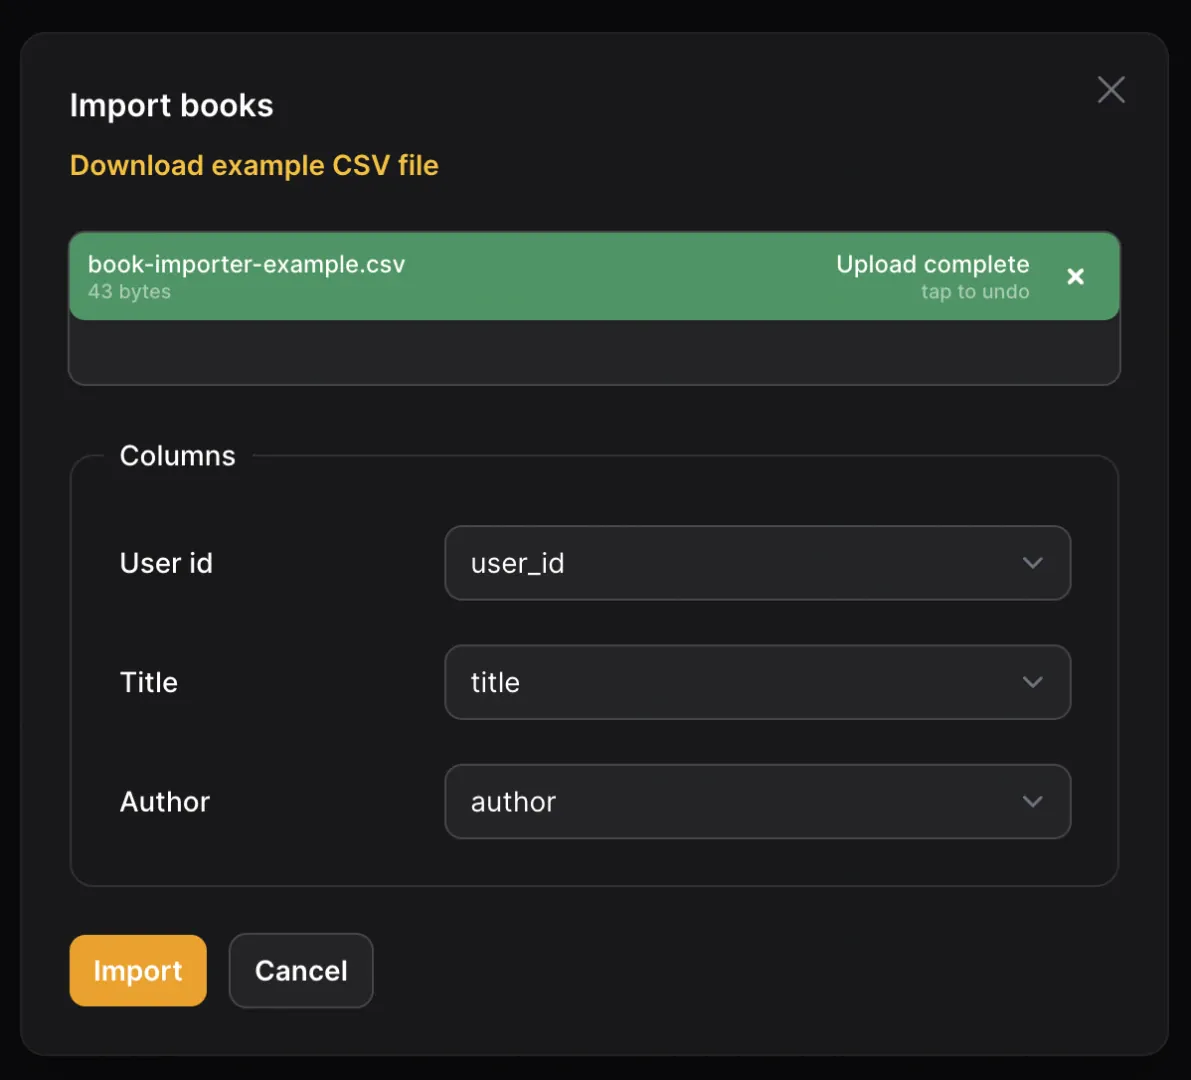
If your CSV headers were identical to mine, you will see that the select fields have already been
filled in with the appropriate CSV column. This is because Filament will attempt to auto-determine
which ImportColumn goes with which CSV header by name as a default.
At this point, once all of your column mappings have been selected, you can click “Import”. If
everything has been set up correctly in your project, you will see your new Book populate the
table within Filament!
Congratulations! You've successfully imported bulk data from a CSV! But we're not done yet, there are still some ways that we can improve what we've built already.
Adding Some Polish
Even though we have successfully imported data from a CSV, there are still a few essential bulk import features you should know about before releasing this feature into the wild.
Required Mappings
Currently, with the way we have set up our ImportColumn array, none of our columns are required
to be mapped to a column in the CSV. This means that we could leave any mappings blank,
resulting in errors getting thrown when Laravel attempts to save a Book model without its three
required parameters: user_id, title, and author.
Luckily, Filament has a simple way to fix this. By adding the requiredMapping() method onto
each of our ImportColumn objects, Filament will not allow the user to start the import until
each column has been mapped.
<?php // Namespaces class BookImporter extends Importer { protected static ?string $model = Book::class; public static function getColumns(): array { return [- ImportColumn::make('user_id'), + ImportColumn::make('user_id') + ->requiredMapping(),- ImportColumn::make('title'), + ImportColumn::make('title') + ->requiredMapping(),- ImportColumn::make('author'), + ImportColumn::make('author') + ->requiredMapping(), ]; } // Other methods }Column Validation
Along with not having any required mappings, our current import solution doesn't have any sort of validation. Just like how incoming requests should always be validated to ensure that a malicious user isn't trying to break our system, we should always validate our bulk import fields as well.
To do this, we can add the rules() method to each ImportColumn in our getColumns() method
and pass in the same validation rules we know and love from Laravel's FormRequest class. For
example, here are some validation rules I would add to our existing ImportColumn objects:
<?php // Namespaces class BookImporter extends Importer { protected static ?string $model = Book::class; public static function getColumns(): array { return [ ImportColumn::make('user_id')+ ->rules(['required', 'exists:users,id']) ->requiredMapping(), ImportColumn::make('title')+ ->rules(['required', 'max:255']) ->requiredMapping(), ImportColumn::make('author')+ ->rules(['required', 'max:255']) ->requiredMapping(), ]; } // Other methods }Handling Relationships
Our getColumns() method is starting to look much better, but there's one more simple step we can
take to leverage Laravel's models and clean up this code. In multiple different places throughout
Filament, we're able to utilize the Eloquent relationships that we already define on our Models
to populate select dropdowns, access related data, and save related models. Now, we can also use
them to clean up our bulk import logic!
Take the user_id column. I have two main gripes with it. First, I don't like that we're specifically
saving the user_id–I would much rather tell Laravel to use my already existing relationship logic
to save the User for me. Second, I don't like that I have to specify rules that are essentially a
duplicate of the relationship checking that Laravel can already do under the hood.
Thankfully, we can solve both of these issues by replacing our rules() method on the user_id
ImportColumn with relationship().
<?php // Namespaces class BookImporter extends Importer { protected static ?string $model = Book::class; public static function getColumns(): array { return [- ImportColumn::make('user_id') - ->rules(['required', 'exists:users'])+ ImportColumn::make('user') + ->relationship() ->requiredMapping() ImportColumn::make('title') ->rules(['required', 'max:255']) ->requiredMapping(), ImportColumn::make('author') ->rules(['required', 'max:255']) ->requiredMapping(), ]; } // Other methods }In the code diff above, along with replacing the rules() method with relationship(), we are
also changing the name of the ImportColumn to line up with the relationship we've defined on our
Book model (which, in this case, is user).
This is much better, but I can still think of one small problem we should solve. Users still currently need to enter the User's ID into their CSV for every row. In many systems, it's difficult for Users to know their own (and each other's) User IDs. Instead, we should use something more easily known and still unique, like an email address!
Right now, if we tried this, we would get an error from Laravel because no ID in the users
table looks like an email address. However, Filament provides a way for us to fix this!
<?php // Namespaces class BookImporter extends Importer { protected static ?string $model = Book::class; public static function getColumns(): array { return [ ImportColumn::make('user')- ->relationship() + ->relationship(resolveUsing: 'email') ->requiredMapping() ImportColumn::make('title') ->rules(['required', 'max:255']) ->requiredMapping(), ImportColumn::make('author') ->rules(['required', 'max:255']) ->requiredMapping(), ]; } // Other methods }Now, when Filament attempts to import each row, instead of looking for the primary key to link a Book
with its User, it will look for the User's email address!
So Much More to Discover
With that, you've now successfully implemented an entire bulk import system in only a few lines of code! But we've only scratched the surface here. There is so much more to discover in the bulk import system: providing sample CSV data, customizing the import job, casting state, and more! Take a look at the Import action documentation for more details on how to customize your own Import Actions.
As always, we'd love to hear your thoughts on bulk imports! This is one of our favorite features from v3.1, and we hope it quickly becomes one of yours as well!
Senior Software Development Engineer @ Zillow. Head of Developer Relations @ Filament. Mentor. Loves Laravel, Filament, JS , and Tailwind. Vim user. Has a cute corgi. Posts at https://alexandersix.com

