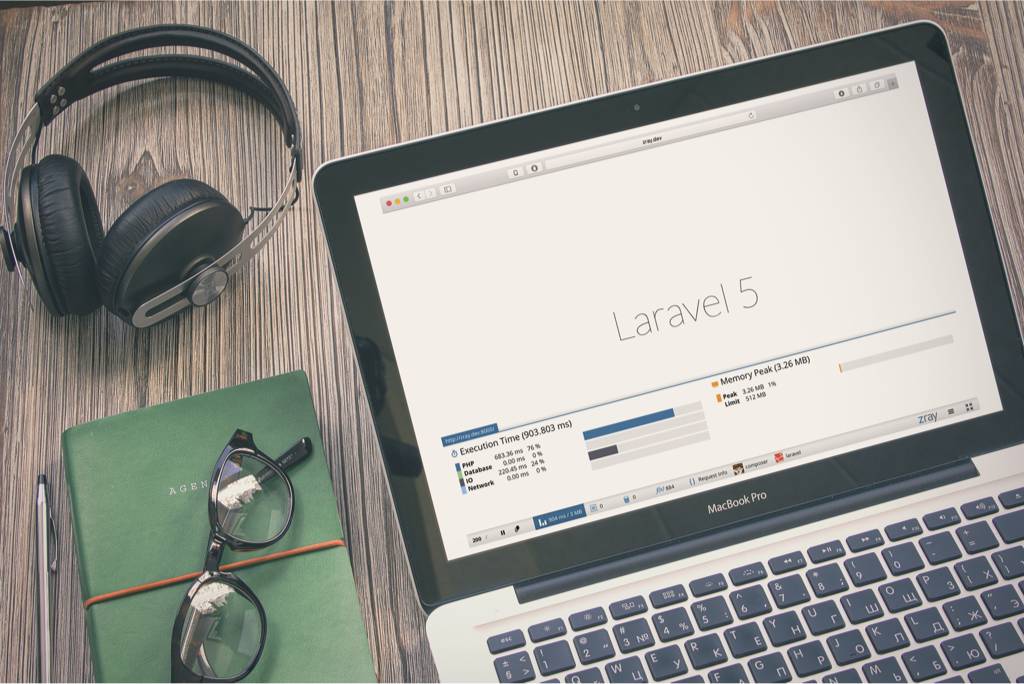
For the past week or so I have been running Zend Z-Ray in Laravel Homestead. Every time using it, new features come to light that are fantastic for debugging your apps in development! What follows is a quick preview of Z-Ray, along with all the steps necessary to install it on Laravel Homestead.
Z-Ray installs on the server, and will automatically load on all your projects on that particular server (in our case Homestead) automatically. Even better, it supports many major frameworks right out of the box, including: WordPress, ZendFramework (1 & 2), Magento, Drupal, with Symfony support on the way. (You can even extend it for your own Framework, if you like!)
This is very exciting for developers who have all their client sites in Homestead, regardless of the framework. The bottom line is that Z-Ray saves time and provides debugging tools without requiring you to install them in each project.
Page Requests lets you specify the context of the ZRay panel, allowing inspection of AJAX requests.Execution Time and Memory peak give you insight into server usage.Errors & Warnings is pretty self-explanitory. However, notice that you can inspect @-silenced errors here as well!Database Queries is one of the most useful features. And remember, you can inspect the queries of AJAX calls as wellThe Functions view lists all functions that are processed on any given request, providing insight into the execution chain.Request Info tab displays the usual request information we can see in modern browser inspection panels. It also includes PHP super-globals, which is super helpful!### Laravel Features in Z-Ray
General Laravel project information.Route inspection providing you with everything you need to know about the route hit by the selected request.The Session inspector lists all the pertinent data, including any errors or messages.User Information — while self-explanatory, definitely useful for debugging and inspecting anything Auth::user related.Views gives you insight into which views are rendered, including details as to the path of the view, and which variables are passed into the views (along with the values, of course).Events Log makes event debugging easy! Check out which events were fired, and in which order### Admin Panel
The admin panel can be easily accessed from the Z-Ray bar itself via the right hamburger menu and selecting “Settings”, or you can browse any of your homestead sites with the admin port 10081, for example http://example.dev:10081/.
Z-Ray’s admin panel provides a wealth of information and configuration options. The home page gives a nice overview of the features.Z-Ray Live! is an interesting features that lets you monitor live activity on your site. This could be useful for behind-the-scenes monitoring of events on live servers.Access Mode lets you configure how you want Z-Ray to appear on your server, including hiding it from the site front-end, while still collecting data in Z-Ray Live!Here you can inspect previous HTTP requests.The Settings page lets you further fine-tune how Z-Ray operates on your server.Installation
------------
Now exit out of Homestead and remove the 10081 port from your Homestead.yml file.
After that, halt and restarting Homestead should be the finishing touch.
homestead halt && homestead up
I want to thank Zeev Suraski from Zend for inviting me to test-drive their tech preview of the stand-alone version of Z-Ray.
We would love to hear about your experiences with Z-Ray! Do you like it? Does it improve your development workflow? Let us know.
SaaSykit is a Multi-tenant Laravel SaaS Starter Kit that comes with all features required to run a modern SaaS. Payments, Beautiful Checkout, Admin Panel, User dashboard, Auth, Ready Components, Stats, Blog, Docs and more.
Acquaint Softtech offers AI-ready Laravel developers who onboard in 48 hours at $3000/Month with no lengthy sales process and a 100 percent money-back guarantee.
Joel and Aaron, the two seasoned devs from the No Compromises podcast, are now available to hire for your Laravel project. ⬧ Flat rate of $9500/mo. ⬧ No lengthy sales process. ⬧ No contracts. ⬧ 100% money back guarantee.