I recently needed the ability to receive emails and process attachments on those emails. I love Mailgun for the sending of transactional email, so when I needed to process incoming mail I started digging into Mailgun closer and realized their powerful inbound routing email features!
Come along and learn how you can set up a webhook to process inbound email and secure it within your Laravel applications. We will even use Laravel Valet (or ngrok directly) to test it out locally!
What is Inbound Routing?
If you’ve ever had to deal with directing email into a web application, you know how painful, error-prone, and high-maintenance a homegrown solution can be.
Mailgun takes the pain out of handing incoming mail, parsing it, and dispatching it. Using it has helped me come up with clever ways to automate around incoming email.
Imagine, if you are building an issue system, you could easily parse the email and associate it back with a ticket in your system. Your users could reply to a support email directly instead of logging into an application to communicate on an issue. Mailgun parses out the email body and attachments, so you could skip saving the email signature and save the attachments to the ticket. GitHub issue emails are a good example of inbound email processing that allows you to send messages to a GitHub issue from email.
The Mailgun incoming routing does an excellent job parsing email messages and delivering them to your webhook in a JSON format. The JSON payload includes attachments, the signature, the email body as a stripped plain-text value, and many other things. The inbound engine allows you to pipe incoming emails through various rules.
Setting up Mailgun
Mailgun provides a generous free tier giving you room to experiment with inbound email. If you want to follow along you, need to have a Mailgun account with DNS configured for inbound mail. You will also need to set up MX DNS records to receive inbound mail.
While I’m not going to walk you through setting up Mailgun for your domain, I will walk you through setting up an example webhook and then run it locally.
One area I was concerned about when I integrated Mailgun inbound routing was the ability to experiment and try it out locally. Having to deploy to test it out would have been clunky and annoying. Fortunately, Laravel Valet makes it trivial to test web hooks locally; I was blown away with how easy it was to use Valet (ngrok really) to walk through this process end-to-end on my local machine.
If you are not using Valet, you can use ngrok directly just the same, and I’ll walk you through that.
Creating a Project
Imagine that your customers are emailing in widget orders and your job is to set up a webhook that takes these orders and processes them. They can send attachments along, and you need to handle those too.
Let’s create a new Laravel project and walk through setting up a secure webhook for widgets. You can create the project with either the Laravel installer or Composer:
# Valet$ laravel new mgexample # Composer$ composer create-project laravel/laravel:5.4 mgexample # Link Valet$ cd mgexample$ valet linkTo use Mailgun as the email provider, you need to update MAIL_DRIVER and add the Mailgun domain and secret values from your account:
MAIL_DRIVER=mailgunMAILGUN_DOMAIN=mg.example.comMAILGUN_SECRET=horizonSetting the MAIL_DRIVER isn’t a requirement for handling inbound email. The Mailgun configuration is in config/services.php.
And that’s it for the setup. It’s time to write a Webhook route and quickly try it out!
The Webhook Route
You can configure inbound rules to store an email message temporarily (up to 3 days) and notify a webhook. We are going to define one in the routes/api.php file to define a stateless API route. The route will end up being something like POST http://example.com/api/mailgun/widgets. You can name the route and controller whatever you want.
First, let’s create a controller for this route:
php artisan make:controller MailgunWidgetsControllerNext, let’s define the route in routes/api.php:
Route::group([ 'prefix' => 'mailgun',],function () { Route::post('widgets', 'MailgunWidgetsController@store');});I am using a route group as I like to collect my Mailgun routes in once place. Each inbound route will eventually use a webhook too, so grouping them makes it easy to apply the secure webhook.
For now, we’ll just log the request so we can see what Mailgun sends in the webhook payload:
<?php namespace App\Http\Controllers; use Illuminate\Http\Request; class MailgunWidgetsController extends Controller{ public function store() { app('log')->debug(request()->all()); return response()->json(['status' => 'ok']); }}Note that if you don’t return a 200 status code, the service will retry later until a 200 is received or the number of failed attempts is reached.
That’s all we need to start receiving mail in our application, although we have a bit more setup to do in the Mailgun control panel.
Mailgun Route Setup
Before we try out our endpoint, we need to set up a new route in Mailgun. There are various options and ways to process a message, but we will pick a relatively simple setup.
First, let’s start up Valet sharing so we can use the URL to configure the webhook:
$ valet share ngrok by @inconshreveable (Ctrl+C to quit) Session Status onlineUpdate update available (version 2.2.8, Ctrl-U to update)Version 2.1.18Region United States (us)Web Interface http://127.0.0.1:4040Forwarding http://d1fc8c85.ngrok.io -> mgexample.app:80Forwarding https://d1fc8c85.ngrok.io -> mgexample.app:80If you’re not using Valet, install ngrok and run it:
ngrok http example.dev:80Next, copy the forwarding URL from ngrok and configure a new route in Mailgun:
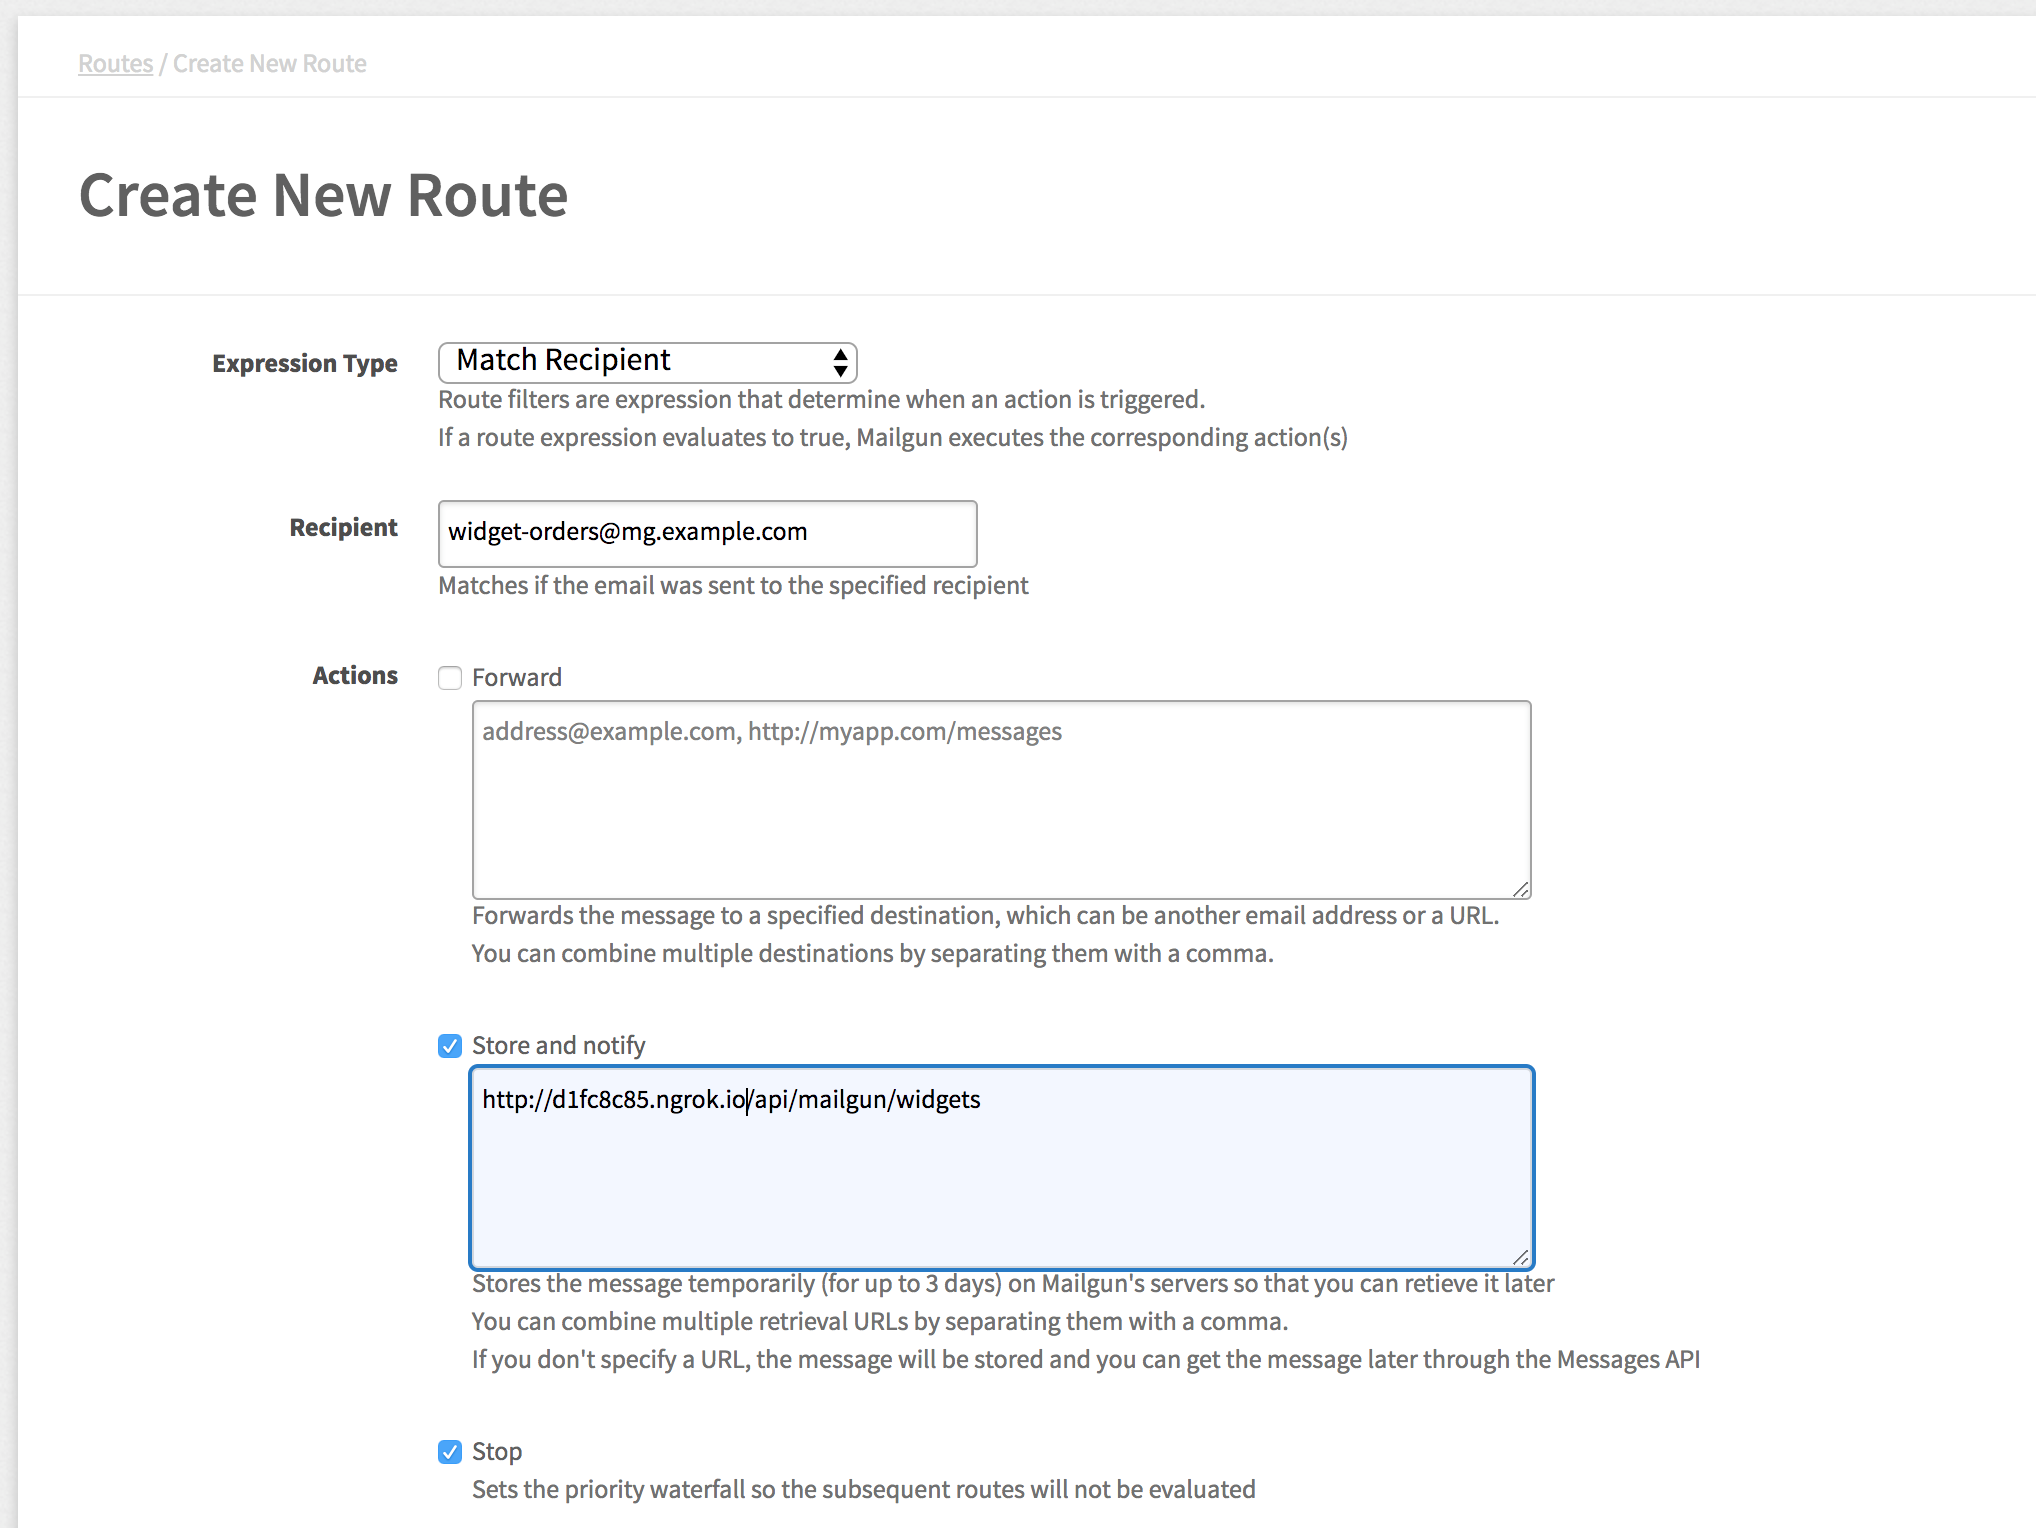
We are going to match the widget-orders@mg.example.com recipient. Replace the example email address with your own domain.
Matching the recipient means that any orders sent to the email will trigger the webhook.
Next, the store and notify rule will store the message and send the JSON payload to the webhook defined. You can specify multiple retrieval URLs with a comma!
We check “stop” to prevent further rules from firing. We only have one route, but if you don’t want other routes processing the same message, you need to stop. Think of it like a JavaScript’s Event.stopPropagation() method.
Leave the remaining options the default, and you can add in a description if you want.
Click “Create Route” and navigate to the logs section so you can see incoming messages we are about to send in the Mailgun console.
Running the Webhook with Laravel Valet
With Valet running (or ngrok), we are ready to try it out. All you need to do is create an email and send it to the email address you configured.

After you send the email, head over to the terminal running ngrok and you should see an HTTP request:
HTTP Requests------------- POST /api/mailgun/widgets 200 OKAlso, check your storage/logs/laravel.log file, and you should see the JSON payload. I sent an example CSV file which looks like this in the webhook payload:
"attachments": [ { "url": "https://se.api.mailgun.net/v3/domains/mg.example.com/messages/eyJwIjpmYWxzZSwiayI6IjBhYjM5MWE5LTU5YzUtNGJkMS1hMzE5LTBhNjU0ODAwOTY4ZCIsInMiOiIyYWMyN2YxYzc2IiwiYyI6InRhbmtiIn0=/attachments/0", "content-type": "text/csv", "name": "widget-order.csv", "size": 554 }]So Mailgun is storing this attachment on their end, and we can get it through the Mailgun API. Before I show you that, let’s secure the webhook, so we know for certain that the request is genuine.
Securing the Webhook
To secure the webhook, Mailgun sends a timestamp and a token in the JSON POST body. Using our configured secret, we can encode the timestamp and token and then compare that value to the signature key in the JSON payload.
To verify webhooks, you need to use the HMAC algorithm using your API secret as the key and SHA256.
We will create a middleware to check these values are making sure the request is legit. You can also add another layer of security by storing the token in something like Redis and rejecting any subsequent requests with the same token. We won’t cover that, but it’s easy to do.
Let’s create a middleware and get it registered as an API middleware:
$ php artisan make:middleware ValidateMailgunWebhookMiddleware created successfully.Next, register the middleware in app/Http/Kernel.php:
protected $routeMiddleware = [ // ... 'mailgun.webhook' => \App\Http\Middleware\ValidateMailgunWebhook::class,];Before we forget, let’s update the route group to use this middleware in routes/api.php:
Route::group([ 'prefix' => 'mailgun', 'middleware' => ['mailgun.webhook'],],function () { Route::post('widgets', 'MailgunWidgetsController@store');});Finally, here’s my implementation of the middleware:
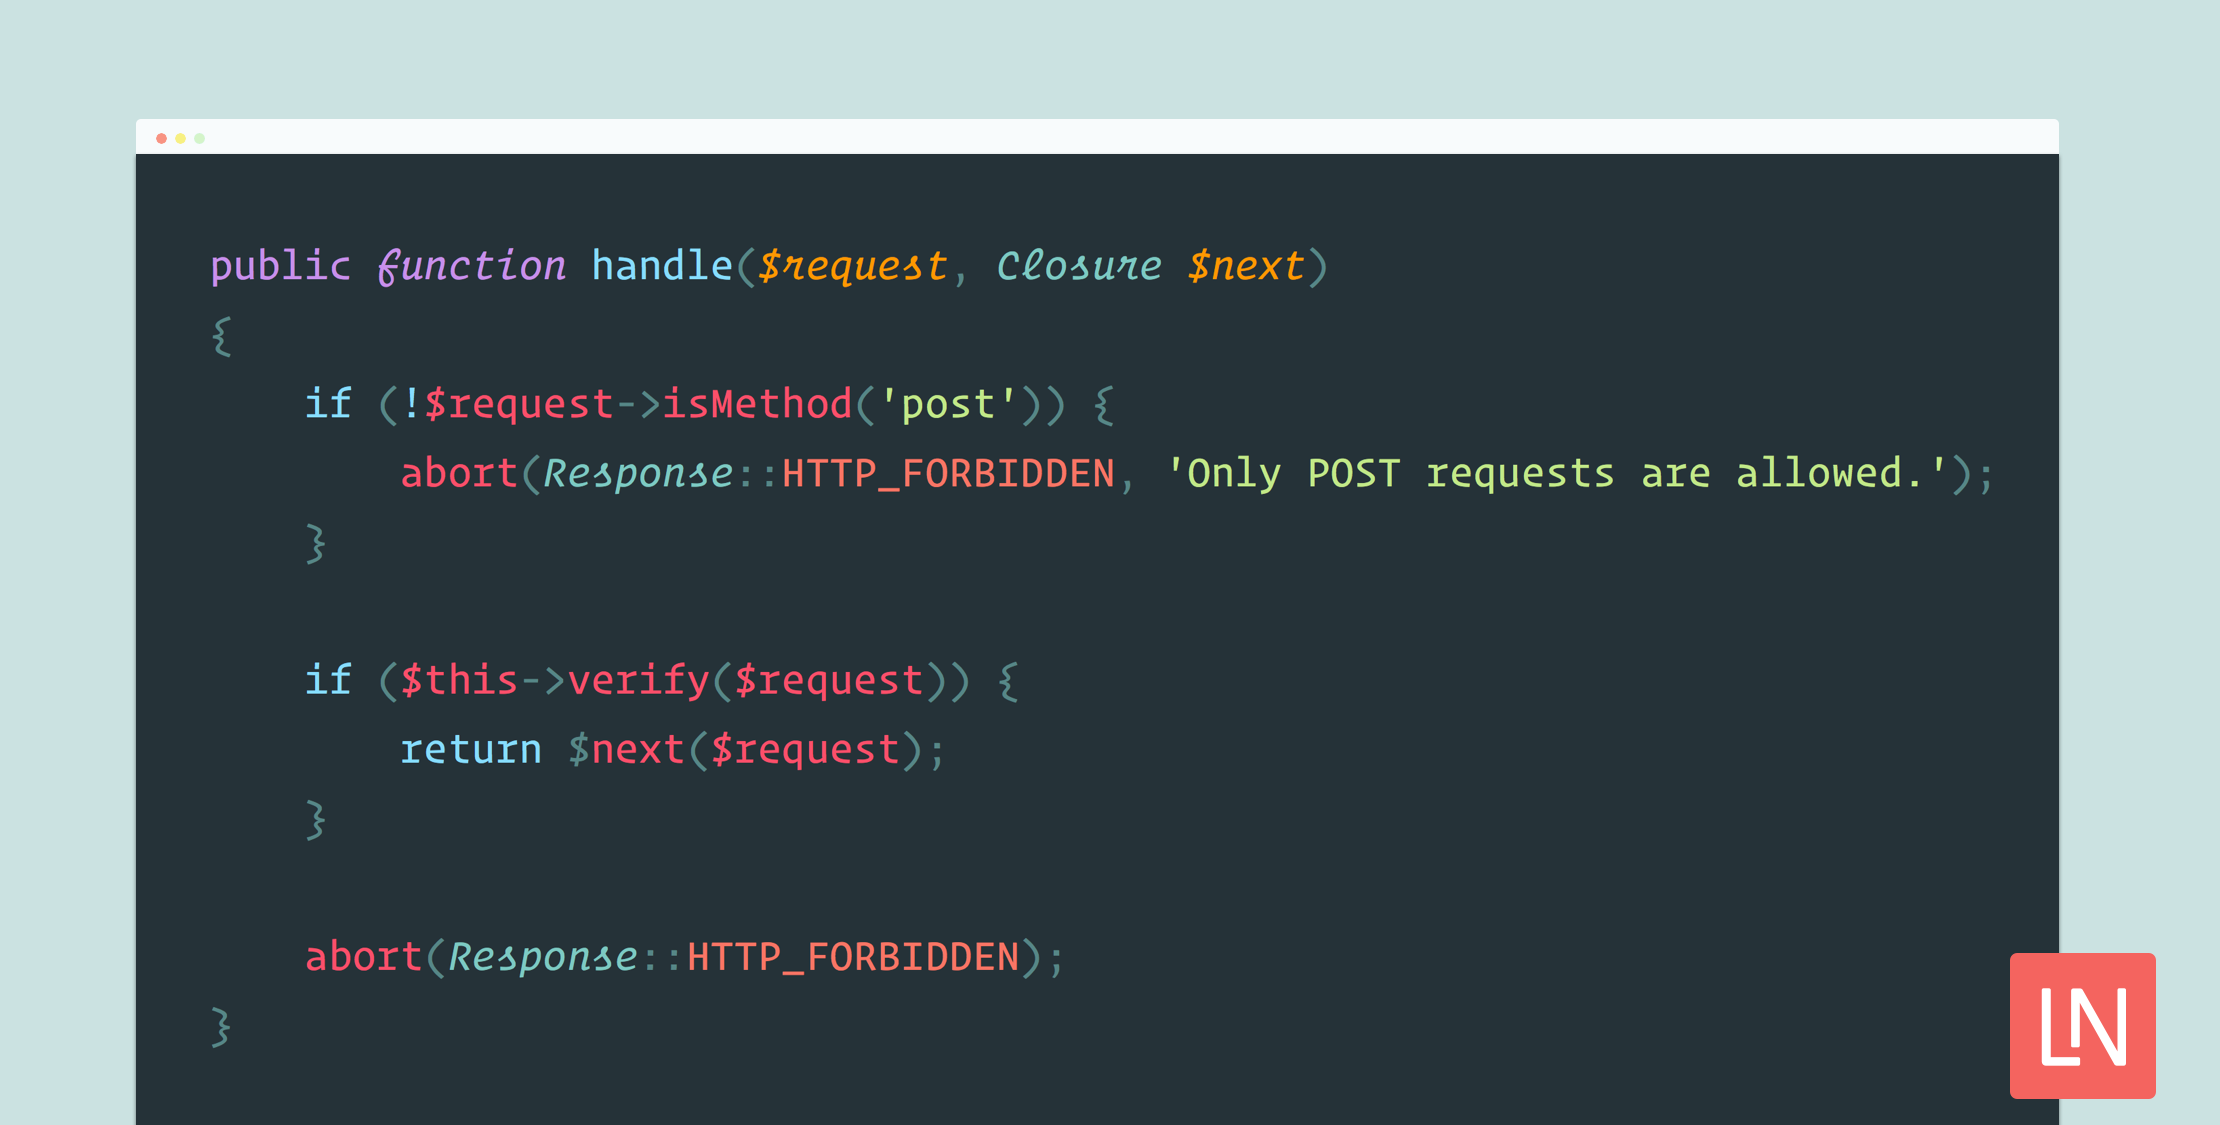
<?php namespace App\Http\Middleware; use Closure;use Illuminate\Http\Response; class ValidateMailgunWebhook{ public function handle($request, Closure $next) { if (!$request->isMethod('post')) { abort(Response::HTTP_FORBIDDEN, 'Only POST requests are allowed.'); } if ($this->verify($request)) { return $next($request); } abort(Response::HTTP_FORBIDDEN); } protected function buildSignature($request) { return hash_hmac( 'sha256', sprintf('%s%s', $request->input('timestamp'), $request->input('token')), config('services.mailgun.secret') ); } protected function verify($request) { if (abs(time() - $request->input('timestamp')) > 15) { return false; } return $this->buildSignature($request) === $request->input('signature'); }}Let’s break this down a little to explain what’s going on.
First, if the request method is not a POST, a 403 response is sent back. Next, we verify the request, and if the verification succeeds, we allow the request to proceed. Last, we abort by default and send back a 403—we defensively protect the route unless it’s valid.
The verify() method checks the request timestamp and makes sure that the request is less than or equal to fifteen seconds. Verify then compares the request’s signature to our signature built from the timestamp and token.
The buildSignature() method encodes the combined timestamp and token, using the Mailgun secret as the key.
Testing the Secured Route
If you send another email, your middleware should still allow the valid requests to go through. However, if you send a request from the terminal, you will get back a 403 now:
$ curl -I -X POST http://mgexample.dev/api/mailgun/widgetsHTTP/1.1 403 ForbiddenServer: nginx/1.10.3Controller Examples
To wrap things up, let’s discuss a few tips for the controller. I find that dispatching a job is the best way to handle Mailgun webhooks after verifying that I am happy with the payload. Usually, I want to do some asynchronous processing on my end, so dispatching the payload to a job makes sense.
If your use-case is simple, you don’t have to complicate things though. Perhaps you just need to store a value in the database and do some minimal work—use your best judgment.
Let’s say I want to process a collection of files of a particular type. You might have something like this in your controller:
public function store(Request $request){ app('log')->debug(request()->all()); $files = collect(json_decode($request->input('attachments'), true)) ->filter(function ($file) { return $file['content-type'] == 'text/csv'; }); if ($files->count() === 0) { return response()->json([ 'status' => 'error', 'message' => 'Missing expected CSV attachment' ], 406); } dispatch(new ProcessWidgetFiles($files)); return response()->json(['status' => 'ok'], 200);}Note that if you send back a 406 (Not Acceptable) response code, Mailgun will assume the POST is rejected and not retry. If you send back a 200, the webhook is successful. If the controller returns any other status code, Mailgun will retry on a schedule until it succeeds or ultimately fails after the maximum number of retry attempts.
In the dispatched job, you could use Guzzle to download the files and process them in your job class:
use GuzzleHttp\Client; $response = (new Client())->get($file['url'], [ 'auth' => ['api', config('services.mailgun.secret')],]); // do something with $response->getBody();The file request uses Guzzle’s auth key to use basic HTTP authentication. Note that these files are only temporarily available for a few days.
You’ve Got Mail
So that’s a whirlwind tour of using Mailgun’s inbound email routing with a webhook in Laravel. I’ve just scratched the surface of what you can do!