I have been using Laravel jobs and queues for a few years now. When I first started using them, it felt really hard, I couldn’t wrap my head around these concepts, the way we structure web apps that rely heavily on them seems a little bit strange, if not overly complex. And then one day it just clicked, and everything started to look clear. Hopefully, the same thing will happen with you, and you’d start wondering how on earth you spent all these years without using them.
From what I can tell, the main issue with learning jobs and queues (in the context of Laravel for instance) is not really the complicity or the novelty of it, but rather the fact that the majority of the learning resources we find online focus mainly on either on too theoretically stuff or give really simple examples that we can’t find in the real world.
I’m writing this tutorial to my past self, this is the tutorial I wish I had when I first started learning about these concepts. The way I like explaining any complex ideas is by examples. We are going to build together parts of a simple analytic app, we will start with a really basic version of it, the way you’d built it if you were the only user of this application, and then we will discover the shortcoming of this approach and some ways in which jobs and queues will help us improve it and solve some of the biggest problems we are going to face.
Description of the application
Our application (and let’s name it basic-analytics-v01) is really basic. It is an app that will allow us to keep track of the traffic a website of ours receives.
Let’s build this app while keeping in mind that we might want to open it up to other users as well, so we need to keep users data separate, and we should not require a lot of work to integrate it into existing websites.
In a nutshell, the website will send a POST request to a specific endpoint in our analytic tool each time a user visits one of its pages, and then we are going to calculate the time spent on each page by subtracting the timestamp of each two consecutive POST requests.
basic-analytics-v01
We will keep this app (or at least the first version of it) really simple.
Let focus on storing those hits on the database, all we need is an endpoint and a controller (yes we are going to put everything in a controller for now).
First, let’s create the two main models we would need and their respective migrations.
-
Tracker: each website would have a unique tracker, for now, we just need to make sure that theIDof the tracker is a valid one (it exists in the database) and unique. -
Hit: eachPOSTrequest will be stored as a “Hit”
our controller code will look something like this:
class TrackingController extends Controller{ public function track($tracker_public_id, Request $request){ $tracker = Tracker::where('public_id', $tracker_public_id)->first(); if ($tracker) { $url = $request->get('url'); $hit = Hit::create(['tracker_id' => $tracker->id, 'url' => $url]); $previousHit = Hit::where('tracker_id', $tracker->id)->orderBy('id', 'desc')->skip(1)->first(); if ($previousHit) { $previousHit->seconds = $hit->created_at->diffInSeconds($previousHit->created_at); $previousHit->save(); return $previousHit->seconds; } return 0; } return -1; }}Keep in mind here that we are oversimplifying many things, and we are interested just in the use case that helps make the point of this article.
As you can tell, there is nothing wrong with this code, especially if all that you are going to deal with is a small personal website.
But let’s imagine some scenarios where this code won’t be good enough, or will just break.
Response time
let’s imagine that the script that is sending these requests need, for one reason or another, to wait and confirm that the request was received.
When I test this by sending a request locally with Postman, here is what I’m getting:
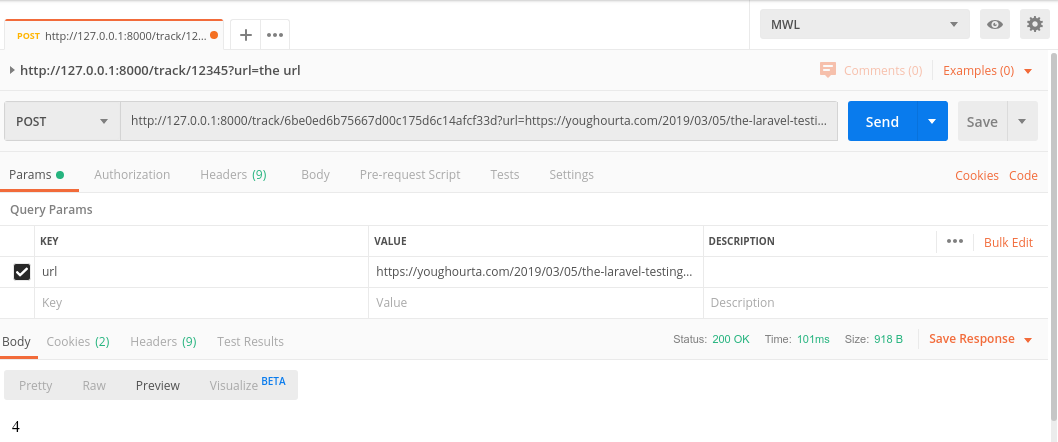
100 ms is quite a long time, even though we are not doing much processing in the controller action. Imagine that we are doing more than this simple processing, and we need to execute multiple database queries, or even talk to a third-party API, we are going to block the script that is sending the request (and thus, we are probably going to block the page that is executing the script) until we finish processing.
Number of concurrent requests
It doesn’t matter whether you are running your Laravel application locally, or on a production server, there is always a limit for how many requests you can handle at any moment.
If you are using the local development server, and serve your Laravel application using php artisan serve you’ll notice that the server can handle just one request at a time.
if we execute our code synchronously as we are doing in our code, it means that we are going to reach this limit more often, since we are keeping the webserver busy, and we will notice that too many requests just timeout. One solution for this issue is to liberate the connection as soon as possible.
Lost of data
One issue that doesn’t come to mind easily when reading the current code is that in case of failure (we can’t access the database for instance when we try to execute the code, or if we have a bug that throws an exception) there is no way we can store the request and retry again.
Let’s see now how the use of jobs and queues will help us solve all these problems:
Pushing jobs to the queue
First, let’s talk about what queues and jobs are.
In a nutshell, a job is a piece of code (a method for instance) that we want to execute. And we put it in a queue to defer its execution and delegate it to “something else”.
To give you an example from the real world, when you go to a fast-food chain to eat, the receptionist who takes your order won’t be the one who prepares it and delivers it to you, but rather she makes sure that your order was taken (correctly) and then “delegates” the rest of the job to someone else.
The reason behind this is that the receptionist won’t need to keep you in line waiting until you get your order, but rather do just the minimum and the necessary work, and move on to the next order (serve as many people as possible in parallel). And we want to implement the same thing with our code.
So, in our code, we want to just make sure that the POST request was received, and then delegate the rest of the job to another part of the application.
One way to do so is by putting the code that we want to delegate in a closure and dispatch it to a queue like this:
dispatch(function () use ($parameters) { // your code here});but I recommend that you create a dedicated job class for your code and then dispatch it instead.
First we need to execute the following command to create the class:
php artisan make:job TrackHitJobthis command will generate the following class:
App\Jobs\TrackHitJobnow let’s move the code we have from the track in the TrackingController to the handle method in the newly created TrackHitJob class. The handle method should look like this:
public function handle(){ $tracker = Tracker::where('public_id', $tracker_public_id)->first(); if ($tracker) { $url = $request->get('url'); $hit = Hit::create(['tracker_id' => $tracker->id, 'url' => $url]); $previousHit = Hit::where('tracker_id', $tracker->id)->orderBy('id', 'desc')->skip(1)->first(); if ($previousHit) { $previousHit->seconds = $hit->created_at->diffInSeconds($previousHit->created_at); $previousHit->save(); return $previousHit->seconds; } return 0; } return -1;}PS: don’t forget to import Tracker and Hit models as well as the Request class.
but how are we going to pass the arguments (the tracker public ID as well as the request itself) to the tracking code? Well, we will pass them to the constructor of the class, and then the handle method could pick them up like this:
<br></br>namespace App\Jobs; use Illuminate\Bus\Queueable;use Illuminate\Contracts\Queue\ShouldQueue;use Illuminate\Foundation\Bus\Dispatchable;use Illuminate\Queue\InteractsWithQueue;use Illuminate\Queue\SerializesModels;use Illuminate\Http\Request;use App\Tracker;use App\Hit; class TrackHitJob implements ShouldQueue{ use Dispatchable, InteractsWithQueue, Queueable, SerializesModels; private $trackerPublicID; private $url; public function __construct($tracker_public_id, Request $request) { $this->trackerPublicID = $tracker_public_id; $this->url = $request->get('url'); } public function handle() { $tracker = Tracker::where('public_id', $this->trackerPublicID)->first(); if ($tracker) { $hit = Hit::create(['tracker_id' => $tracker->id, 'url' => $this->url]); $previousHit = Hit::where('tracker_id', $tracker->id)->orderBy('id', 'desc')->skip(1)->first(); if ($previousHit) { $previousHit->seconds = $hit->created_at->diffInSeconds($previousHit->created_at); $previousHit->save(); return $previousHit->seconds; } return 0; } return -1; }}Now each time we receive a new hit, we need to dispatch a new job.
We can do it as follows:
namespace App\Http\Controllers; use Illuminate\Http\Request;use App\Jobs\TrackHitJob; class TrackingController extends Controller{ public function track($tracker_public_id, Request $request) { TrackHitJob::dispatch($tracker_public_id, $request); }}Look how clean and slim our controller is.
If you try and send a POST request like we did in the beginning, we will notice that nothing has changed, we still see the hits in the hits tables, and the request is still taking around the same time (~100ms) just like last time.
So, what’s going on here? Are we really delegating?
Queue Connections
If you open up the .env file, you’ll find that we have a variable called QUEUE_CONNECTION set to `sync
QUEUE_CONNECTION=syncwhat this means, is that we are processing any jobs as soon as they are dispatched, and we are doing this synchronously.
So, if we want to benefit from the power of queues, we need to change this queue connection to something else. In other terms, we need a place where we can “queue”/store the jobs before they get processed.
There are multiple choices. If you take a look at config/queue.php, you’ll notice that Laravel support out of the box multiple connections (“sync”, “database”, “beanstalkd”, “sqs”, “redis”).
Since we are just getting started with queues and jobs, let’s avoid for now any queue connections that will require either a third party service (beanstalkd and Amazon SQS), or an application that we don’t necessarily have in our dev machine (redis). And we will stick for now with database.
So, every time we receive a new job, it will be stored in the database (in a dedicated table). And it will be then picked up and processed.
PS: if you are using the local development server, don’t forget to restart it, otherwise the changes you introduce to the .env file won’t be taken into consideration.
QUEUE_CONNECTION=databasebefore we try sending a POST request, we need to create a table where these jobs will be stored. Thankfully Laravel provides us with a command that will generate this table for us.
php artisan queue:tableafter executing this command (and thus creating the migration), we’d need to run the migration
php artisan migrate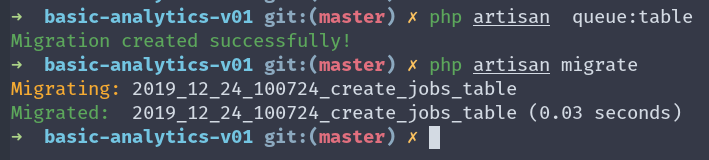
now if we send the POST request one more time we will notice the following:
- the response time is slightly lower (since we are no longer processing the request synchronously).
- we can see a new entry in the
jobstable
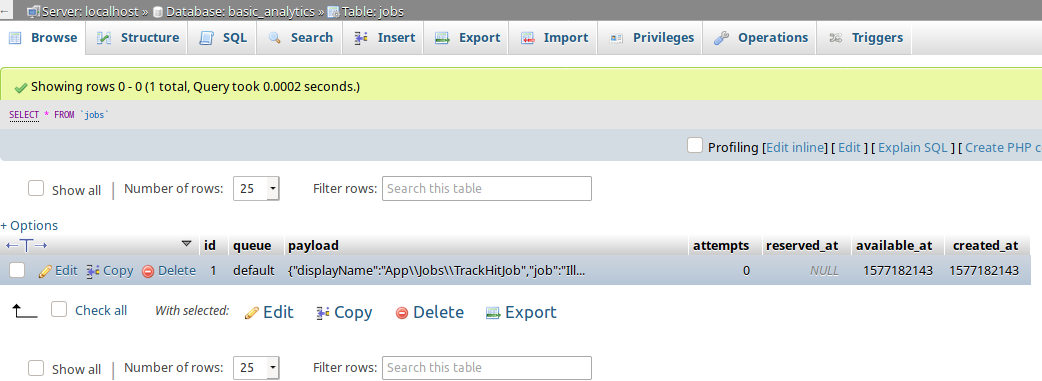
- but there are no new entries in the
hitstable.
We are not seeing any entries in the hits table because we don’t have any processes to “consume” the jobs we have in the queue. In order to consume them we need to execute the following command:
php artisan queue:work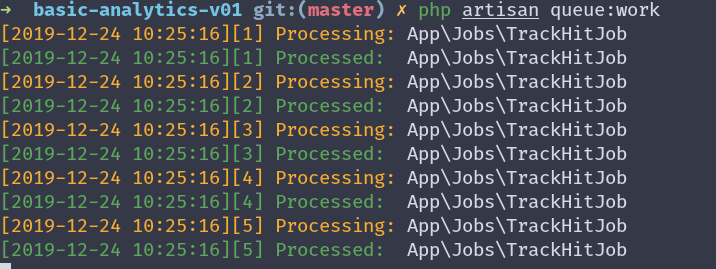
➜ basic-analytics-v01 git:(master) ✗ php artisan queue:work [2019-12-24 10:25:16][1] Processing: App\Jobs\TrackHitJob[2019-12-24 10:25:16][1] Processed: App\Jobs\TrackHitJob[2019-12-24 10:25:16][2] Processing: App\Jobs\TrackHitJob[2019-12-24 10:25:16][2] Processed: App\Jobs\TrackHitJob[2019-12-24 10:25:16][3] Processing: App\Jobs\TrackHitJob[2019-12-24 10:25:16][3] Processed: App\Jobs\TrackHitJob[2019-12-24 10:25:16][4] Processing: App\Jobs\TrackHitJob[2019-12-24 10:25:16][4] Processed: App\Jobs\TrackHitJob[2019-12-24 10:25:16][5] Processing: App\Jobs\TrackHitJob[2019-12-24 10:25:16][5] Processed: App\Jobs\TrackHitJobnotice that this command doesn’t exit, and it will keep waiting for any new incoming jobs to process.
If you are wondering how would you execute this command on a production server and how you keep it running after you log out of your server, don’t worry, we will talk about this point later in depth.
Now, if you go back to the jobs table in your database, you’ll find it empty since all the jobs where processed.
Consuming multiple jobs in parallel
After we saw how we can dispatch jobs and process them asynchronously (IE: we don’t need to wait for the job to finish), let’s move to the second reason we use jobs and queues: parallelism.
If you were following carefully so far, you’ll notice that even though we are dispatching the jobs and delegating them, we are still processing them one at a time.
The solution is really simple, just open a new terminal tab and execute the same php artisan queue:work command we executed previously, and next time you send multiple POST request to your app (I.e when you have multiple jobs waiting in the queue), you’ll notice that the processes in both tabs are consuming the jobs, which means we are processing them in parallel, and the more process you have the faster you empty your queue up.
Again, if you are wondering how you are going to do this on a production server, don’t worry, we will cover this as well later on.
Dealing with failed jobs
Now imagine that you pushed some new code to your server that introduced a bug, and it took you some time before you discovered it, which mean all the requests your app received during this period will just fail, is there a way you could process them after you fix the bug. As you can tell, you just can’t ask your customer to resend you the requests again (this just won’t be possible). Fortunately, the data is not lost, and we can retry the failed jobs without any problems.
But before we explore how we would do this, I invite you to read the help of the queue:work command:
php artisan queue:work --help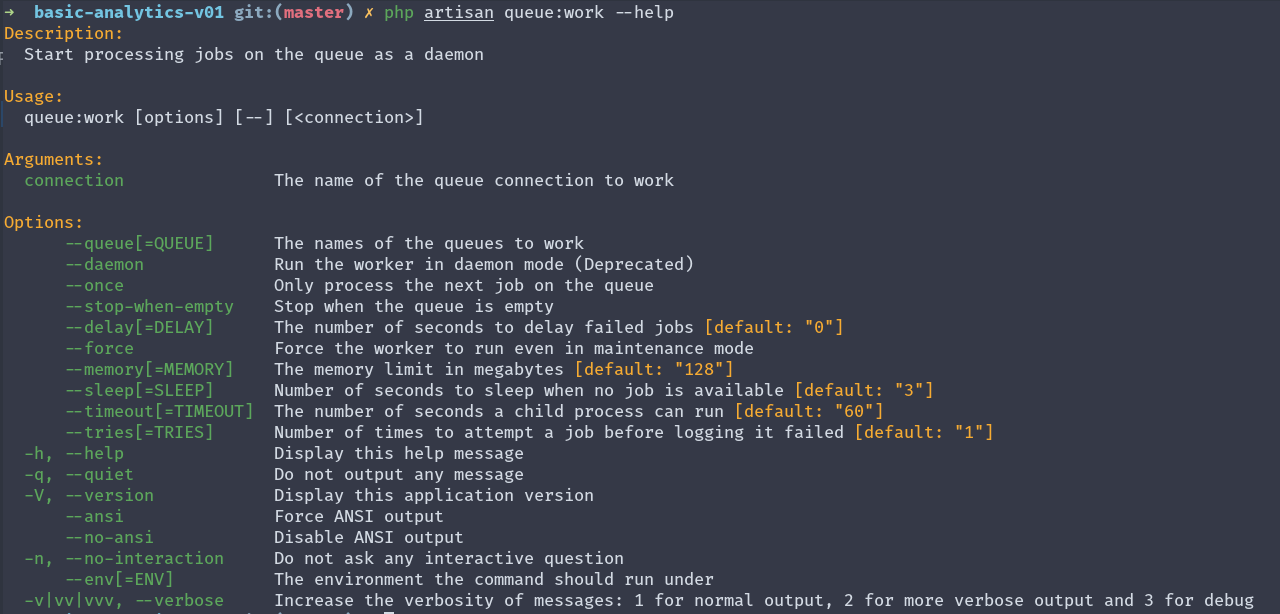
notice that the command accepts multiple arguments, and one of them (the one that interests us here) is the tries one
--tries[=TRIES] Number of times to attempt a job before logging it failed [default: "1"]This argument helps us determine how many times we retry the job before we mark it as failed. Notice that the default value is 1, which means that as soon as the job fails once, it will be marked as failed.
When a job fails, it will be persisted in the failed_jobs table, Laravel provides us with a command that creates this table’s migration as well:
php artisan queue:failed-tablein other terms, if you are working with jobs and queues in your application you’d need to run this command and the migration that results from it.
Now let’s stop all the queue:work processes, and try to simulate a failing job.
Let’s add the following line at the beginning of the handle() method:
throw new \Exception("Error Processing the job", 1);so the job will fail each time we try to process it, and see what would happen (don’t forget to send some new POST requests)

as you can see here, the jobs are failing, and if we visit the failed_jobs table we can find more information about them.
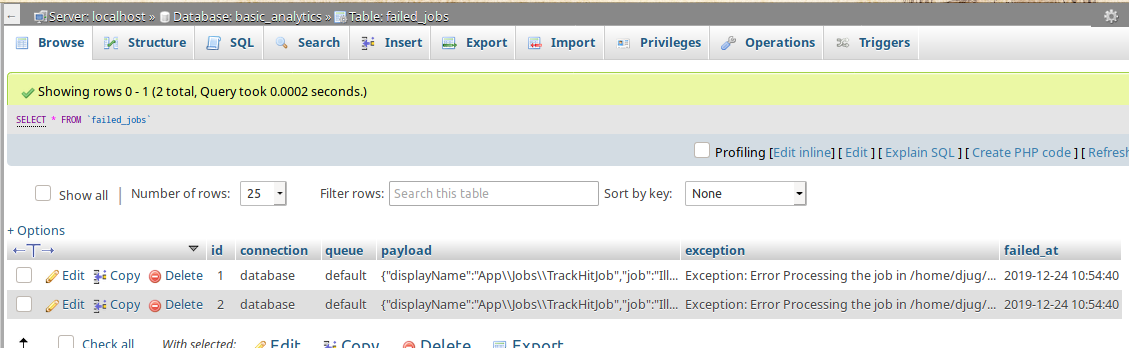
for each entry we can see the payload of the job, the exception that made it fail as well the connection, the queue and the time when the job failed.
Now let’s get rid of the line that was throwing an exception, and let’s retry those jobs again.
We can retry all the failed jobs or just a specific one like this (replace all with the ID of the job):
php artisan queue:retry allif you haven’t stopped the previous queue:work process before retrying the jobs, you’ll notice that the retried jobs failed again. So what’s going on here?
According to the Laravel documentation:
queue workers are long-lived processes and store the booted application state in memory. As a result, they will not notice changes in your codebase after they have been started. So, during your deployment process, be sure to restart your queue workers.
So we need to restart that process again.
Alternatively, and if you want to avoid restarting the process each time you change something locally, you can use the following command instead:
php artisan queue:listenBut, according to the official documentation, this command is not as efficient as queue:work:
Now let’s restart the queue:work process again, and retry all the failed jobs.
The jobs will be processed, and you’ll see new entries in the hits table.
What’s next
in the next tutorial, we will see how to use other queue connections (other than the database connection), we will explore the use of multiple queues and how we can make some jobs/queue have more priority than the other.
We will explore next how we would deploy our application that relies on jobs and queues, and what needs to be done to keep the processes running.

Back-end developer http://youghourta.com I built:
- botmarker.com
- bookmarkingBot.com
- todocol.com
I'm also the author of "Laravel Testing 101" http://laraveltesting101.com