Laravel Elfinder
Laravel Elfinder stats
- Downloads
- 1.8M
- Stars
- 732
- Open Issues
- 168
- Forks
- 168
A Laravel Package to integrate elFinder 2
elFinder Package for Laravel
For Laravel 8.x and older, please use the latest 0.4 version.


This packages integrates elFinder 2.1, by making the php files available with Composer (+autoloading) and the assets with a publish command. It also provides some example views for standalone, tinymce and ckeditor. Files are updated from the a seperate build repository
Note: Use
php artisan elfinder:publishinstead of the old publish command, for future changes!
Installation
Require this package with Composer
composer require barryvdh/laravel-elfinderAdd the ServiceProvider to the providers array in app/config/app.php
Barryvdh\Elfinder\ElfinderServiceProvider::classYou need to copy the assets to the public folder, using the following artisan command:
php artisan elfinder:publishRemember to publish the assets after each update (or add the command to your post-update-cmd in composer.json)
Routes are added in the ElfinderServiceProvider. You can set the group parameters for the routes in the configuration.
You can change the prefix or filter/middleware for the routes. If you want full customisation, you can extend the ServiceProvider and override the map() function.
Configuration
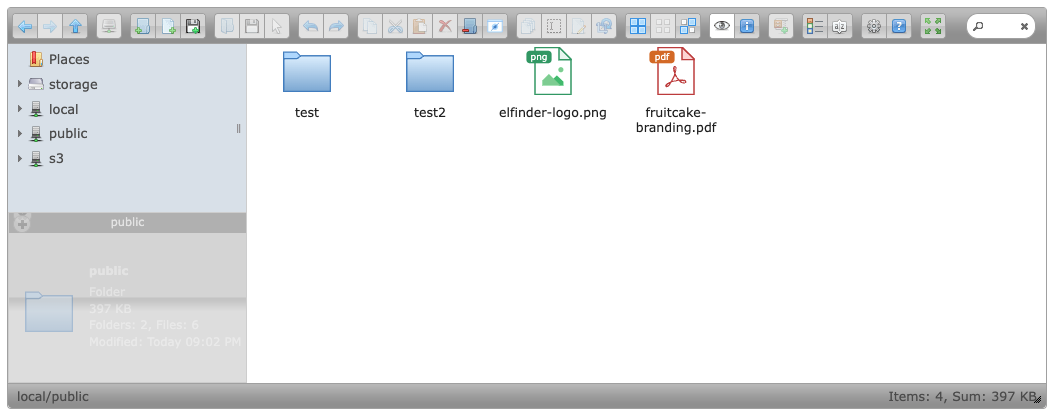
The default configuration requires a directory called 'files' in the public folder. You can change this by publishing the config file.
php artisan vendor:publish --provider='Barryvdh\Elfinder\ElfinderServiceProvider' --tag=configIn your config/elfinder.php, you can change the default folder, the access callback or define your own roots.
Views
You can override the default views by copying the resources/views folder. You can also do that with the vendor:publish command:
php artisan vendor:publish --provider='Barryvdh\Elfinder\ElfinderServiceProvider' --tag=viewsUsing Filesystem disks
Laravel has the ability to use Flysystem adapters as local/cloud disks. You can add those disks to elFinder, using the disks config.
This examples adds the local disk and my-disk:
'disks' => [ 'local', 'my-disk' => [ 'URL' => url('to/disk'), 'alias' => 'Local storage', ]],You can add an array to provide extra options, like the URL, alias etc. Look here for all options. If you do not provide an URL, the URL will be generated by the disk itself.
Using Glide for images
See elfinder-flysystem-driver for Glide usage. A basic example with a custom Laravel disk and Glide would be:
-
Add the disk to your apps config/filesystems disks:
'public' => ['driver' => 'local','root' => base_path().'/public',],Tip: you can use the
extendmethod to register your own driver, if you want to use non-default Flysystem disks -
Create a Glide Server for your disk, eg. on the
glide/<path>route, using a cache path:Route::get('glide/{path}', function($path){$server = \League\Glide\ServerFactory::create(['source' => app('filesystem')->disk('public')->getDriver(),'cache' => storage_path('glide'),]);return $server->getImageResponse($path, Input::query());})->where('path', '.+'); -
Add the disk to your elfinder config:
'disks' => ['public' => ['glideURL' => '/glide',],], -
(Optional) Add the
glideKeyalso to the config, and verify the key in your glide route using the Glide HttpSignature.
You should now see a root 'public' in elFinder with the files in your public folder, with thumbnails generated by Glide. URLs will also point to the Glide server, for images.
TinyMCE 5.x
You can use tinyMCE 5 integration with the following route /elfinder/tinymce5:
route('elfinder.tinymce5');In the TinyMCE init code, add the following line:
file_picker_callback : elFinderBrowserThen add the following function (change the elfinder_url to the correct path on your system):
function elFinderBrowser (callback, value, meta) { tinymce.activeEditor.windowManager.openUrl({ title: 'File Manager', url: elfinder_url, /** * On message will be triggered by the child window * * @param dialogApi * @param details * @see https://www.tiny.cloud/docs/ui-components/urldialog/#configurationoptions */ onMessage: function (dialogApi, details) { if (details.mceAction === 'fileSelected') { const file = details.data.file; // Make file info const info = file.name; // Provide file and text for the link dialog if (meta.filetype === 'file') { callback(file.url, {text: info, title: info}); } // Provide image and alt text for the image dialog if (meta.filetype === 'image') { callback(file.url, {alt: info}); } // Provide alternative source and posted for the media dialog if (meta.filetype === 'media') { callback(file.url); } dialogApi.close(); } } });}TinyMCE 4.x
You can use tinyMCE integration with the following route, which by default is /elfinder/tinymce4:
route('elfinder.tinymce4');In the TinyMCE init code, add the following line:
file_browser_callback : elFinderBrowserThen add the following function (change the elfinder_url to the correct path on your system):
function elFinderBrowser (field_name, url, type, win) { tinymce.activeEditor.windowManager.open({ file: '<?= route('elfinder.tinymce4') ?>',// use an absolute path! title: 'elFinder 2.0', width: 900, height: 450, resizable: 'yes' }, { setUrl: function (url) { win.document.getElementById(field_name).value = url; } }); return false;}TinyMCE 3.x
You can add tinyMCE integration with the following route (default: /elfinder/tinymce):
route('elfinder.tinymce');In the TinyMCE init code, add the following line:
file_browser_callback : 'elFinderBrowser'Then add the following function (change the elfinder_url to the correct path on your system):
function elFinderBrowser (field_name, url, type, win) { var elfinder_url = '/elfinder/tinymce'; // use an absolute path! tinyMCE.activeEditor.windowManager.open({ file: elfinder_url, title: 'elFinder 2.0', width: 900, height: 450, resizable: 'yes', inline: 'yes', // This parameter only has an effect if you use the inlinepopups plugin! popup_css: false, // Disable TinyMCE's default popup CSS close_previous: 'no' }, { window: win, input: field_name }); return false;}CKeditor 4.x
You can add CKeditor integration with the following route:
'elfinder.ckeditor'In the CKeditor config file:
config.filebrowserBrowseUrl = '/elfinder/ckeditor';Standalone Popup Selector
To use elFinder by using a href, button or other element to trigger a popup window, you will need to do the following.
Add support for a popup window, we have used Jacklmoore's jQuery colorbox, (Not included), but you could use any other, obviously adjusting the following instructions accordingly.
Add required routes
You can add the popup with the following action:
'Barryvdh\Elfinder\ElfinderController@showPopup'Add the required resources
Be Sure that you have published this packages public assets as described above. Then within the <head> section of your page include the required colorbox styles (we suggest example1' styles, but any will do)
<link href="/assets/css/colorbox.css" rel="stylesheet">Colorbox depends on jQuery, so ensure that you have it included within your page, then somewhere after your jQuery file has been included, add the script for jQuery Colorbox, such as...
<script type="text/javascript" src="https://raw.githubusercontent.com/barryvdh/laravel-elfinder/master/assets/js/jquery.colorbox-min.js"></script>Now add a link to the popup script, just before the close of your <body> tag. A non-minified version is also provided, for if you wish to modify the colorbox config. Simply copy to your assets location, and adjust/minify as desired.
<script type="text/javascript" src="https://raw.githubusercontent.com/barryvdh/laravel-elfinder/master/packages/barryvdh/elfinder/js/standalonepopup.min.js"></script>Usage
In order to use the finder to populate an input, simply add your input that you wish to be populated, ensuring to use an ID (This will be used to update the value once a file/image has been selected)......
<label for="feature_image">Feature Image</label><input type="text" id="feature_image" name="feature_image" value="">Now just add the element that you wish to use to trigger the popup, ensuring to add the class popup_selector and the data-inputid atribute containing the value matching the id of your input you wish to be populated, as below.
<a href="" class="popup_selector" data-inputid="feature_image">Select Image</a>You can have as many elements as you wish on the page, just be sure to provide each with a unique ID, and set the data-updateid attribute on the selector accordingly.