
I know, I know! I was there too, trust me. The AWS dashboard can be intimidating, confusing, seemingly overkill for what you are trying to do, and compared to other popular resources out there it is easy to completely dismiss AWS altogether and roll with something else.
However, there is a reason that some of the BIGGEST companies in the world use AWS for their web services. Companies like Twitch, LinkedIn, Facebook and even all of those chill time movies are streamed from Netflix through AWS. It is for good reason.
I cannot teach the entirety of AWS in a single article, but I can demystify the dashboard just a bit by showing you how to navigate through and ultimately implement S3 buckets in your Laravel apps.
Prerequisites
There are two thing I ask that you have before attempting anything in this article.
- An AWS account.
- A Laravel project with the
Flyststem S3package installed with the following command:
composer require league/flysystem-aws-s3-v3 "^3.0" --with-all-dependenciesIAM That IAM
Like most seemingly confusing names in AWS, this one is actually pretty simple. IAM = 'Identity and Access Management'.
This is where we need to start, by creating a Group and a User and get your Access Key and Secret. Come on, one step at a time.
User Group
- In the searchbar at the top, type "IAM" and click on the IAM service.
- On the left sidebar, click "User Groups"
- Click the "Create group" button
- Create a name for the group, I am going to call mine "S3FullAccess", all the users in this group will have full access to do anything to any of my S3 buckets, but they will ONLY have access to make changes to S3 buckets.
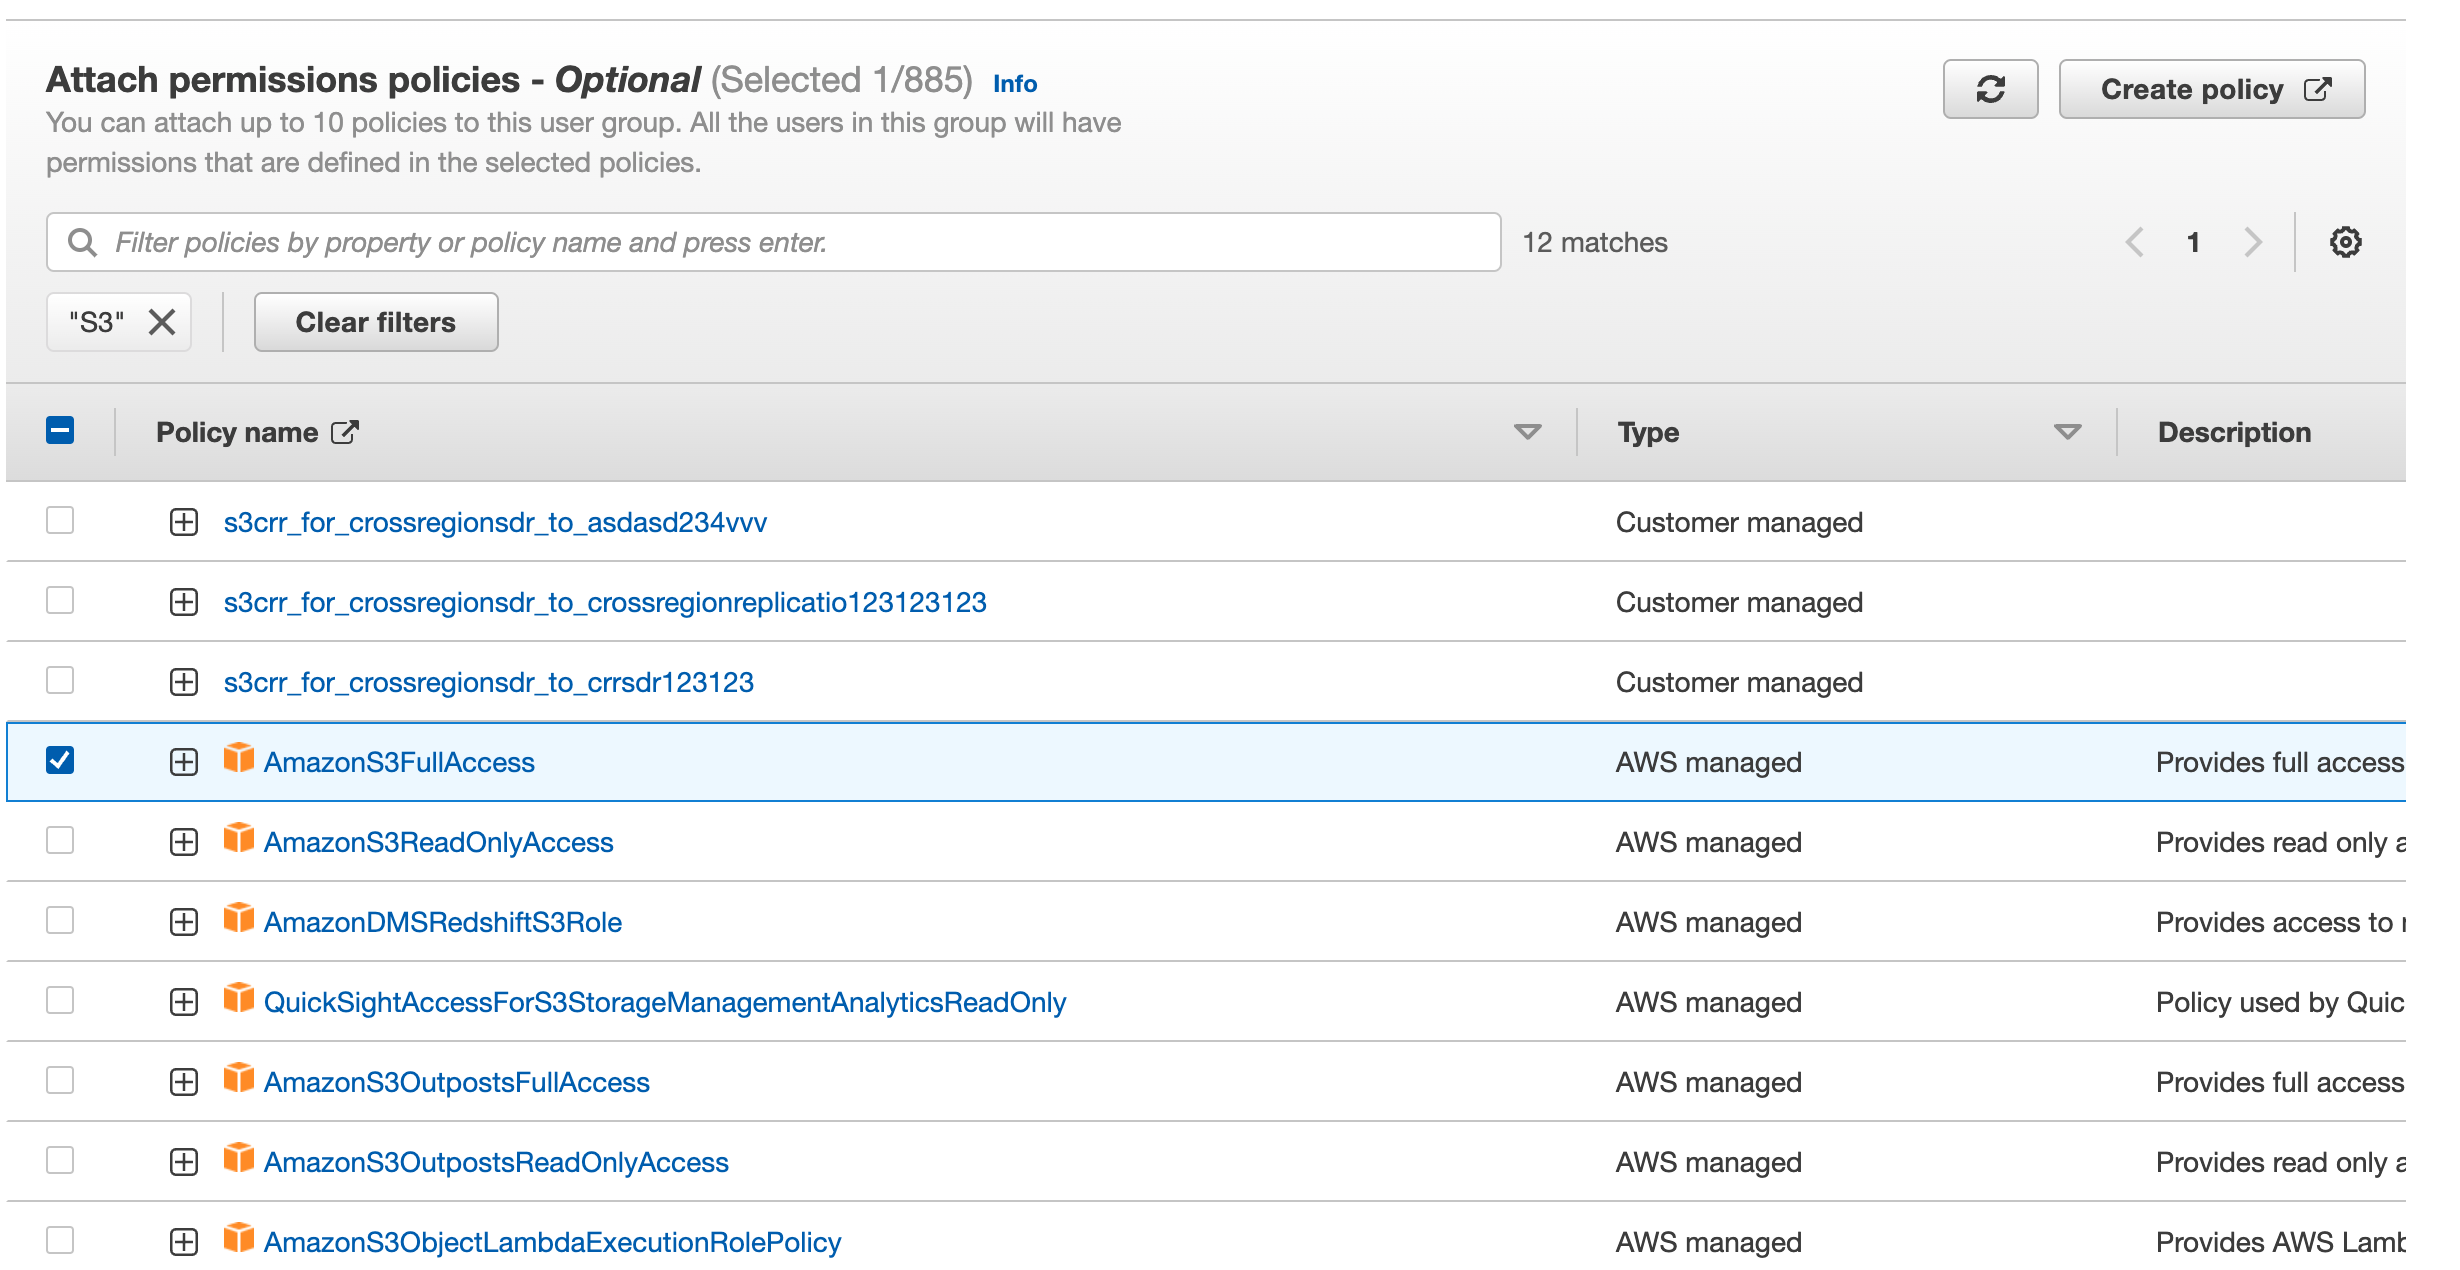
- Scroll down and in the :Attach permissions policies", search for "S3". The search bar here is a bit wonky, just hit enter and you will see the list update.
- Check the box next to "AmazonS3FullAccess" and click the "Create group" button on the bottom.
Create The User
- Next click "Users" in the left sidebar.
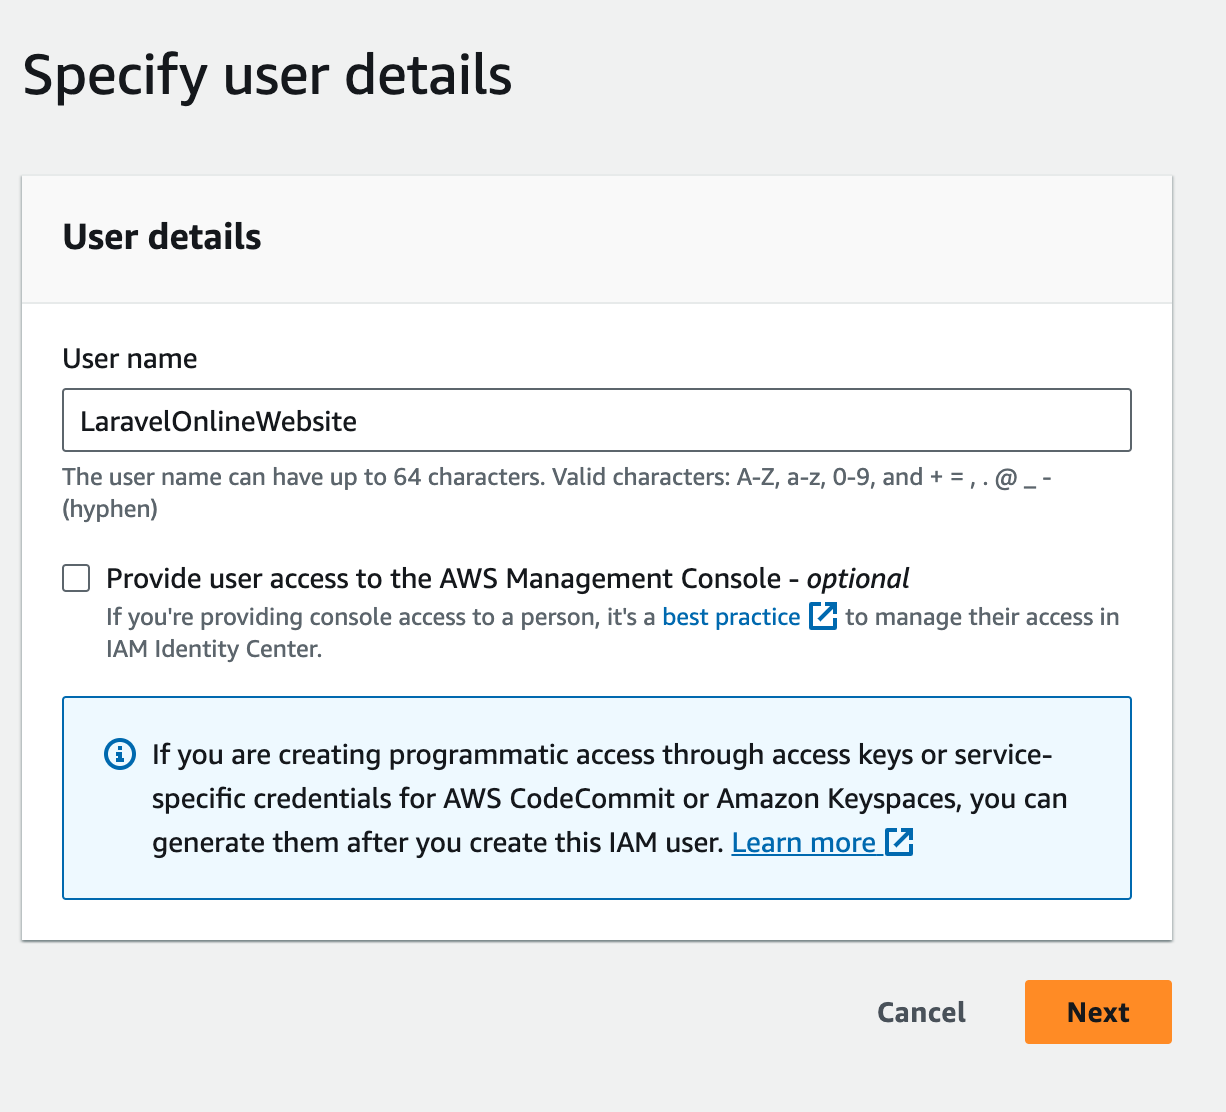
- Click "Create user" and give the user a name. Now the name can be anything you want, typically I make a user for each of my apps and name it accordingly.
- Do NOT check the box to grant the user AWS Console access unless you know what you are doing. Essentially, this will also allow our user to log into AWS and also have API access which isn't the goal of this demo.
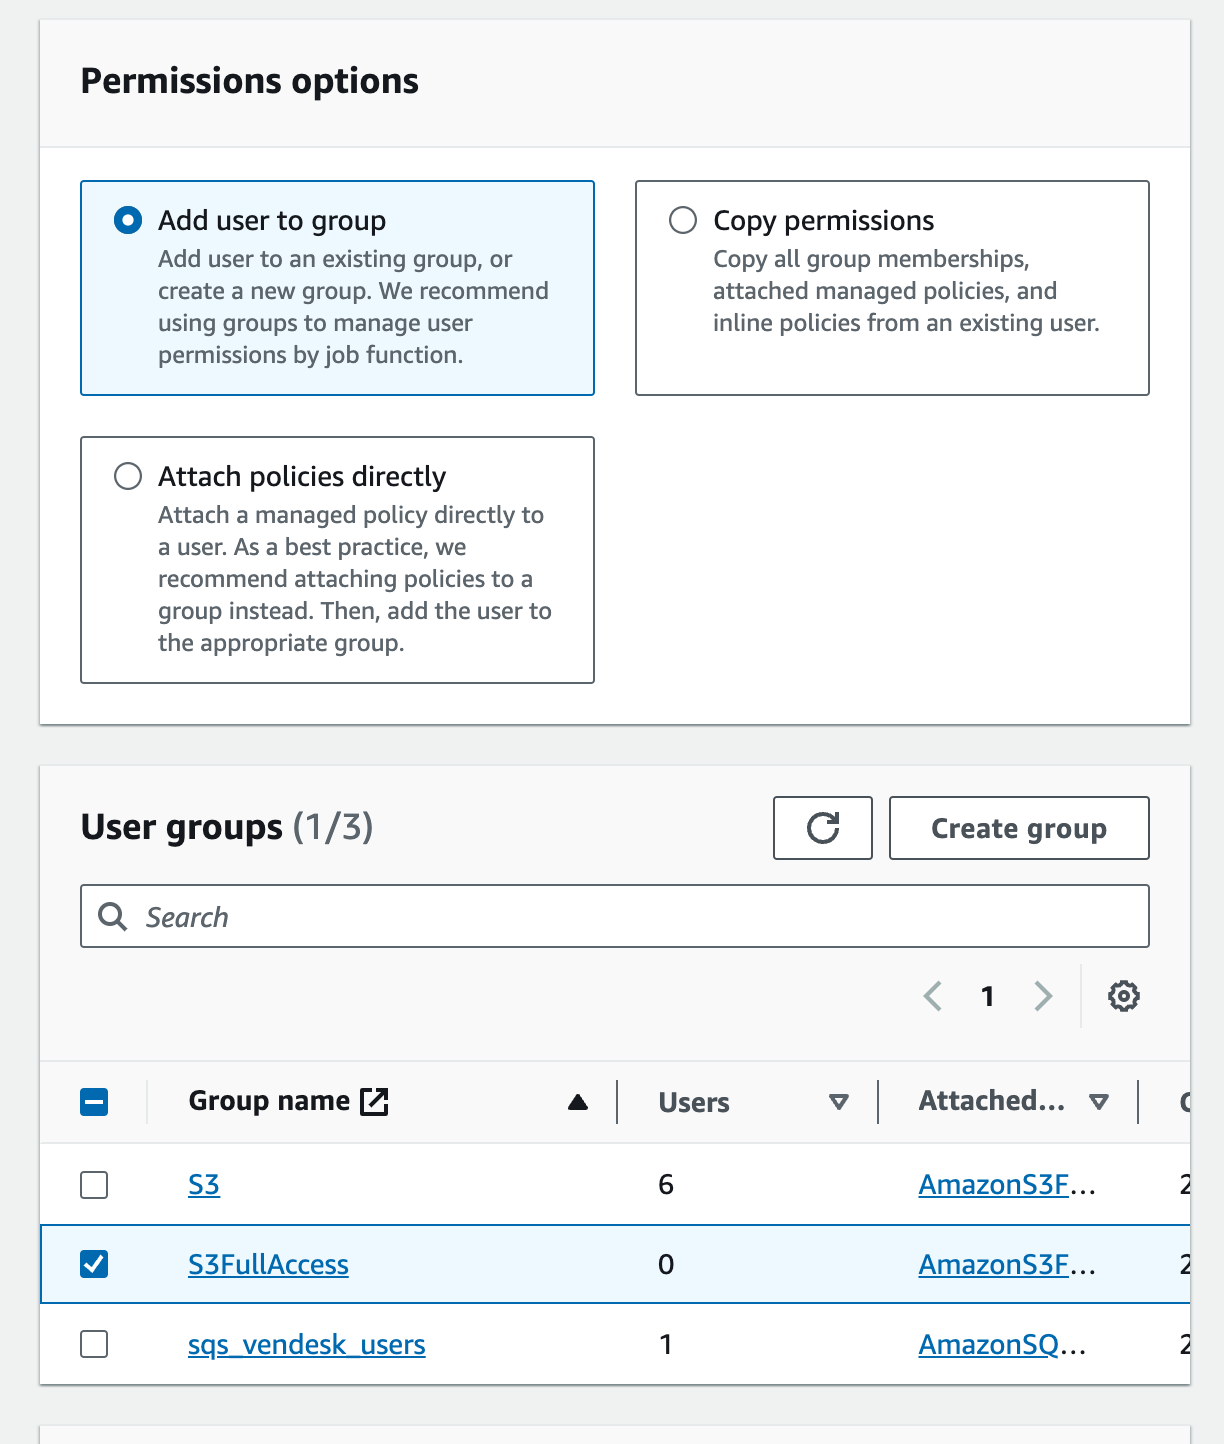
- Click "Next". Now we are going to add this user to the group we just made, check the box next to the group and click "Next".
- You can add "Tags" to your user if you want, I normally just skip these. Click "Create user".
Get the Key and Secret
- The next screen should show you a list of all your users, click on the user you just created.
- Click on the Security credentials tab and scroll down to the "Access keys" section.
- Click "Create access key".
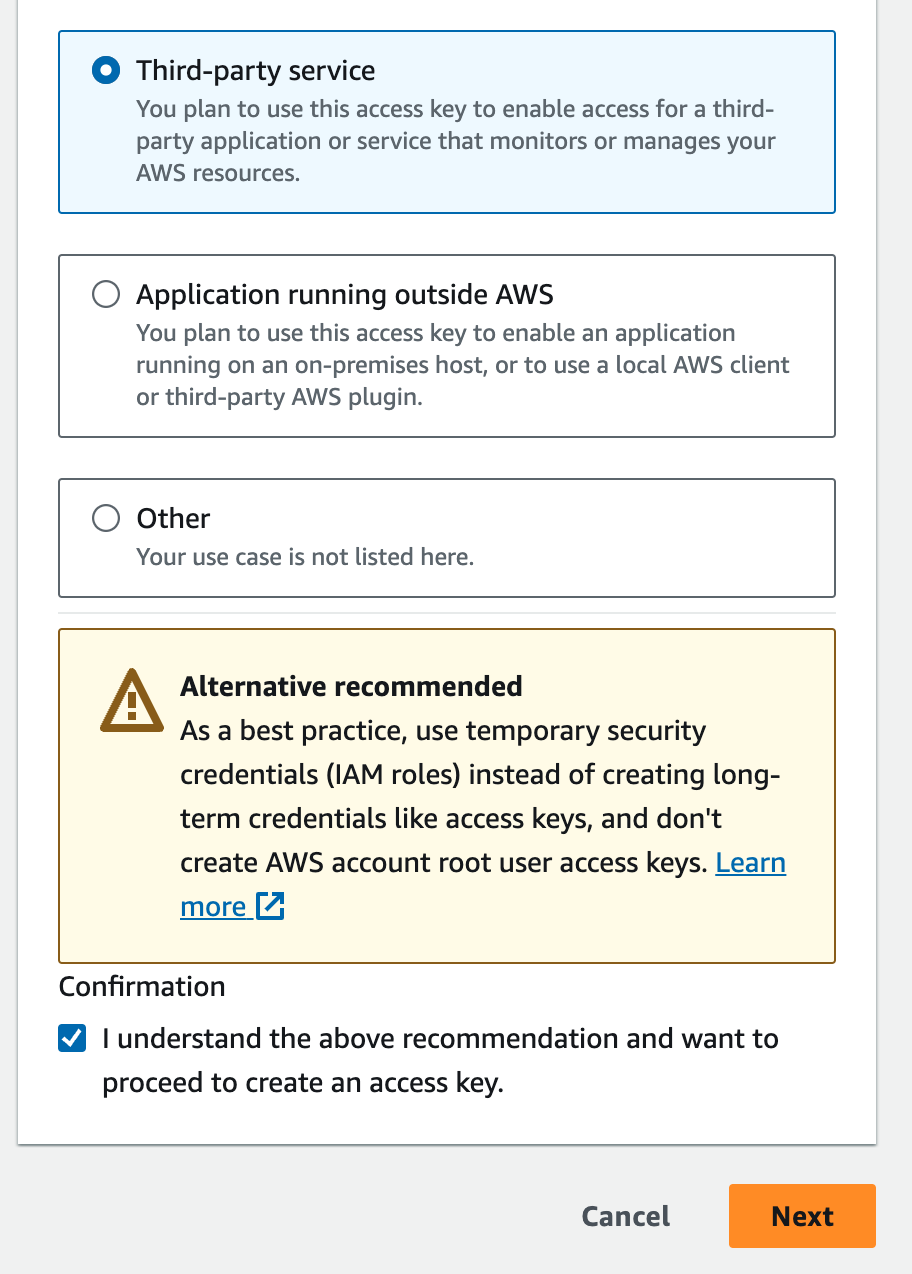
- For this tutorial, the user we are creating is essentially a "Third-party service", select it, check the Confirmation at the bottom and click "Next".
- I skip the description tag. Each user can have multiple access key (up to 2) and you can label them here if you want.
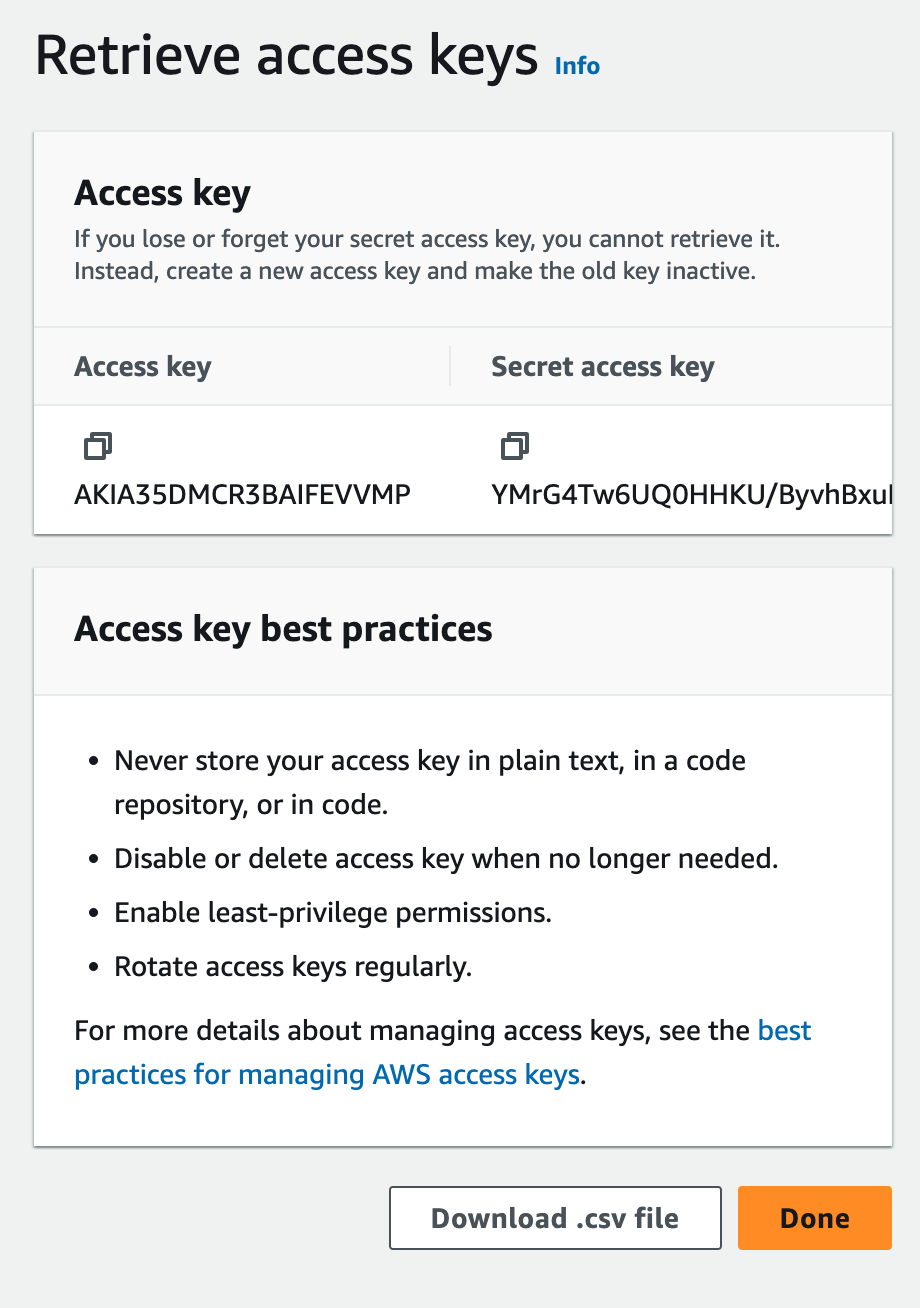
- Click "Create access key". On the next page you will see your access key, and you can show or copy your secrete access key. You will need both of these values, copy them and paste them into your Laravel
.envfile.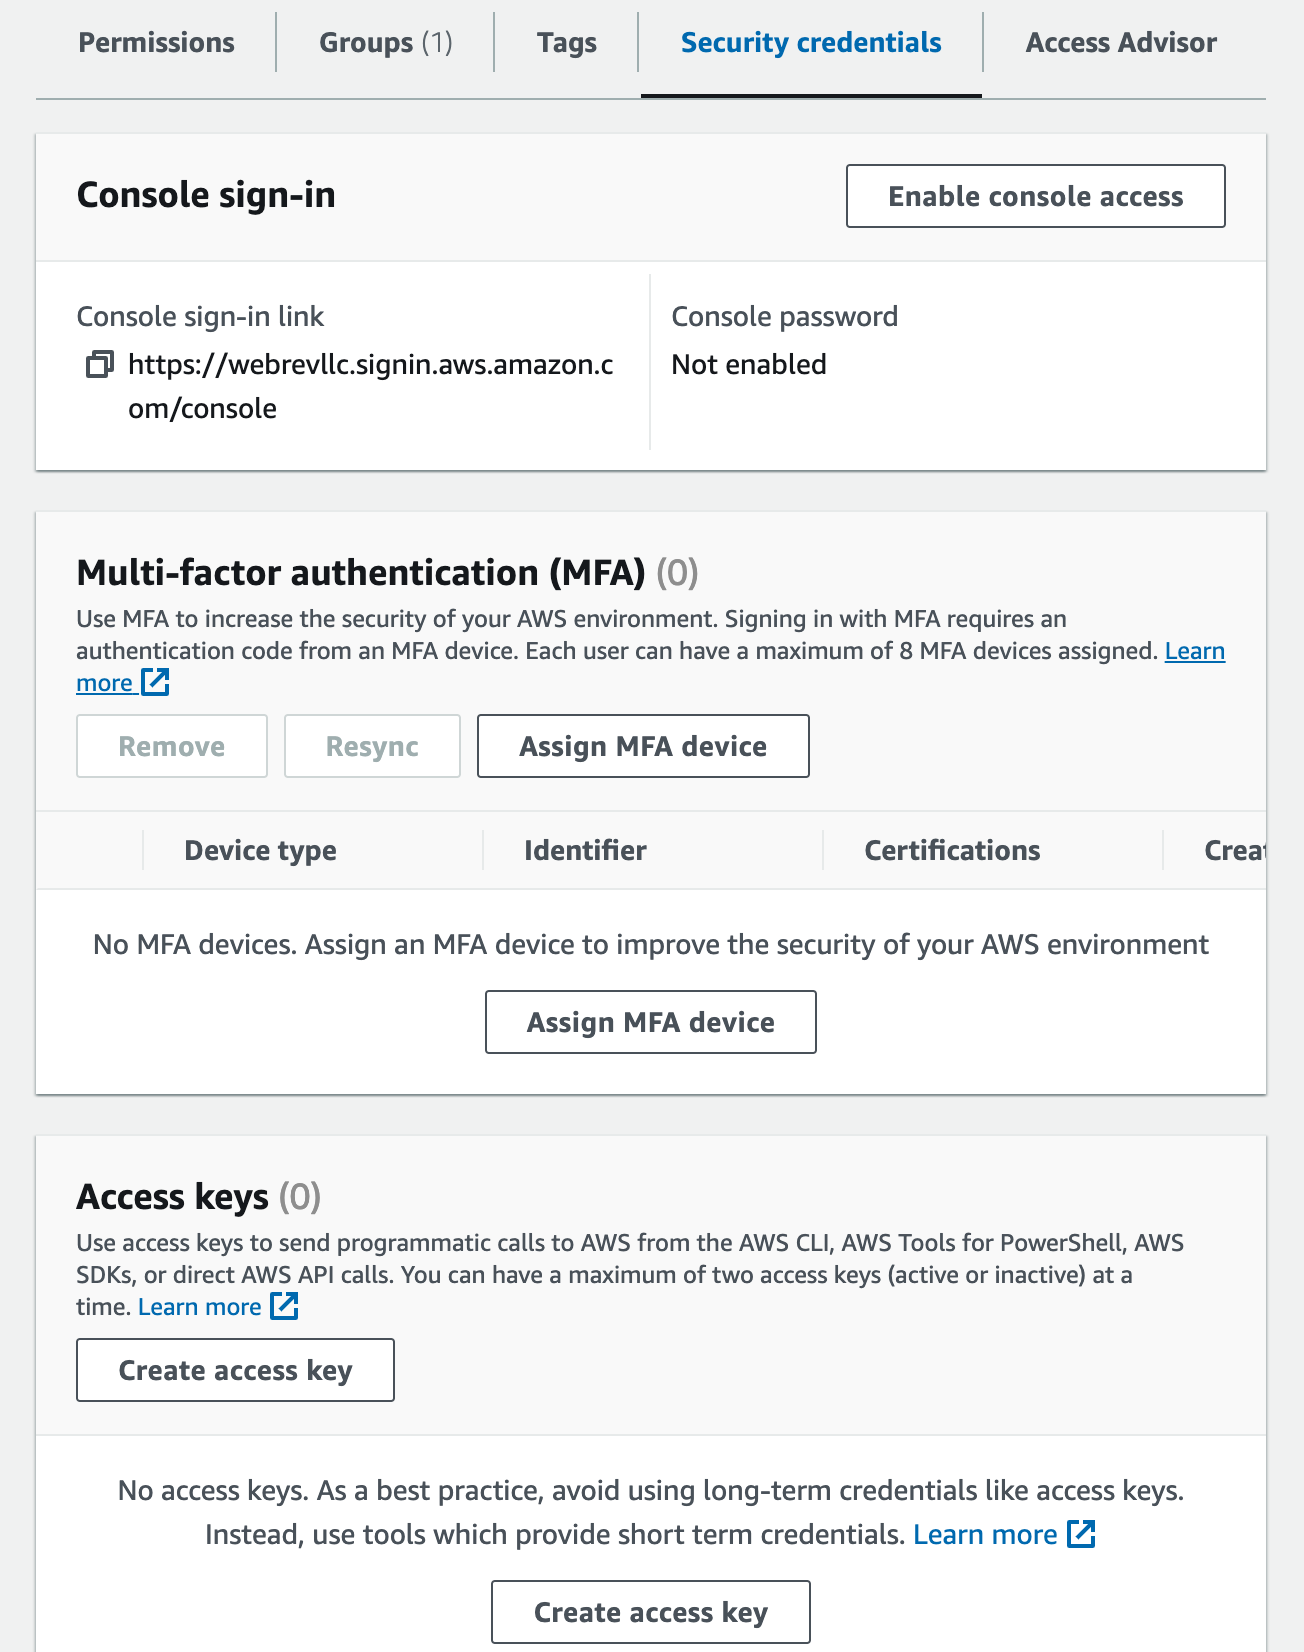

Kick The Bucket
Ok, "S3" - this is another confusing AWS name, right? S3 - simply stands for Simple Storage Service, 3 S's = S3. That is all. I am certain you have come up with worse variable names than this :D. Everything that goes into a bucket is an "Object", I will likely refer to "objects" instead of pictures, videos etc. because anything can go into a bucket. And a bucket is simply put a container for objects.
Let's roll!
Create the Bucket
- In the search bar type "s3" and select "S3".
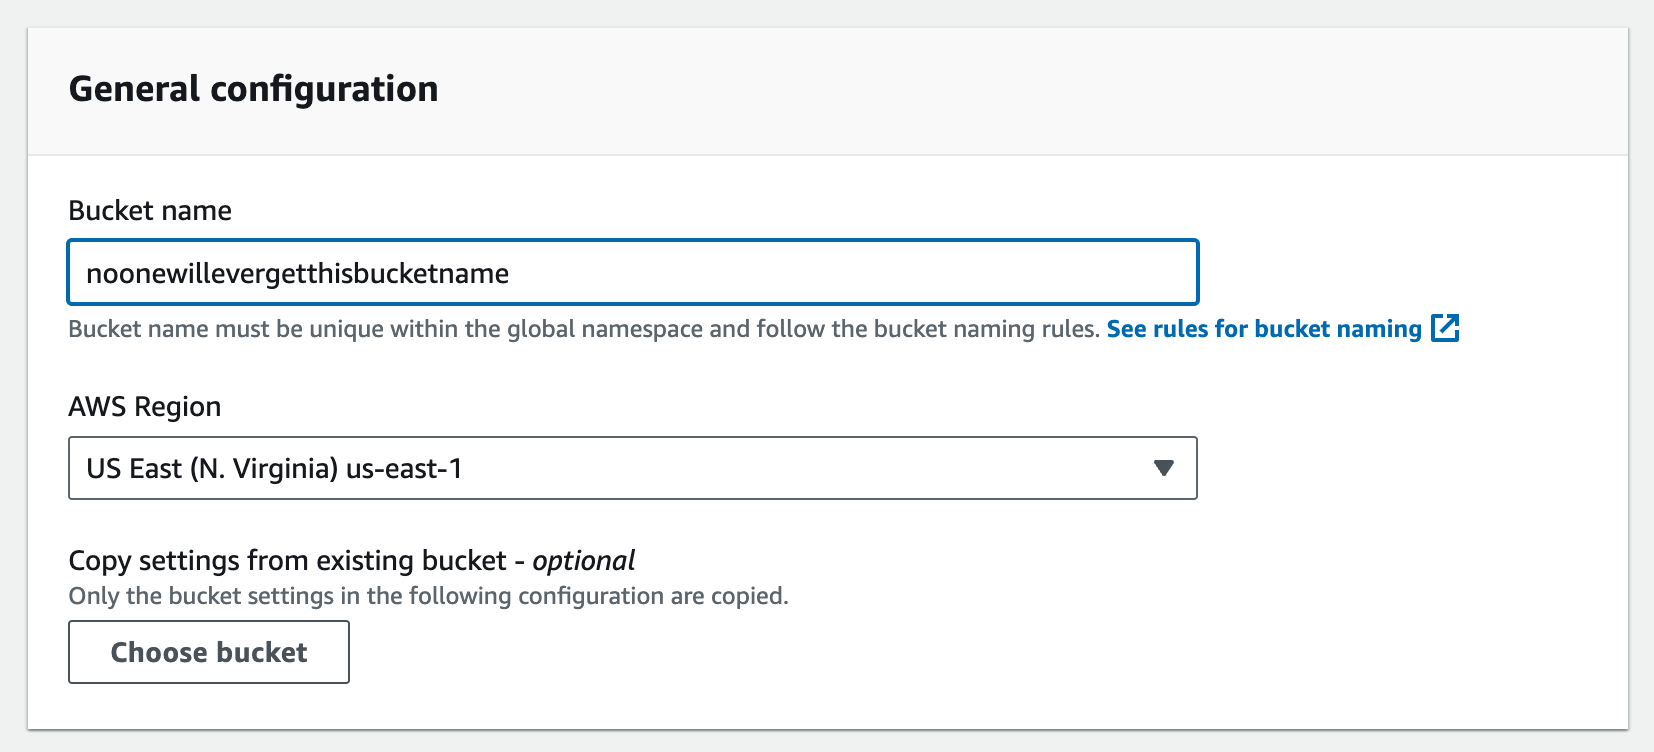
- Click the "Create bucket" button. On the next screen we are going to specify several things that you can edit later, except the bucket name.
- Additionally, be sure to take note of the "AWS Region", you will need this in your
.env.
A Note about Bucket names: Bucket names are unique per region.The `us-east-1` region is closes to where I live and the one I typically use,but so do a LOT of people. The bucket name "Laravel" for example will notbe available there because someone else created it first. Choose yourbucket name carefully.- Scroll down and check the "ACLs enabled" radio button in the "Object ownership" section.
- Select "Object writer".
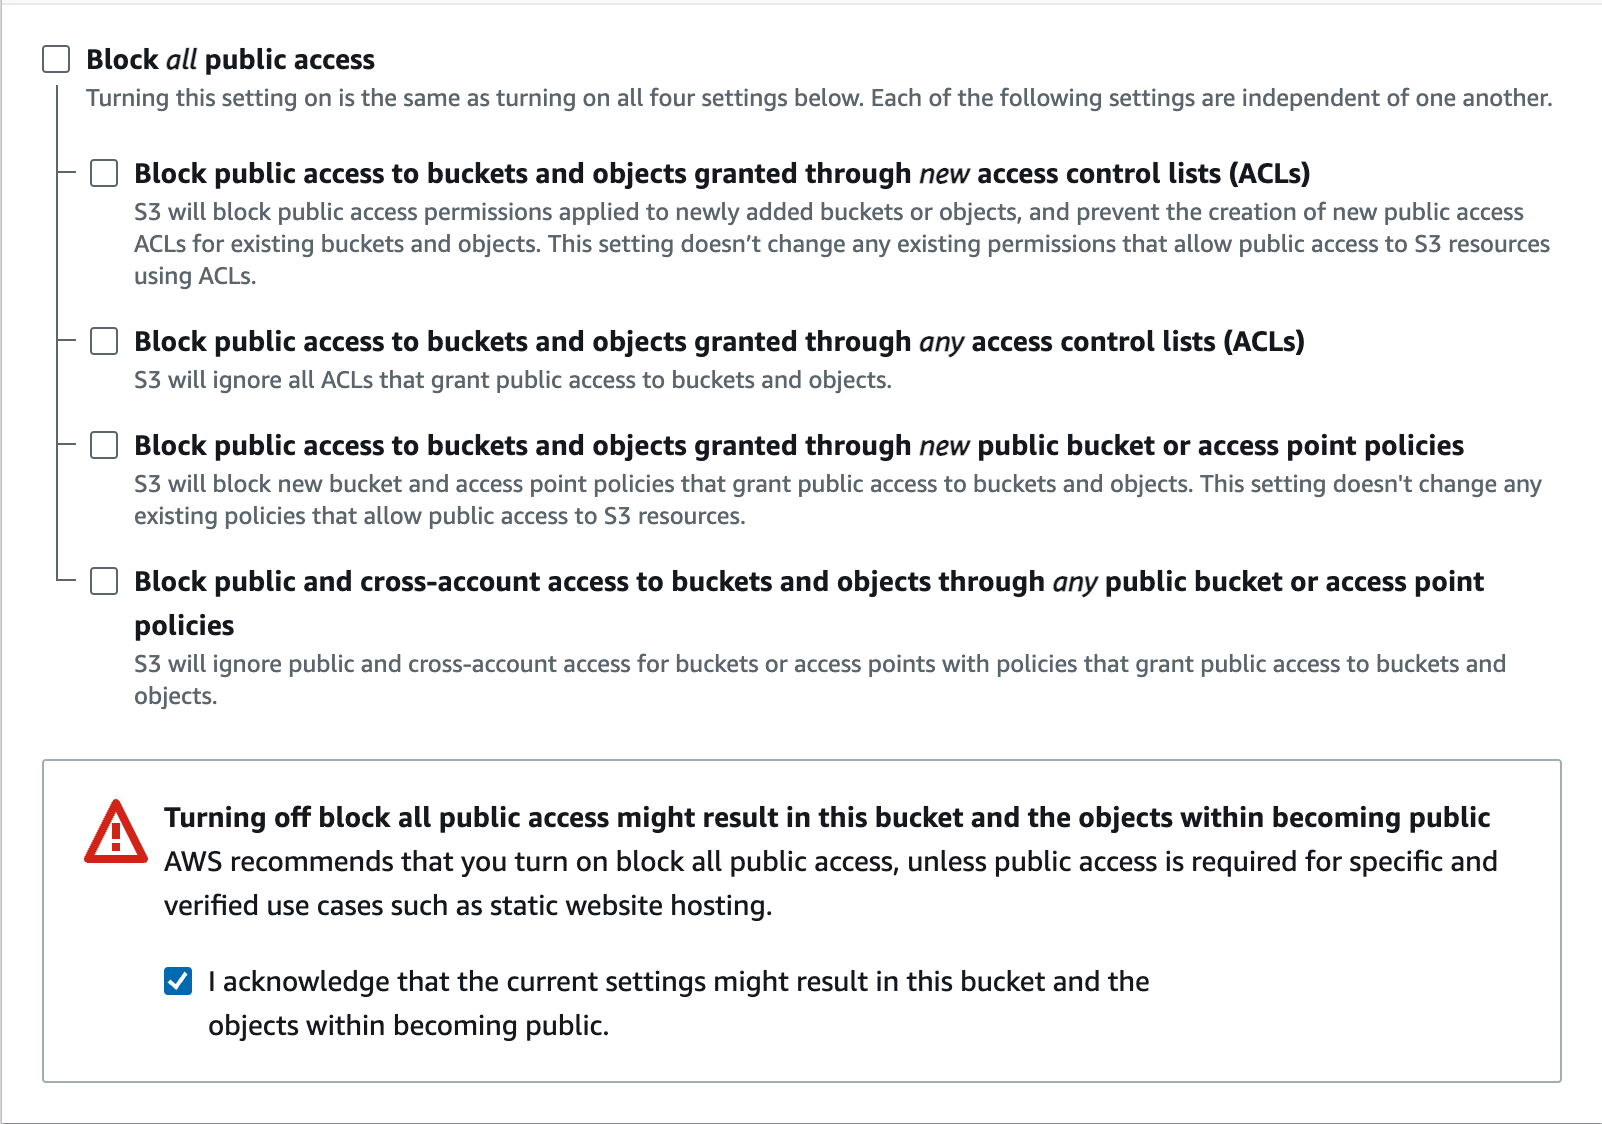
- Uncheck the "Block all public access" and check the acknowledgement.
- I will keep versioning disabled, no tags... I will leave the rest of the defaults untouched and click "Create bucket".
Update the Bucket Policies and CORS
- The next screen should be a list of your buckets, click on the one you just created.
- Click the "Permissions" tab.
- In the "Bucket policy" section click the "Edit" button, paste the following code, but make sure you update it with your bucket's name and click "Save changes".
{ "Version": "2012-10-17", "Id": "Policy1692807538499", "Statement": [ { "Sid": "Stmt1692807537432", "Effect": "Allow", "Principal": "*", "Action": "s3:*", "Resource": "arn:aws:s3:::laravelonlinebucket" } ]}- You can read more on how to control who and what has access to your bucket objects, this statement will allow any "Principal" or entity to take any action in our bucket. You can get more strict with statements like this as you learn more.
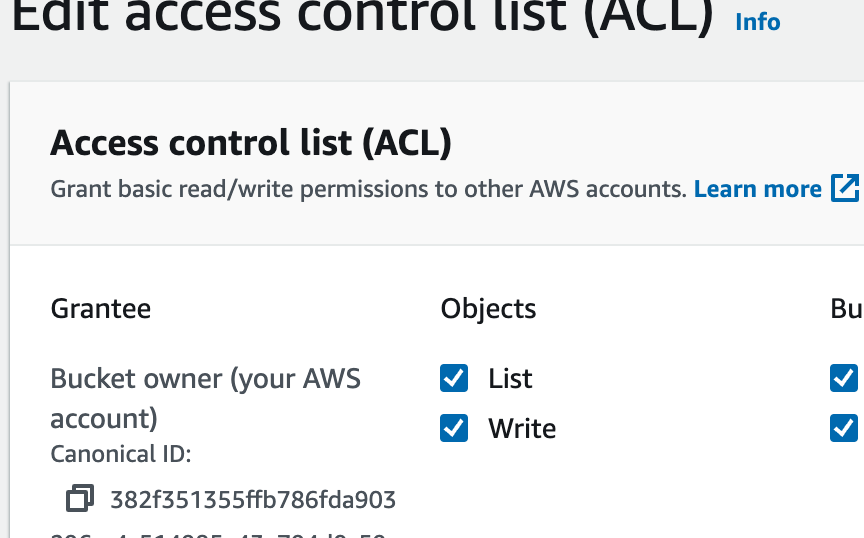
- Scroll to the "Access control list (ACL)" section and click the "Edit" button.
- Check the box for "List" and "Read" next to "Everyone (public access)" and check the acknowledgement on the bottom and click "Save changes".
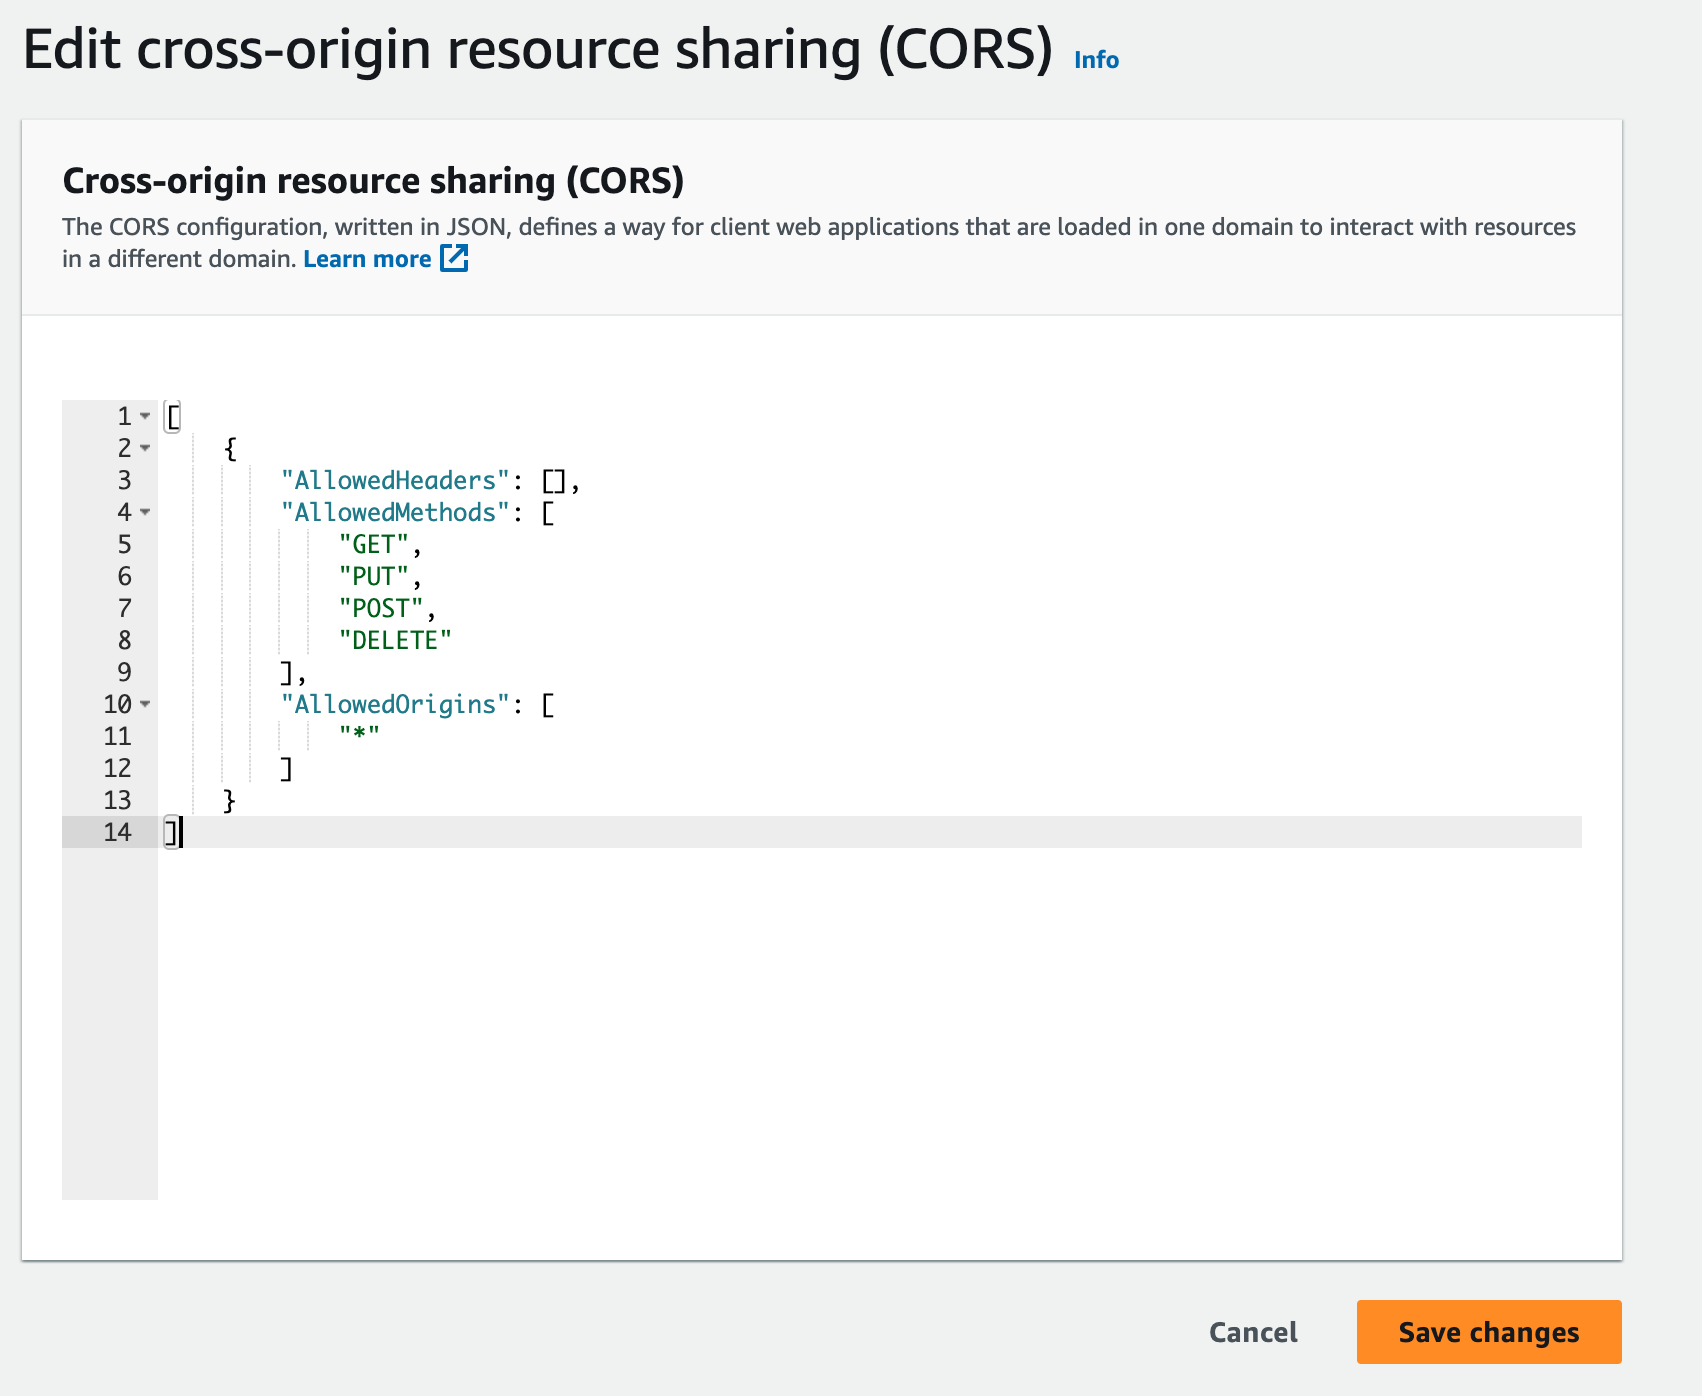
- Scroll down to the "Cross-origin resource sharing (CORS)" section, click the "Edit" button and paste in the following code:
[ { "AllowedHeaders": [], "AllowedMethods": [ "GET", "PUT", "POST", "DELETE" ], "AllowedOrigins": [ "*" ] }]- In the "AllowedOrigins" section of that json we are allowing ALL origins, that means ANY domain can access the objects in this bucket. If you want to limit that to a specific domain you can adjust it here.
- Click on the "Objects" tab. we will refresh this section once we push some objects to the bucket.
- Let's head back over to the Laravel app and update our
.envaccordingly, set your bucket name, region, url, etc. like this.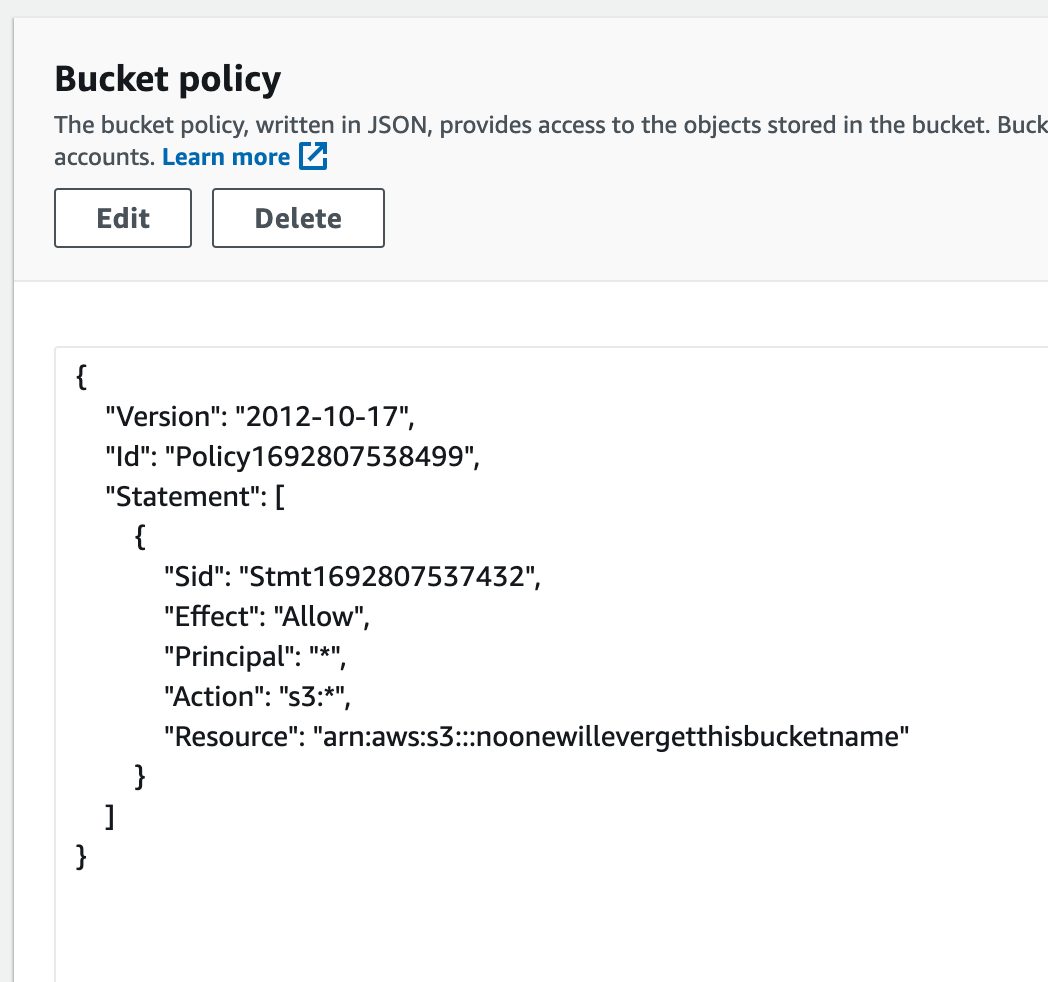
AWS_ACCESS_KEY_ID=AKIA35DMCR3BAIFEVVMPAWS_SECRET_ACCESS_KEY=YMrG4Tw6UQ0HHKU/ByvhBxuF56jKhgTJfBwHUkVRAWS_DEFAULT_REGION=us-east-1AWS_BUCKET=noonewillevergetthisbucketnameAWS_URL="https://noonewillevergetthisbucketname.s3.amazonaws.com/"AWS_USE_PATH_STYLE_ENDPOINT=trueFacade
This tutorial is NOT a Laravel Storage lesson. However, we gotta see the benefits of what we just did and test things out. I am going to do a VERY simplistic approach to pushing objects to the bucket and do it all from a web route function - YOLO!
Storage Disks
- Back in your Laravel app, head over to the
config/filesystems.phpfile. - You can use the
S3disk that is set up here already and just tweak things. However, typically my apps will post different types of files that I want organized into different directories in my bucket. For example, an "invoices" directory and a "profile-picture" directory. I will create two disks here and configure them appropriately. - Paste the following code, updating it for your use cases:
'invoices' => [ 'driver' => 's3', 'key' => env('AWS_ACCESS_KEY_ID'), 'secret' => env('AWS_SECRET_ACCESS_KEY'), 'region' => env('AWS_DEFAULT_REGION'), 'bucket' => env('AWS_BUCKET'), 'url' => env('AWS_URL'), 'endpoint' => env('PROFILE_ENDPOINT'), 'use_path_style_endpoint' => env('AWS_USE_PATH_STYLE_ENDPOINT', false), 'visibility' => 'public', 'root' => 'invoices'],,'profile-photos' => [ 'driver' => 's3', 'key' => env('AWS_ACCESS_KEY_ID'), 'secret' => env('AWS_SECRET_ACCESS_KEY'), 'region' => env('AWS_DEFAULT_REGION'), 'bucket' => env('AWS_BUCKET'), 'url' => env('AWS_URL'), 'endpoint' => env('PROFILE_ENDPOINT'), 'use_path_style_endpoint' => env('AWS_USE_PATH_STYLE_ENDPOINT', false), 'visibility' => 'public', 'root' => 'profile-photos'],- Take note of the 'root' this tells S3 which directory to put files when using each disk.
Demo Time
- I have an image stored in my
storage/appdirectory called 'hero.png' that I will be using for this demo. - The code below is getting the raw image data from my storage directory, then it is uploading it the specified disk/directory which returns the path, using the
Storageurlfunction, passing the path in, we get the full url to the image!
Route::get('buckets', function(){ $disk = 'profile-photos'; $heroImage = Storage::get('hero.png'); $uploadedPath = Storage::disk($disk)->put('hero.png', $heroImage); return Storage::disk($disk)->url($uploadedPath);});- Hitting this route in browser yields: https://noonewillevergetthisbucketname.s3.amazonaws.com/profile-photos/hero.png. Go ahead and check this awesome image I made with Midjourney
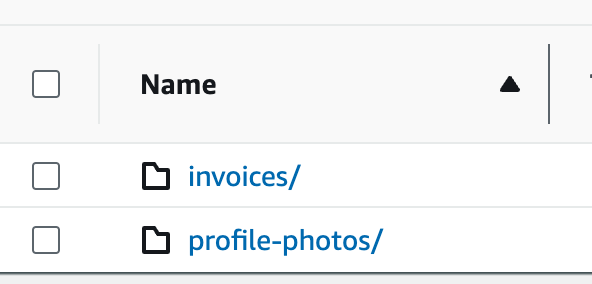
- If we go back to our bucket objects in AWS and refresh we should see the
profile-photosdirectory and thehero.pngfile inside. - If we swap out the disk in our function, refresh S3 objects again we will see a different directory is now created for our invoices.
Route::get('buckets', function(){ $disk = 'invoices'; $heroImage = Storage::get('hero.png'); $uploadedPath = Storage::disk($disk)->put('hero.png', $heroImage); return Storage::disk($disk)->url($uploadedPath);});- You can continue and carry on using all the Laravel Storage methods you know and love and take advantage of the amazing power behind AWS S3 Buckets.
Not so bad right?
So you got a taste of what you can do in AWS. One thing I like to do if I know that some of my objects need to be "highly available" in my bucket, meaning it needs to be available quickly all over the world, is leverage Cloudfront which will distribute all of the files in a bucket or a directory in a bucket to all of Amazon's servers all over the world. That way when someone in Japan requests a file it isn't making hops all the way from Virginia. Play with things, experiment, get your feet wet!
You might become a pro at this and get a raise 😉!

Hey, I’m Shane — Laravel dev turned mobile maker 📱. I’m building NativePHP for Android 💥 so you can use Laravel to craft real native apps. From C to Kotlin to PHP, I’m all-in on making native feel like home for the Laravel community ❤️.


