A Vue “wrapper” component is a technique used to integrate a 3rd party plugin with Vue by wrapping it in a custom Vue component.
The wrapper technique means that you are likely bringing in a library like jQuery and a jQuery plugin. This combination seems to be the most ubiquitous, and it’s my personal preference when I want to use a jQuery plugin inside of a Vue application.
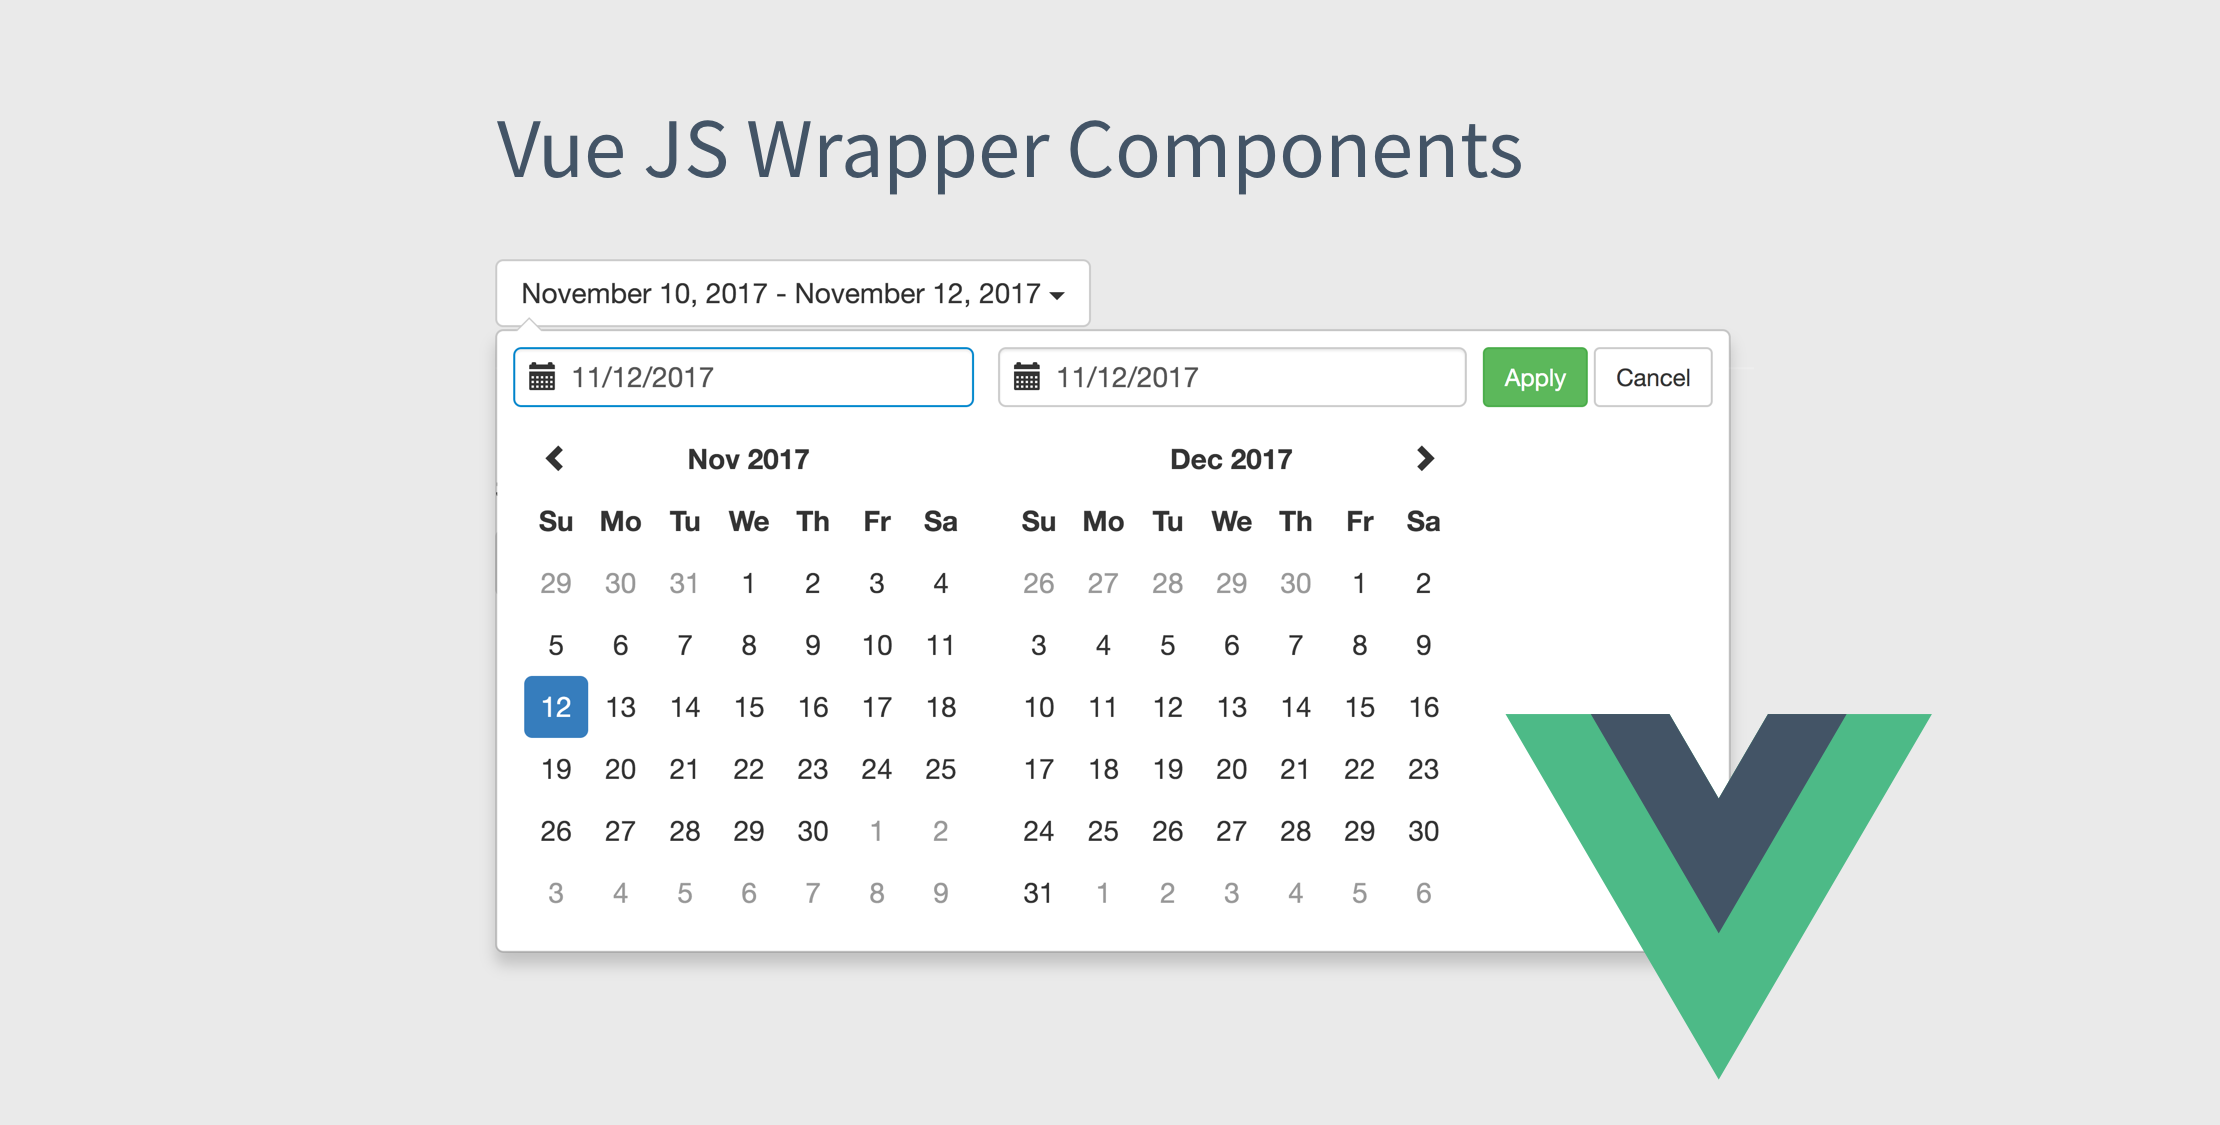
Let’s quickly cover an example of how we might build a wrapper component with a date range picker, which allows you to pick a start and an end date. For our example, we’ll use the Date Range Picker, which is a Bootstrap component that relies on jQuery and Moment.js.
In a simple example, you might use this component like so in a jQuery project:
$('input[name="daterange"]').daterangepicker();In our case, we want to make it a Vue component that we can reuse, that will look something like this:
<date-range-picker @apply="onDateChange"></date-range-picker>As you can gather from the jQuery example, the plugin expects to use a jQuery selector, so we need to replicate that in our component. To initialize the component, we could do something like the following in the Component’s mounted() lifecycle event:
mounted: function () { this.$nextTick(function () { window.$(this.$el).daterangepicker(); }}The component uses $nextTick to ensure that Vue has finished updating the DOM after data changes. As you can see, we are using the this.$el property, which is the root DOM element in the component. Unfortunately, our Vue component cannot react to the changes made.
It’s important to understand that your components shouldn’t reach outside of the component’s context. The best approach is to use the root element on the component using this.$el.
If we want to make our component react to changes made by the date range picker plugin, we need to hook up a jQuery event to respond to changes:
Vue.component('date-range-picker', { template: '#date-range-template', props: { startDate: { default: function () { return moment().subtract(30, 'days'); } }, endDate: { default: function () { return moment(); } } }, data: function () { return { start: this.startDate, end: this.endDate }; }, computed: { dateRange: function () { var start = moment(this.start); var end = moment(this.end); return start.format('LL') + ' - ' + end.format('LL'); } }, mounted: function () { var vm = this; this.start = moment(this.start); this.end = moment(this.end); this.$nextTick(function () { var options = { startDate: this.start, endDate: this.end, alwaysShowCalendars: true }; window.$(this.$el) .daterangepicker(options) .on('apply.daterangepicker', function (e, picker) { vm.$emit('apply', picker.startDate, picker.endDate); vm.start = picker.startDate; vm.end = picker.endDate; }); }); }});You can see that we’ve added a bunch of code to the component, but first look at the updated mounted() call. Now we’ve provided a on('apply.daterangepicker') event handler which emits an apply event with the start and end dates. Next, the callback sets the new start and end dates on the component instance.
We also provide some props for start and end date, with default values which set the date range over the last 30 days.
Here’s the accompanying template for the component:
<script type="text/x-template" id="date-range-template"> <div class="btn-group"> <a class="btn btn-default btn-rounded calendar-picker" data-toggle="collapse" aria-expand="true" > <span class="date-range-label">{{ dateRange }}</span> <span class="caret"></span> </a> </div></script>I’ve used a Bootstrap button group, but you could also make an additional component for a form input. In my case, I wanted the date range picker to be a button that was clickable, but the user couldn’t edit the date range via a form input.
At this point, we have a component that emits an event when the date range is updated. In the parent, we can listen to that event by defining an event attribute:
<date-range-picker @apply="onDateChange"></date-range-picker>A simple event handler example might look like the following:
var app = new Vue({ el: '#app', data: { start: null, end: null }, methods: { onDateChange: function (start, end) { this.start = start; this.end = end; } }});Let’s add some more options to the wrapper component to expose more functionality from the underlying date range plugin. Here’s a complete example:
Vue.component('date-range-picker', { template: '#date-range-template', props: { showRanges: { type: Boolean, default: false }, startDate: { default: function () { return moment().subtract(30, 'days'); } }, endDate: { default: function () { return moment(); } }, minDate: { default: false }, opens: { default: 'right' }, maxDate: { default: false }, autoApply: { default: false }, }, data: function () { return { start: this.startDate, end: this.endDate }; }, computed: { dateRange: function () { var start = moment(this.start); var end = moment(this.end); var today = moment(); if ( start.format('LL') === end.format('LL') && today.format('LL') === start.format('LL') ) { return 'Today'; } else if (start.format('MM-DD-YYYY') === end.format('MM-DD-YYYY')) { return start.format('LL'); } return start.format('LL') + ' - ' + end.format('LL'); } }, mounted: function () { var vm = this; this.start = moment(this.start); this.end = moment(this.end); this.$nextTick(function () { var options = { opens: this.opens, startDate: this.start, endDate: this.end, autoApply: this.autoApply, alwaysShowCalendars: true }; if (this.minDate) { options.minDate = this.minDate; } if (this.maxDate) { options.maxDate = this.maxDate; } if (this.showRanges) { options.ranges = { Today: [moment(), moment()], Yesterday: [ moment().subtract(1, 'days'), moment().subtract(1, 'days') ], 'Last 7 Days': [ moment().subtract(6, 'days'), moment() ], 'Last 30 Days': [ moment().subtract(30, 'days'), moment() ], 'This Month': [ moment().startOf('month'), moment().endOf('month') ], 'Last Month': [ moment().subtract(1, 'month').startOf('month'), moment().subtract(1, 'month').endOf('month') ] }; } window.$(this.$el) .daterangepicker(options) .on('apply.daterangepicker', function (e, picker) { vm.$emit('apply', picker.startDate, picker.endDate); vm.start = picker.startDate; vm.end = picker.endDate; }); }); }});We’ve added a bunch more options, although these options might not be 100% of the available options the plugin provides. I prefer to grab the options I need and add more as I need them in a project.
Based on the passed component props, you can customize the functionality and options available to the plugin, which makes this wrapper component super flexible and only exposes the options that you want to expose, allowing you to isolate or disable some options that you don’t want to support.
The dateRange computed property will now more intuitively display the date range. If the start and end date range are today, the label will output “Today.” If the date range spans only one day, it just shows one date. And by default, the UI will display the start and end date.
Here’s a more complete example of how you might use the component:
<date-range-picker @apply="onDateChange" :start-date="startDate" :end-date="endDate" :max-date="defaultEndDate" min-date="01-01-2017" opens="left"></date-range-picker>You can define a max date, the default start, and end dates, and the minimum date that can be selected. Last, you can configure which way the date range picker opens.
Learn More
Check out the complete working example (JS Bin) using ES5. You can quickly adapt the component to ES6.
In this component example, you learned how to wrap a jQuery plugin by using the root this.$el DOM element in a component to initialize a plugin when the component is mounted. You also learned how you need to hook into the plugin to emit data to a parent component.
The official Vue documentation has a Wrapper Component Example, which demonstrates using the popular Select2 jQuery plugin in a wrapper Vue component with v-model to bind a custom wrapper component.