The popularity of Laravel has improved recently as more developers have started to adopt the technology. Laravel has an easy-to-understand syntax that boosts productivity by letting the developer focus on the core features of their application and not bother with repetitive tasks like authentication and sending emails. It has a very vibrant community of users and great learning materials.
Freshly created Laravel applications are configured to use relational databases. The purpose of this tutorial is to show how to use MongoDB in a Laravel application. We will build a simple task reminder system to achieve this.
Prerequisites
The following tools and technologies are required to follow along effectively with this tutorial.
- A free MongoDB Atlas cluster
- PHP and Composer
- NPM
- Basic knowledge of the Laravel framework
- Familiarity with MongoDB and NoSQL databases
Environment setup
To work with MongoDB, we need to configure our development environment. We need to ensure that all the necessary development dependencies are installed and configured properly. Make sure you have the following installed.
- PHP and the MongoDB extension
- Composer
Project setup
To get started building our reminder system, the first thing to do is create a new Laravel project. We can do so using the composer with the command below:
composer create-project laravel/laravel LaravelMongodbProjectcd LaravelMongodbProjectInstall MongoDB Laravel package
A freshly created Laravel project when installed comes with default configurations for relational databases like MySql and PostgreSQL. MongoDB does not work in Laravel by default. We need to install the Laravel MongoDB package and also do a little configuration in config/database.php. Proceed to install the package using the command below:
composer require mongodb/laravel-mongodbConfigure database
Once the installation of the Laravel MongoDB package is completed, the next step is to add our MongoDB database connection to our config/database.php file to complete the configuration. Copy the code below and paste it in the connections array that contains configurations for other database types.
return [ 'connections' => [ 'mongodb' => [ 'driver' => 'mongodb', 'dsn' => env('MONGODB_URI'), 'database' => 'YOUR_DATABASE_NAME', ], //You can keep other existing connections ],Let's take a moment to explain. The dsn value is obtained from the .env file. In your .env file, create a value for 'MONGODB_URI and set it to the value of your MongoDB Atlas connection string, like below:
MONGODB_URI="<<MONGODB_ATLAS_CONNECTION_STRING>>"DB_CONNECTION=mongodbAuthentication with Laravel Breeze
We have installed and configured our application to work with MongoDB. Let's proceed to authentication. Laravel simplifies the implementation of authentication by providing packages like Laravel Breeze, Laravel Fortify, and Laravel Jetstream. In this tutorial, we will use Laravel Breeze for our authentication. We need to install it using Composer with the command below:
composer require laravel/breeze --devOnce the installation is complete, proceed by running the next set of commands.
php artisan key:generate php artisan breeze:installphp artisan migrate php artisan db:seednpm installnpm run devThis will prompt you to choose your preferred stack and testing package like the sample below. For the purpose of this article, we will select the first option (Blade and Alpine).
┌ Which Breeze stack would you like to install? ───────────────┐│ > ● Blade with Alpine ││ ○ Livewire (Volt Class API) with Alpine ││ ○ Livewire (Volt Functional API) with Alpine ││ ○ React with Inertia ││ ○ Vue with Inertia ││ ○ API onlyAfterward, it will add authentication views, routes, controllers, and other related resources to your application.
At this point, let's serve the project using Laravel's built-in server and confirm that everything works properly. Serve your project using the command below:
php artisan serveThe project should be served at 127.0.0.1:8000. In case the port 8000 is already in use, Laravel will switch to a new available port. If everything was done right, your screen should look like the image below
 You can log in using these credentials: email is "test@example.com" and password is "password".
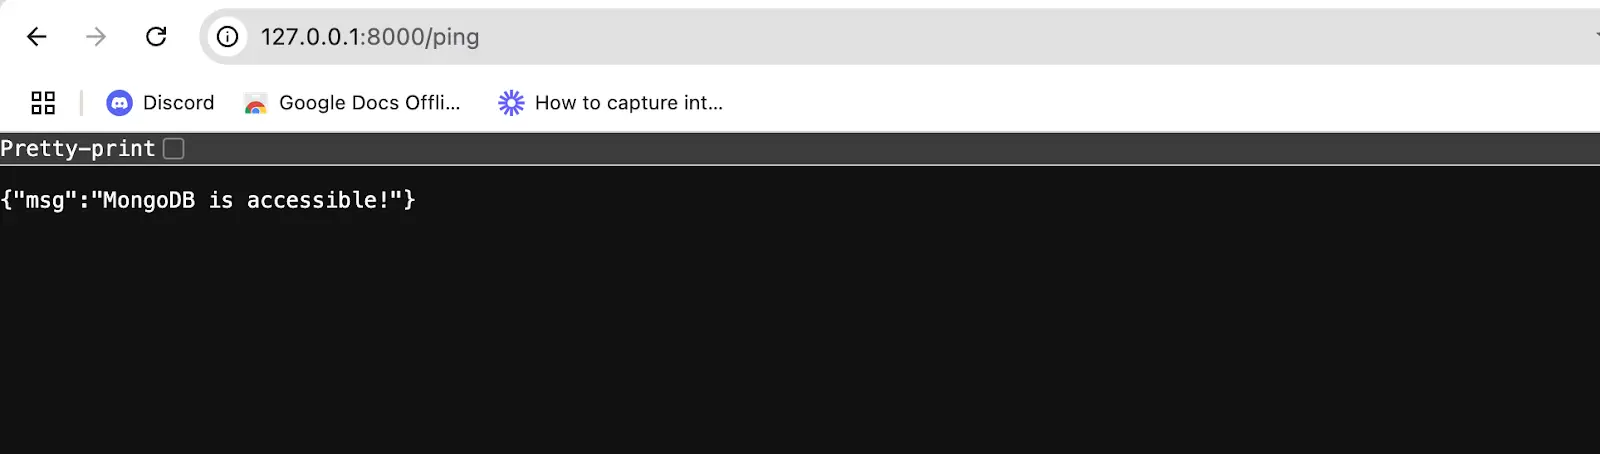
To make sure that the Laravel MongoDB package was configured properly, let's create a route to ping our MongoDB cluster. Add the following to route/web.php.
Route::get('/ping', function (Request $request) { $connection = DB::connection('mongodb'); try { $connection->command(['ping' => 1]); $msg = 'MongoDB is accessible!'; } catch (Exception $e) { $msg = 'You are not connected to MongoDB. Error: ' . $e->getMessage(); } return ['msg' => $msg];});Visit this route in your browser. Your screen should look like the image below, if everything was done right:
Creating the task reminder system
Let's create our model and controller for the task scheduling feature. Use the command below to do so:
php artisan make:model Task --resource --controllerThe command above will create the Task model in the app/Models directory and the TaskController in the app/Http/Controllers directory with resource methods.
Let's create a route for the TaskController. Navigate to routes/web.php and add the following to the file.
use App\Http\Controllers\TaskController;Route::resource('tasks', TaskController::class)->middleware('auth');Next, let's modify the content of the task model to our needs. Navigate to app/Models/Task.php and replace the content with the following:
<?phpnamespace App\Models;use MongoDB\Laravel\Eloquent\Model;class Task extends Model{ protected $connection = 'mongodb'; protected $table = 'tasks'; protected $fillable = [ 'title', 'description', 'due_date', 'email', 'reminder_time', 'last_notification_date' ];}The code above is our task model.
- The
use MongoDB\Laravel\Eloquent\Modelstatement after the namespace is specific to MongoDB models. It overrides the Eloquent features implemented with SQL, using MongoDB queries. - The
protected $table = 'tasks'is optional. It is the name of the MongoDB collection that is used to tore the documents from this model. - The
protected $fillable = ['title', 'description', 'due_date', 'email', 'reminder_time']specifies the mass assignable properties.
One of the unique features of MongoDB is that it doesn't need migrations like relational databases do. This means you can add new fields directly to your documents without having to update the model or create migrations. This is particularly helpful in handling dynamic data.
Next, let's modify our controller. Navigate to app/Http/Controllers/TaskController.php and update the content with the code below:
<?phpnamespace App\Http\Controllers;use App\Models\Task;use Carbon\Carbon;use Illuminate\Http\Request;class TaskController extends Controller{ /** * Display a listing of the resource. */ public function index() { $tasks = Task::where('email', auth()->user()->email)->get(); return view('tasks.index', compact('tasks')); } /** * Show the form for creating a new resource. */ public function create() { return view('tasks.create'); } /** * Store a newly created resource in storage. */ public function store(Request $request) { $request->validate([ 'title' => 'required|string|max:255', 'description' => 'nullable|string', 'due_date' => 'required|date', 'reminder_time' => 'required|date', ]); $data = $request->all(); $data['due_date'] = Carbon::parse($request->due_date); $data['reminder_time'] = Carbon::parse($request->reminder_time); $data['email'] = auth()->user()->email; $data['last_notification_date'] = null; Task::create($data); return redirect()->route('tasks.index')->with('success', 'Task created successfully.'); } /** * Display the specified resource. */ public function show(string $id) { // } /** * Show the form for editing the specified resource. */ public function edit(string $id) { $tasks = Task::where('id', $id)->get(); return view('tasks.edit', ['tasks' => $tasks]); } /** * Update the specified resource in storage. */ public function update(Request $request, string $id) { $task = Task::findOrFail($id); $data = $request->all(); $data['due_date'] = Carbon::parse($request->due_date)->format('Y-m-d H:i:s'); $data['reminder_time'] = Carbon::parse($request->reminder_time)->format('Y-m-d H:i:s'); $task->update($data); return redirect()->route('tasks.index')->with('success', 'Task updated successfully.'); } /** * Remove the specified resource from storage. */ public function destroy(string $id) { $task = Task::findOrFail($id); $task->delete(); Return redirect()->route('tasks.index')->with('success', 'Task deleted successfully.'); }}Our newly created TaskController above contains code that handles the CRUD operations of our task model. The index method retrieves all tasks belonging to the logged-in user and sends them to the index.blade.php file to be displayed on the front end.
The create method returns the form view for creating a new task, while the store method validates the input, assigns the logged-in user's email to the task, and saves it to the database.
For updates, the edit method retrieves the specific task to be edited and displays it in an edit form. When this form is submitted, it calls the update method which saves the edited task in our MongoDB task collection.
The destroy method deletes a specific task. Each operation redirects back to the task's list with a success message for user feedback.
Let's create view files for our task scheduler. In the resources/views directory, create a folder named /tasks and create the following files in it:
- create.blade.php
- edit.blade.php
- index.blade.php
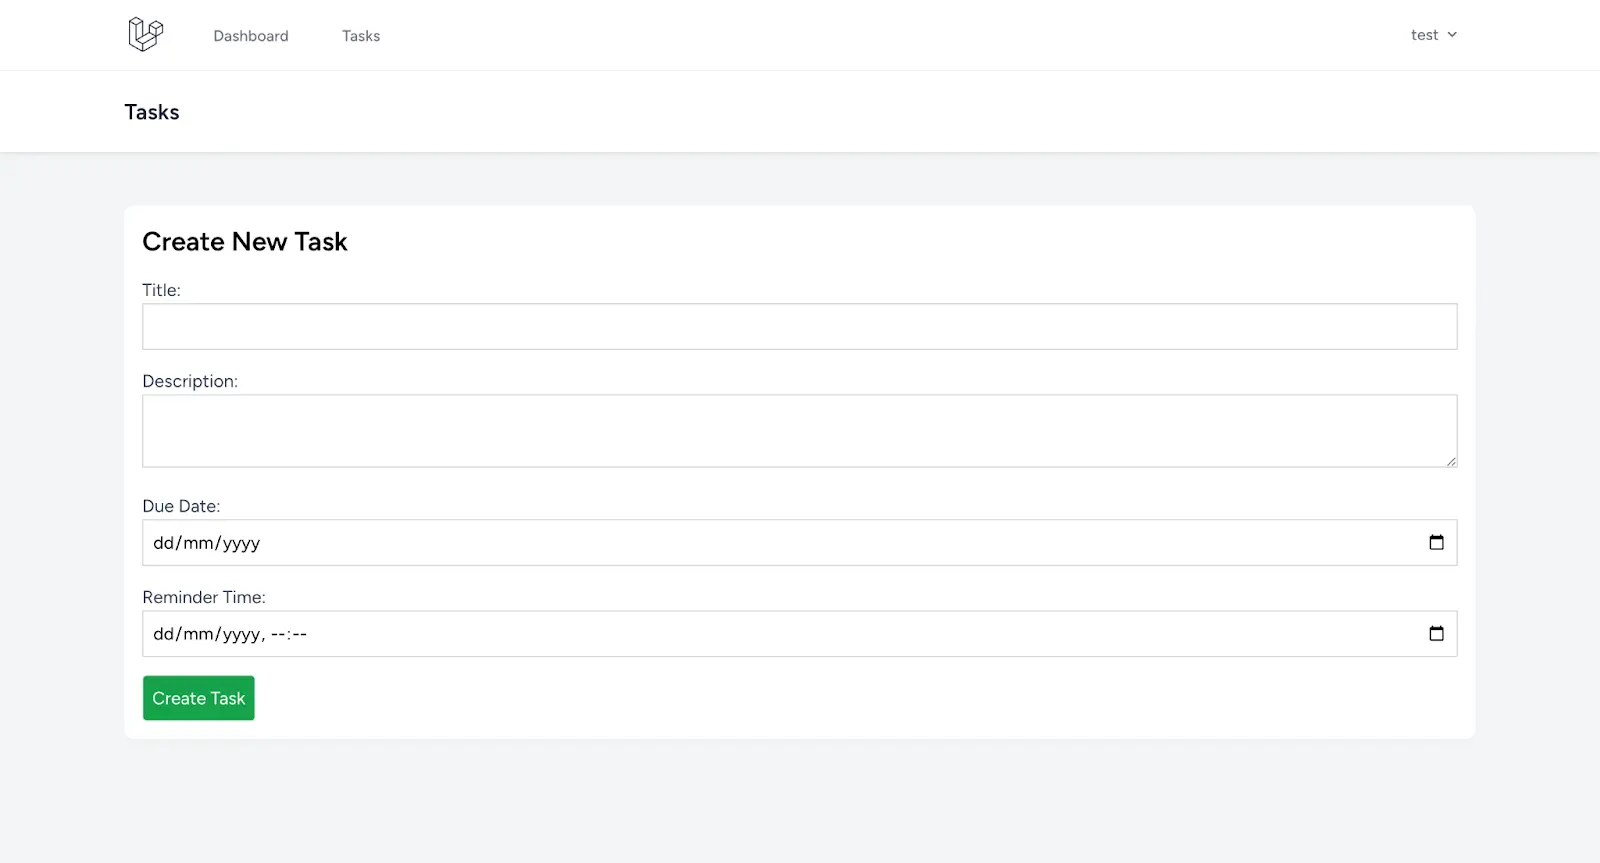
Navigate to resources/views/create.blade.php and replace the content of the page with the following:
<x-app-layout> <x-slot name="header"> <h2 class="font-semibold text-xl text-gray-800 leading-tight"> {{ __('Tasks') }} </h2> </x-slot> <div class="py-12"> <div class="max-w-7xl mx-auto sm:px-6 lg:px-8"> <div class="bg-white overflow-hidden shadow-sm sm:rounded-lg"> <div class="container mx-auto p-4"> <h2 class="text-2xl font-bold mb-4">Create New Task</h2> <form action="{{ route('tasks.store') }}" method="POST"> @csrf <div class="mb-4"> <label for="title" class="block text-gray-700">Title:</label> <input type="text" name="title" id="title" required class="border border-gray-300 p-2 w-full" value="{{ old('title') }}"> @error('title') <p class="text-red-500">{{ $message }}</p> @enderror </div> <div class="mb-4"> <label for="description" class="block text-gray-700">Description:</label> <textarea name="description" id="description" class="border border-gray-300 p-2 w-full">{{ old('description') }}</textarea> </div> <div class="mb-4"> <label for="due_date" class="block text-gray-700">Due Date:</label> <input type="date" name="due_date" id="due_date" required class="border border-gray-300 p-2 w-full" value="{{ old('due_date') }}"> @error('due_date') <p class="text-red-500">{{ $message }}</p> @enderror </div> <div class="mb-4"> <label for="reminder_time" class="block text-gray-700">Reminder Time:</label> <input type="datetime-local" name="reminder_time" id="reminder_time" class="border border-gray-300 p-2 w-full" value="{{ old('reminder_time') }}"> </div> <button type="submit" class="bg-green-600 text-white text-gray-399 p-2 border rounded">Create Task</button> </form> </div> </div> </div> </div></x-app-layout>In the code above, we added HTML for the create form. The form contains text input for title and description and date and time input for due date and reminder time. If your code is right, your screen should look like the image below.
 Do the same for edit.blade.php. Navigate to resources/views/edit.blade.php and add the code below to the content of the page:
<x-app-layout> <x-slot name="header"> <h2 class="font-semibold text-xl text-gray-800 leading-tight"> {{ __('Edit Task') }} </h2> </x-slot> <div class="py-12"> <div class="max-w-7xl mx-auto sm:px-6 lg:px-8"> <div class="bg-white overflow-hidden shadow-sm sm:rounded-lg"> <div class="p-6 text-gray-900"> @foreach($tasks as $task) <form action="{{ route('tasks.update', $task->id) }}" method="POST"> @csrf @method('PUT') <div class="mb-4"> <label for="title" class="block text-gray-700">Title:</label> <input type="text" name="title" id="title" required class="border border-gray-300 p-2 w-full" value="{{ old('title', $task->title) }}"> @error('title') <p class="text-red-500">{{ $message }}</p> @enderror </div> <div class="mb-4"> <label for="description" class="block text-gray-700">Description:</label> <textarea name="description" id="description" class="border border-gray-300 p-2 w-full">{{ old('description', $task->description) }}</textarea> </div> <div class="mb-4"> <label for="due_date" class="block text-gray-700">Due Date:</label> <input type="date" name="due_date" id="due_date" required class="border border-gray-300 p-2 w-full" value="{{ old('due_date', $task->due_date) }}"> @error('due_date') <p class="text-red-500">{{ $message }}</p> @enderror </div> <div class="mb-4"> <label for="reminder_time" class="block text-gray-700">Reminder Time:</label> <input type="datetime-local" name="reminder_time" id="reminder_time" class="border border-gray-300 p-2 w-full" value="{{ old('reminder_time', $task->reminder_time) }}"> </div> <button type="submit" class="bg-blue-500 text-white p-2 rounded">Update Task</button> </form> @endforeach </div> </div> </div> </div></x-app-layout>The edit contains the same input fields as the create form above. It is loaded with the data of the task currently being edited.
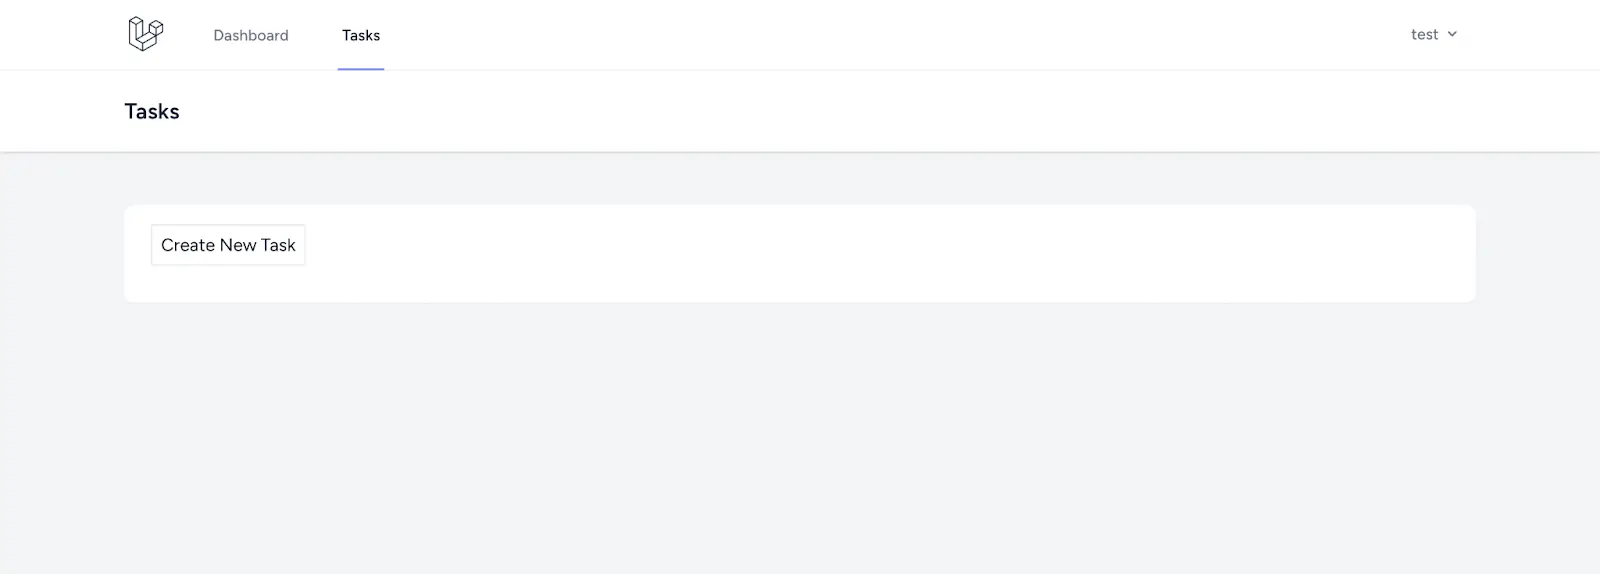
Lastly, navigate to resources/views/index.blade.php and replace the content with the code below:
<x-app-layout> <x-slot name="header"> <h2 class="font-semibold text-xl text-gray-800 leading-tight"> {{ __('Tasks') }} </h2> </x-slot> <div class="py-12"> <div class="max-w-7xl mx-auto sm:px-6 lg:px-8"> <div class="bg-white overflow-hidden shadow-sm sm:rounded-lg"> <div class="p-6 text-gray-900"> <div class="mb-2"> <a href="{{ route('tasks.create') }}" class="p-2 border mb-4">Create New Task</a> </div> <ul class="mt-4"> @foreach ($tasks as $task) <div class="mt-2"> <hr> </div> <li> <h1 class="text-2xl"> <strong>{{ $task->title }}</strong> - Due: {{ $task->due_date }} </h1> <p class="text-gray-600"> {{ $task->description }} </p> <div class="flex gap-2 mt-4"> <div class="p-2 text-white bg-gray-700"> <a href="{{ route('tasks.edit', $task->id) }}">Edit</a> </div> <div class="p-2 text-white bg-red-700 rounded"> <form action="{{ route('tasks.destroy', $task->id) }}" method="POST" style="display:inline;"> @csrf @method('DELETE') <button type="submit">Delete</button> </form> </div> </div> </li> @endforeach </ul> </div> </div> </div> </div></x-app-layout>In the code above, we have a link to the create form. It also loops through all the reminders and displays those belonging to this user.
Add route
Next, we need to add a link to the task feature from our application navigation. Open resouces/views/layouts/navigation.blade.php and add the following line of code just after the dashboard navigation link.
//...existing code ...<div class="hidden space-x-8 sm:-my-px sm:ms-10 sm:flex"> <x-nav-link :href="route('tasks.index')":active="request()->routeIs('tasks.index')"> {{ __('Tasks') }} </x-nav-link></div>At this point, we should be able to test the CRUD operation of our task management system. Ensure that everything works correctly before moving on to the next section.
Setting reminders using Laravel task scheduling
Let's proceed to implementing the reminder system for due tasks. To do this we will:
- Create a custom artisan command to send reminders through email.
- Register the command for automatic scheduling. Let's create a custom artisan command using the command below:
php artisan make:command SendTaskRemindersOnce the command is completed, update the content of app/Console/Commands/SendTaskReminders.php with the code below:
<?php namespace App\Console\Commands; use App\Models\Task;use Carbon\Carbon;use Illuminate\Console\Command;use Illuminate\Support\Facades\Mail; class SendTaskReminders extends Command{ /** * The name and signature of the console command. * * @var string */ protected $signature = 'app:send-task-reminders'; /** * The console command description. * * @var string */ protected $description = 'Command description'; /** * Execute the console command. */ public function handle() { $now = Carbon::now(); $upcomingTasks = Task::where('last_notification_date', null)->get(); $upcomingTasks = Task::where('last_notification_date', null) ->where('reminder_time', '>=', $now->clone()->subMinutes(10)) ->get(); foreach ($upcomingTasks as $task) { $emailBody = <<<EOF Hello, This is a reminder for your task: Title: {$task->title} Description: {$task->description} Due Date: {$task->due_date} Please make sure to complete it on time! Regards, Your Task Reminder App EOF; Mail::raw($emailBody, function ($message) use ($task) { $message->to($task->email) ->subject("Task Reminder: {$task->title}"); }); $task->last_notification_date = $now; $task->save(); $this->info("Reminder email sent for task: {$task->title}"); } return self::SUCCESS; }}The main logic of our custom artisan command is written in the handle() method. From the code above, we get the current timestamp using Carbon::now().
Next, we query the database to get all the tasks where reminder_time is less than or equal to the current time (the value of $now) and where reminder_time is greater than or equal to 10 minutes before the time, with this line of code: 'reminder_time','>=',$now->clone()->subMinutes(10). In MongoDB, all dates are stored in UTC. Even if your server uses a different timezone, you don't need to change it.
To throw more light, let's assume that the current time is $now = 2024-10-22 15:00:00. The task reminder query fetches all tasks between 2024-10-22 14:50:00 and 2024-10-22 15:00:00. We fetch all tasks that are due in 10 minutes.
Then, we loop through the result and send reminders to the user emails of tasks that will be due in the next 10 minutes.
For the task scheduler to work properly, you must configure your application to send emails.
Mailtrap.io is a great tool for testing email sending. Get a detailed explanation of how to configure your application to send emails using Mailtrap.
Scheduling notifications for task reminders
To wrap it all up, we need to schedule the artisan command created above to run every minute. Think of this as a way to automatically run php artisan app:send-task-reminders every minute.
There are different approaches to scheduling a task in Laravel. In this tutorial, we are working with Laravel version 11.9, which is the most recent version at the time of this writing. To proceed, navigate to routes/console.php and add the following:
//...existing code ...Schedule::command('app:send-task-reminders')->everyMinute();To test that this works, run the command below:
php artisan schedule:runOn a production server, you will need to configure a cron job to run the php artisan schedule:run command at regular intervals.
In a Linux- or Unix-based server, you can open your cron configuration file using the command below:
crontab -eAdd the code below into the cron configuration tab:
* * * * * /usr/bin/php /path-to-your-project/artisan schedule:run >> /dev/null 2>&1For this to work properly, replace /usr/bin/php with the path to your PHP binary and /path-to-your-project with the full path to your Laravel project on your server, then save and exit.
You can verify that everything works fine by typing this command below:
crontab -lConclusion
We have come to the end of this tutorial; great job if you followed along. Now, for a recap, in this tutorial, we walked through the process of creating a task scheduler in Laravel and MongoDB. Some of the key implementations were:
- Configuring a Laravel project to work with MongoDB.
- Implementing CRUD features for our tasks scheduler.
- Creating a custom Laravel artisan command for our reminder system.
- Scheduling a task to run the artisan command in intervals.
- Walking through the steps to configure the cron job on a Linux-based server.
Find the project on GitHub. Feel free to clone it, sign up for MongoDB Atlas, and customize it to your specific needs. For more support, join the MongoDB Developer Community.

Software Engineer, Technical writer , PHP, Laravel, Livewire, TailwindCSS & VueJS. Laravel developer and founder at codecontent.pro