Media Library Pro: Vue, React and Blade components to handle uploads (sponsor)
Published on by Freek Van der Herten
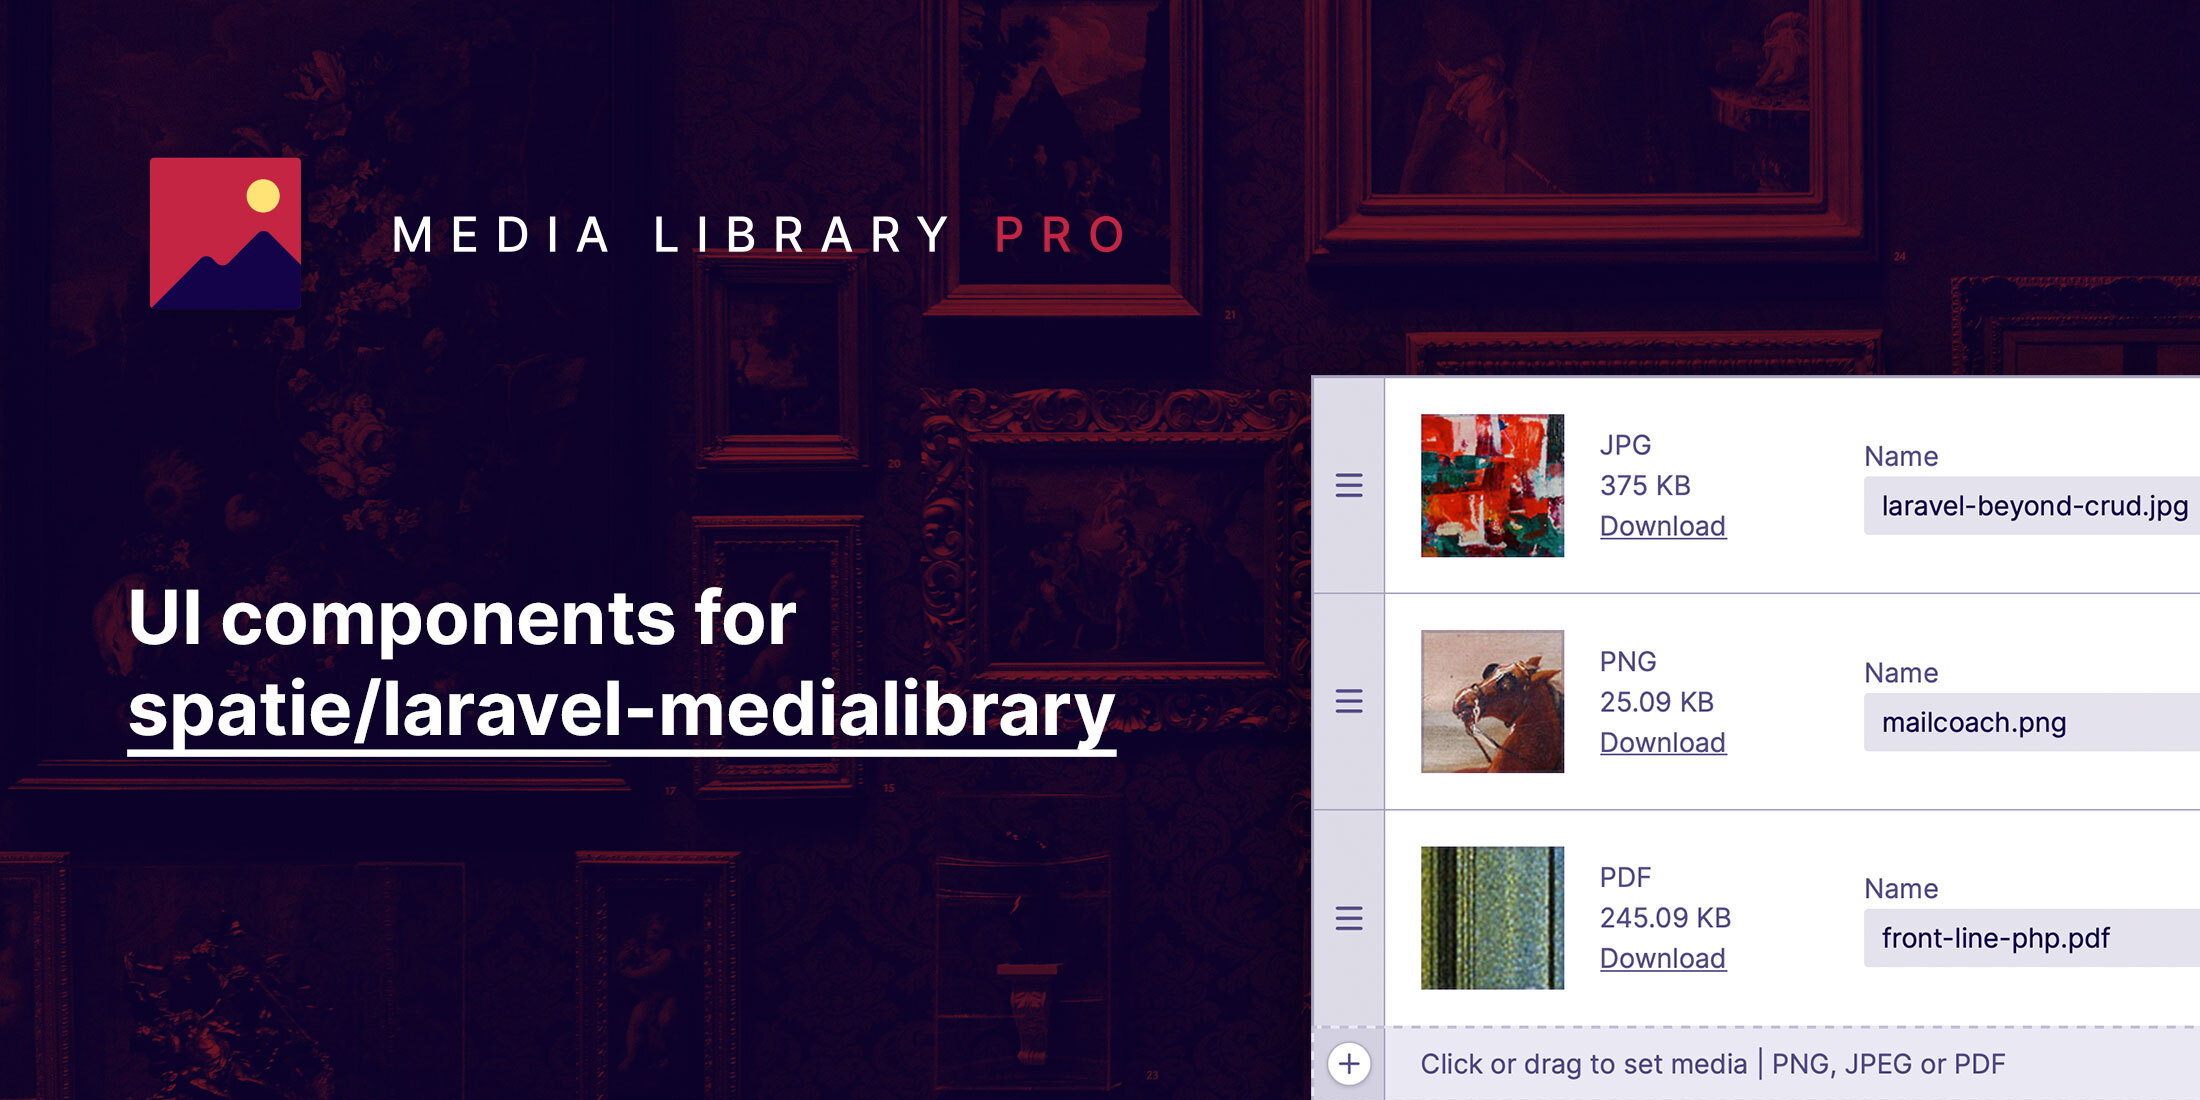
I’m proud to announce that Media Library Pro is now available. Media Library Pro is an add-on package for our free Media Library base package. It contains a set of Blade, Vue and React components that make it easy to upload files to media library and to manage files inside of a media library collection.
In this blog post, I’d like to introduce Media Library Pro to you.
Getting to know Laravel Media Library
Before getting into the Pro components, let’s first get you up to speed with what the free version of Media Library can do for you. If you’re already familiar with the free version of Media Library, you can skip this section.
Shortly said, Media Library can associate files with Eloquent models. You can, for instance, associate images with a blog post model.
$blogPost ->addMedia($pathToFile) ->toMediaCollection('images');In your Blade view, you can retrieve URLs to the associated images.
@foreach($blogPost->getMedia('images') as $mediaItem) <img src="{{ $mediaItem->getUrl() }}" alt="my image" />@endforeachMedia Library can also generate all sorts of conversions. Using the blog post example, you probably don’t want to display the original image in a list of blog posts. It’s more likely that you want to show a smaller version of the image, a thumbnail, on such a list.
You can let Media Library generate converted images by defining a conversion on the model. Here’s a conversion that could be put in the BlogPost model.
// somehwere in the BlogPost model public function registerMediaConversions(Media $media = null): void{ $this->addMediaConversion('thumb') ->width(300) ->height(300) ->sharpen(10);}With that in place, Media Library will generate a thumbnail that fits in a 300×300 square. The image is also sharpened a bit, so it looks crispy. Of course, that thumbnail will be much smaller than the original image. You can get to the URL of a conversion simply by using the conversion’s name as an argument to getUrl.
@foreach($blogPost->getMedia('images') as $mediaItem) <img src="{{ $mediaItem->getUrl('thumb') }}" alt="my thumbnail" />@endforeachIn the example above, we’ve defined a single thumb conversion, but you can add as many conversion to a model as you like.
The Media Library can do a whole lot more. It can handle multiple collections, work with multiple filesytems, create zips on the fly to download multiple files, use a customized directory structure, save bandwidth using responsive images and much more.
In these two videos, I show you the basics of Laravel Media Library.
Want to see more videos like this? Check out our free video course on how to use Laravel Media Library.
The problem with traditional uploads
Before exploring Media Library Pro, let’s first explained why we built it in the first place. Here’s how a traditional upload form might look like. It uses a regular input of type file.
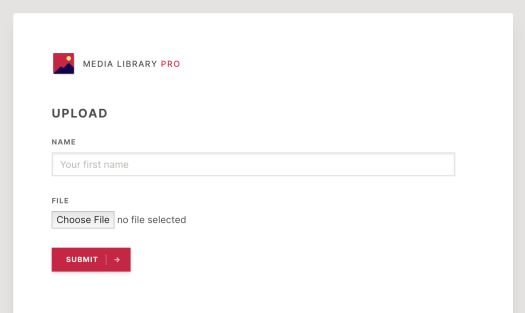
Here’s the Blade view that renders that form. It was taken from this demo application
<form method="POST" enctype="multipart/form-data"> <x-grid> @csrf <x-field label="name"> <x-input id="name" name="name" placeholder="Your first name" /> </x-field> <x-field label="file"> <input type="file" name="file"> @error('file') {{ $message }} @enderror </x-field> <x-button dusk="submit">Submit</x-button> </x-grid></form>There are two big problems with this standard upload element.
First, the upload process only starts when the form is submitted. For small files in small forms, this might not be a problem. But imagine you’re uploading a multi MB file in a form. When submitting the form, you now have to wait for the upload to complete before seeing the submission results.
The second problem is something that has bothered me for a long, long time. Imagine that the input field is part of a form of which some fields are required. You’re selecting a file, submitting the form, leaving some of the required fields empty. You get redirected back to the form where error messages are now displayed. Your previous file selection is gone, and you need to select the file again. Over the years, I’ve said many curse words when this happened to me.
I’m also pretty sure that, as a developer, you probably lost time debugging uploads because you forgot to add enctype="multipart/form-data" to the form.
In this video, you’ll see a demo of all these problems.
Let’s look at how all of these problems are solved in Media Library Pro.
Introducing Media Library Pro
Media Library Pro is a paid add-on package that offers Blade, Vue, and React components to upload files to your application. It ships with two components. The first one is the attachment component. It is meant to be used on a public-facing page where you want users to upload one or multiple files.
The second one is called the collection component. This one can manage the files in an existing collection. It is meant to be used in the admin part of your app.
Both of these components are available as Vue, React and Blade components. Under the hood, the Blade components are powered by Caleb’s excellent Livewire package.
These components are straightforward to install and are documented in great detail.
Let’s take a look at both the Attachment and Collection component. In the remainder of the blog post, I’ll use the Blade version of the examples, but rest assured that everything shown can also be done with the Vue and React counterparts.
The Attachment component
If you want to see a quick demo of the attachment component, check out this video.
You can find the code used in that video in this repo on GitHub. All further code examples are taken from that app.
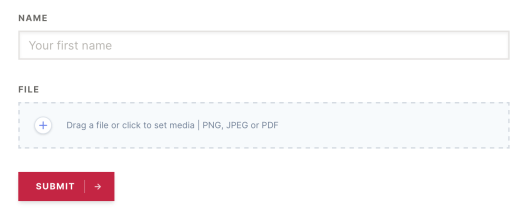
To get started with the Attachment Blade component you’ll have to use x-media-library-attachment in your view.
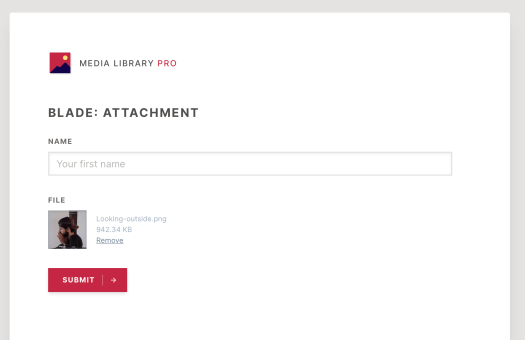
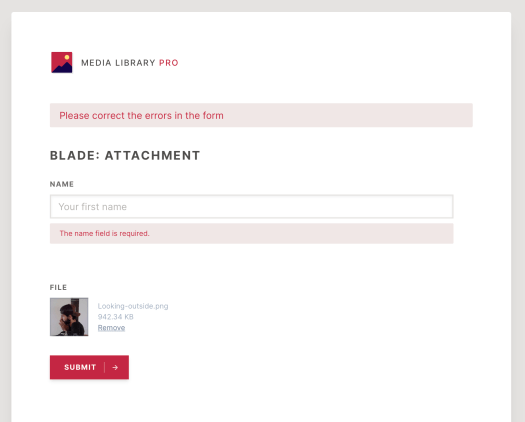
<form method="POST"> @csrf <input id="name" name="name"> <x-media-library-attachment name="avatar"/> <button type="submit">Submit</button></form>Here’s how it looks like after we’ve selected a file but before submitting the form.
The x-media-library-attachment has taken care of the upload. The file is now stored as a temporary upload. In case there are validation errors when
submitting the form, the x-media-library-attachment will display the temporary upload when you get redirected back to
the form. There’s no need for the user to upload the file again.
Here’s the form request used to validate the uploaded.
namespace App\Http\Requests\Blade; use Illuminate\Foundation\Http\FormRequest;use Spatie\MediaLibraryPro\Rules\Concerns\ValidatesMedia; class StoreBladeAttachmentRequest extends FormRequest{ use ValidatesMedia; public function rules() { return [ 'name' => 'required', 'media' => ['required', $this->validateSingleMedia() ->maxItemSizeInKb(3000), ], ]; }}By applying the ValidatesMedia trait, you get access to the validateSingleMedia, which allows you to validate the upload. You can chain on many validation methods, which are documented here.
In your controller, you can associate the upload file to any model you’d like.
$formSubmission ->addFromMediaLibraryRequest($request->media) ->toMediaCollection('images');And that is all you need to do!
The attachment component can be used to handle multiple uploads as well. In this video, you’ll see how that is done.
The Collection component
You can manage the entire contents of a media library collection with x-media-library-collection component. This
component is intended to use in admin sections.
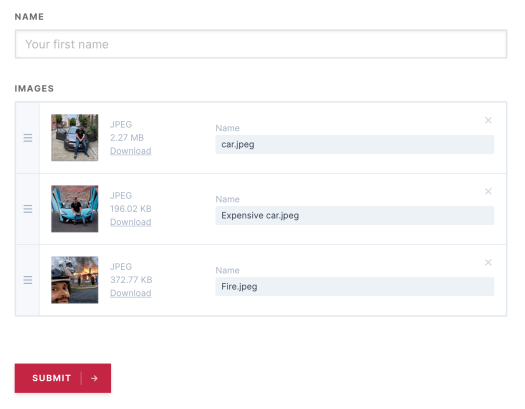
Here is an example where we will administer an images collection of a $formSubmission model.
<form method="POST"> @csrf <x-field label="name"> <x-input id="name" name="name" autocomplete="off" placeholder="Your name" value="{{ old('name', $formSubmission->name) }}"/> </x-field> <x-field label="Images"> <x-media-library-collection name="images" :model="$formSubmission" collection="images" max-items="3" rules="mimes:png,jpeg" /> </x-field> <x-button dusk="submit" type="submit">Submit</x-button></form>Here’s how that component looks like:
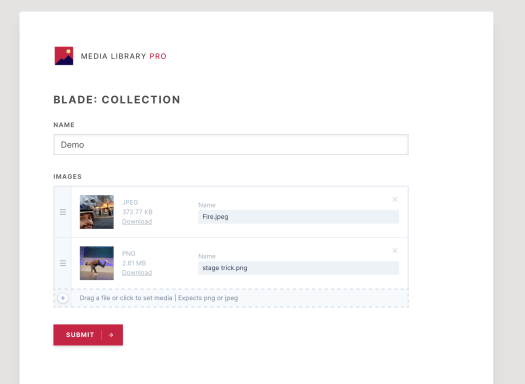
This component will display the contents of the entire collection. Files can be added, removed, updated, and reordered.
In this video, you’ll see the collection component in action.
To validate the response of the form, a form request like this one can be used:
namespace App\Http\Requests\Blade; use Illuminate\Foundation\Http\FormRequest;use Spatie\MediaLibraryPro\Rules\Concerns\ValidatesMedia; class StoreBladeCollectionRequest extends FormRequest{ use ValidatesMedia; public function rules() { return [ 'name' => 'required', 'images' => [$this->validateMultipleMedia() ->maxItems(3) ->itemName('required'), ], ]; }}Again, you need to ValidatesMedia trait. This time the validateMultipleMedia should be used. You can chain on the other validation methods, which are documented here.
In the controller, you can associate the media in the collection component with your model using the syncFromMediaLibraryRequest method.
Here’s the relevant code in the controller of the demo app.
$formSubmission ->syncFromMediaLibraryRequest($request->images) ->toMediaCollection('images');Adding custom properties
When using the collection component, you probably want to add some extra fields to be displayed. We’ve made this a straightforward thing to do.
In the screenshot below, we added the Extra field field.
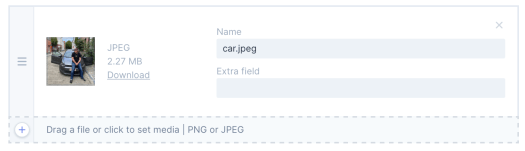
You can achieve this by passing a blade view to the fields-view prop of the x-media-library-collection.
<x-media-library-collection name="images" :model="$formSubmission" collection="images" max-items="3" rules="mimes:png,jpeg" fields-view="uploads.blade.partials.custom-properties"/>In that custom-properties view, you can put anything that should be displayed in the right half of the collection component.
Here’s the content of that custom-propertiesview.
@include('media-library::livewire.partials.collection.fields') <div class="media-library-field"> <label class="media-library-label">Extra field</label> <input dusk="media-library-extra-field" class="media-library-input" type="text" {{ $mediaItem->customPropertyAttributes('extra_field') }} /> @error($mediaItem->customPropertyErrorName('extra_field')) <span class="media-library-text-error"> {{ $message }} </span> @enderror</div>In the form request, you can use the customProperty to validate any extra custom attributes. The second argument of the function can take any validator in Laravel.
namespace App\Http\Requests\Blade; use Illuminate\Foundation\Http\FormRequest;use Spatie\MediaLibraryPro\Rules\Concerns\ValidatesMedia; class StoreBladeCollectionCustomPropertyRequest extends FormRequest{ use ValidatesMedia; public function rules() { return [ 'name' => 'required', 'images' => [$this->validateMultipleMedia() ->maxItems(3) ->itemName('required|max:30') ->customProperty('extra_field', 'required|max:30'), ], ]; }}In the controller where you process the form submission, you should use the withCustomProperties method to whitelist any extra attributes that you want to sync with your media.
$formSubmission ->syncFromMediaLibraryRequest($request->images) ->withCustomProperties('extra_field') ->toMediaCollection('images');Here’s a video where you see all of this in action.
Customizing the look and feel
By default, both the Attachment and Collection components already look good. Probably you’d like to adapt them so they match the look of your app.
Luckily, this is easy to do. The styles that ship with Media Library Pro can be used by importing or linking dist/styles.css. The styles were built with a default tailwind.config.js.
You can customize the styles by importing src/styles.css and run every @apply rule through your own tailwind.config.js
/* app.css */ @tailwind base; @tailwind components; @tailwind utilities; @import "src/styles.css"; …To view this in action, watch this video.
How temporary files are used
To achieve that behavior where uploaded files are preserved when a form validation error occurs, we use temporary uploads. In this video, I explain how that works.
Testing the components
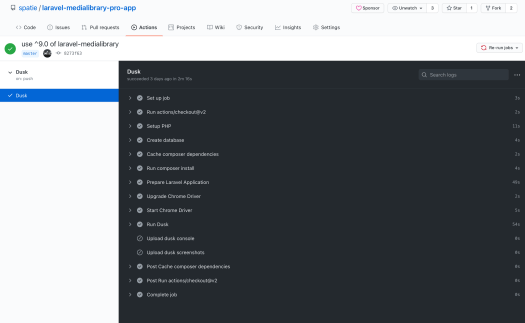
Inside the private spatie/laravel-medialibrary-pro repo, there are a lot of tests to make sure the back end integration and the Vue, React, and Blade front end components are working as expected.
We also wanted to have browser tests that ensure that front end components work perfectly with the back end and vice versa. That’s why we added Dusk tests in our demo application. You can see them here.
Let’s take a look at one of them:
/** * @test * * @dataProvider routeNames */public function it_can_handle_a_single_upload(string $routeName){ $this->browse(function (Browser $browser) use ($routeName) { $browser ->visit(route($routeName)) ->type('name', 'My name') ->attach('@main-uploader', $this->getStubPath('space.png')) ->waitForText('Remove') ->waitUntilMissing('.media-library-progress-wrap.media-library-progress-wrap-loading') ->press('@submit') ->assertSee('Your form has been submitted'); $this->assertCount(1, FormSubmission::get()); $this->assertEquals('space.png', FormSubmission::first()->getFirstMedia('images')->file_name); });}This test will upload a file and make sure that the file is associated with a model after the form is submitted.
A thing to note here is that @dataProvider attribute. This will make PHPUnit run the test for each result returned by the routeNames function defined in the same file.
public function routeNames(): array{ return [ ['vue.attachment'], ['react.attachment'], ['blade.attachment'], ];}You can see that in combination with the routeNames function, the it_can_handle_a_single_upload will run for the vue.attachment, react.attachment and blade.attachment routes. Visiting these routes will display the form that will use the Vue, React, or Blade component, respectively. So, this one test covers a lot of logic. It makes sure that the component work using any technology. This gives us a lot of confidence that all of the components are working correctly.
Another cool thing to note is that the Dusk tests also run on GitHub Actions. Here’s the workflow contained in the repo.
In closing
In my mind, these front end components were a final missing part in the media library experience. I’m delighted how they turned out and how easy it now becomes to upload and manage media in a Laravel app.
Because we invested quite some time in getting these components just right, we decided to make spatie/laravel-media-library-pro a paid package. You can buy a license on our website. As mentioned previously, the package contains Blade, Vue, and React components. You’ll find the extensive documentation [here].
After you’ve bought a license, you’ll immediately get access to the private spatie/laravel-medialibrary-pro repo. Even if you’re not in the market for kick-ass upload components, it still might be worthwhile to buy them: the source code contains many interesting things you might learn from.
At the time of writing, we are running a launch promo. Use this coupon code when buying Media Library Pro to get a 20% discount:
MEDIA-LIBRARY-PRO-IS-HEREOur whole team gave input on these components, so I consider it a team effort. My colleague Adriaan coded up most of the JavaScript. Willem, as always, made everything look gorgeous.
For those wondering, the base media library package is still free, and we’ll always keep it free.
Be sure also to check out our other paid products and our extensive collection of free open source packages.

PHP developer, Laravel enthousiast at Spatie.be, blogger, and package creator.