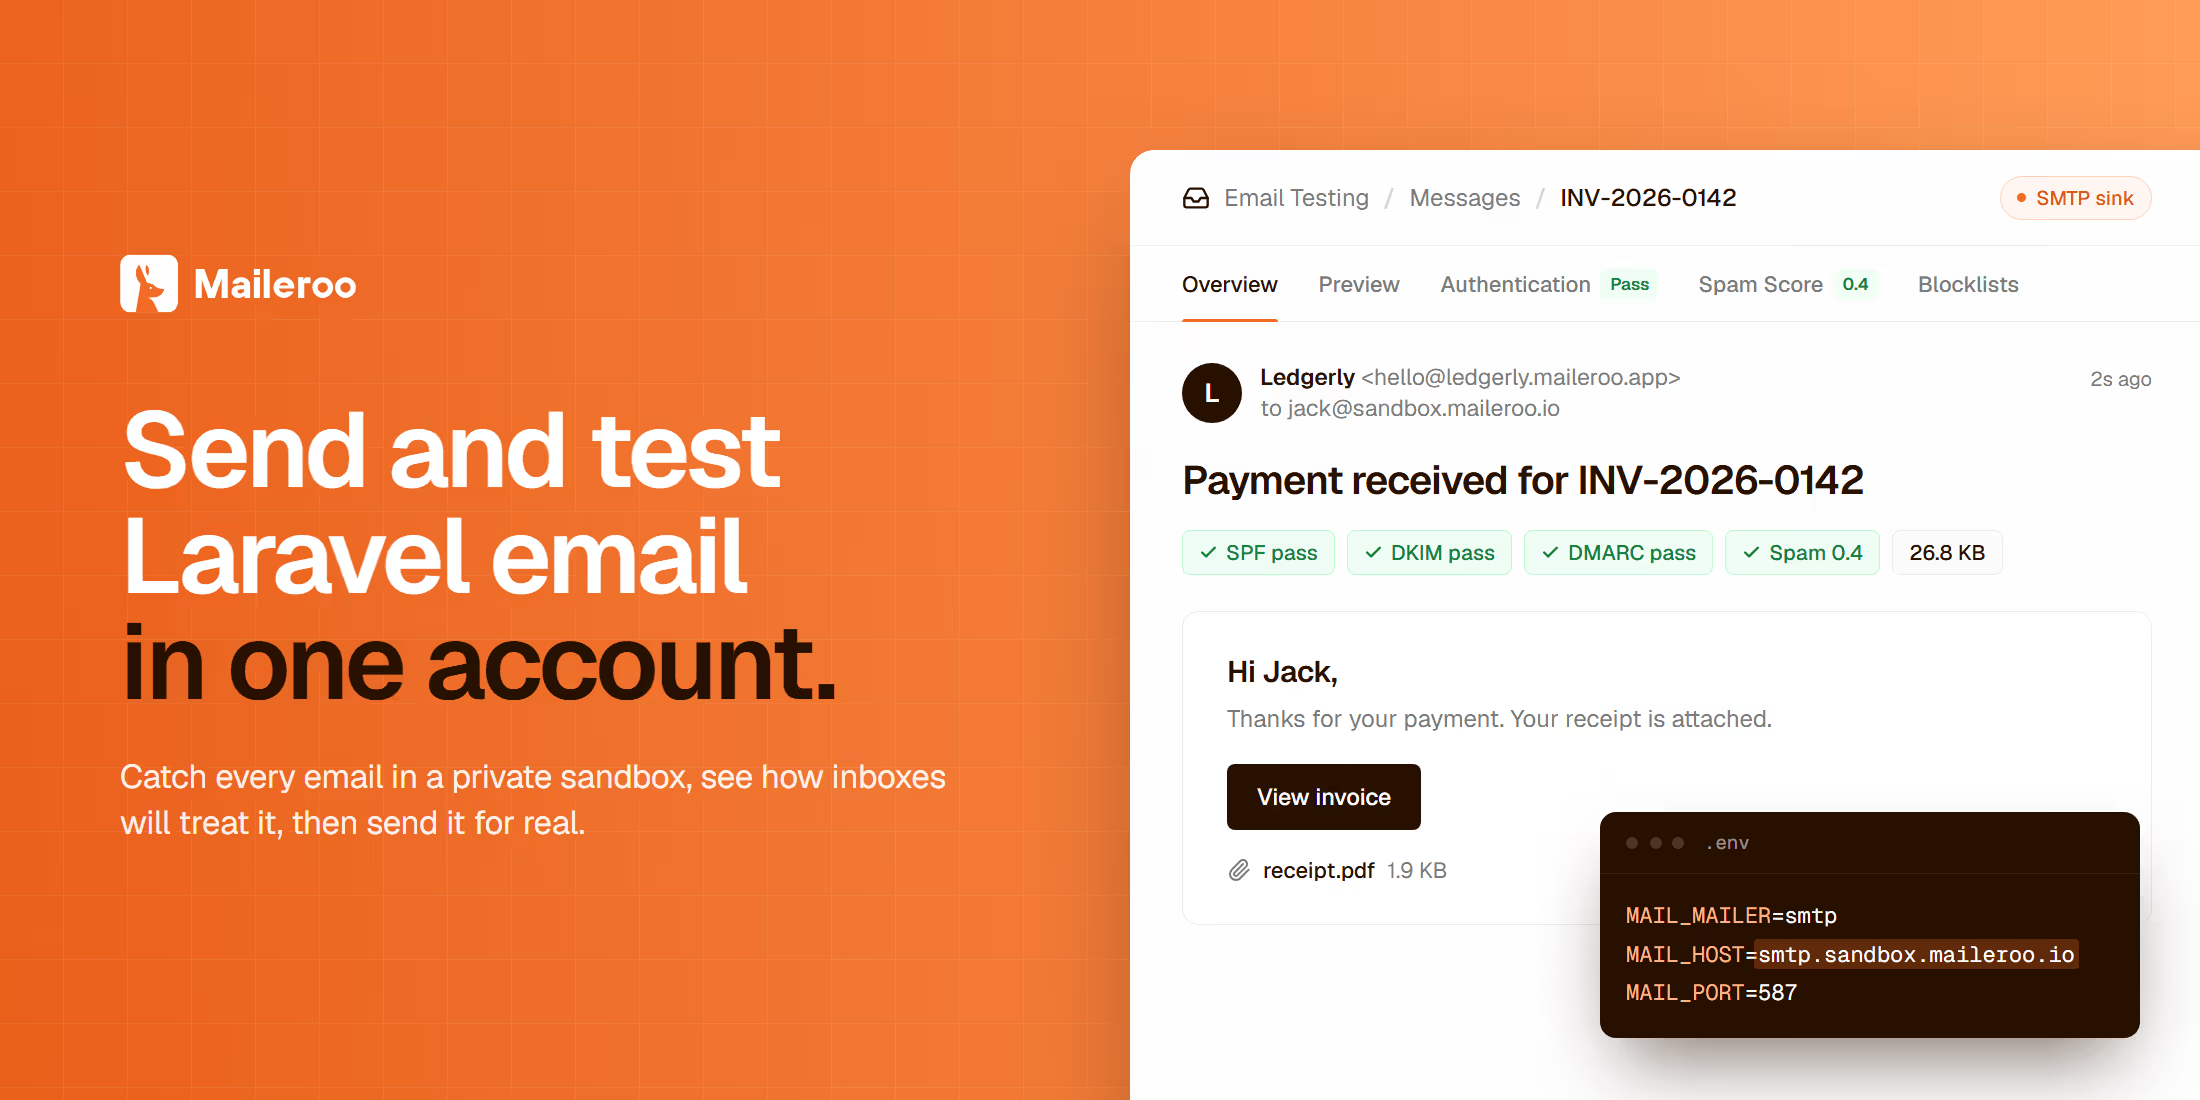
Most Laravel apps send email: sign-up confirmations, password resets, receipts, weekly summaries. Developers change these emails all the time, but rarely get to see them the way a customer does. Locally, the mail goes to a log file, staging points at a separate testing service, and production uses a sending provider that nobody looks at until a customer says an email never arrived.
We built Email Testing so you can check those emails in the same Maileroo account you send them from. Your app's test mail lands in a private sandbox where you can read it, see how spam filters will score it, preview it in light and dark mode, and act on it the way a recipient would. Email Testing is included in every Maileroo plan at no extra cost.
When you're done, your Laravel app will send real mail through Maileroo in production, capture every email in development and staging, and run an automated check on its emails in continuous integration (CI).
The examples come from Ledgerly, a small invoicing app. It sends four emails to a customer named Jack: an email confirmation, a password reset, a payment receipt with a PDF attached, and a weekly summary.
How sending and testing fit together
A Maileroo account has two sides.
Sending delivers mail to real people. Your app hands each email to our SMTP Relay (SMTP is Simple Mail Transfer Protocol, the standard way servers pass email along) or to our Email API, and we deliver it from your verified domain.
Email Testing is a sandbox that keeps mail instead of delivering it. You can get mail into it in two ways:
- The SMTP sink is a mail server that accepts everything your app sends and stores it. Nothing leaves. A "sink" in this sense is a drain: mail goes in and stays there. You point Laravel at it in
.env, and from then on no email from that environment can reach a real customer by accident. - Test inboxes are real addresses, such as
jack@sandbox.maileroo.io, that receive mail from anywhere on the internet. Mail sent to them lands in your sandbox instead of a mailbox. That includes mail sent by Maileroo's own SMTP Relay, so you can send a real production email and inspect exactly what arrived.
Everything that lands in the sandbox shows up in one list, with the same checks run on every message.
Before you start
- A Laravel app. The code here uses features available from Laravel 10 onward.
- A Maileroo account. The free plan includes Email Testing with 100 captured emails a month.
- For the sending side, a verified sending domain in Maileroo. You can add your own domain, or use a subdomain we create for you with its DNS (Domain Name System) records already in place. The examples use
ledgerly.maileroo.app.
Catch every email your app sends
The SMTP sink is the place to start. Once Laravel points at it, every email your app sends in that environment is stored in your sandbox, whoever it's addressed to.
Create SMTP credentials
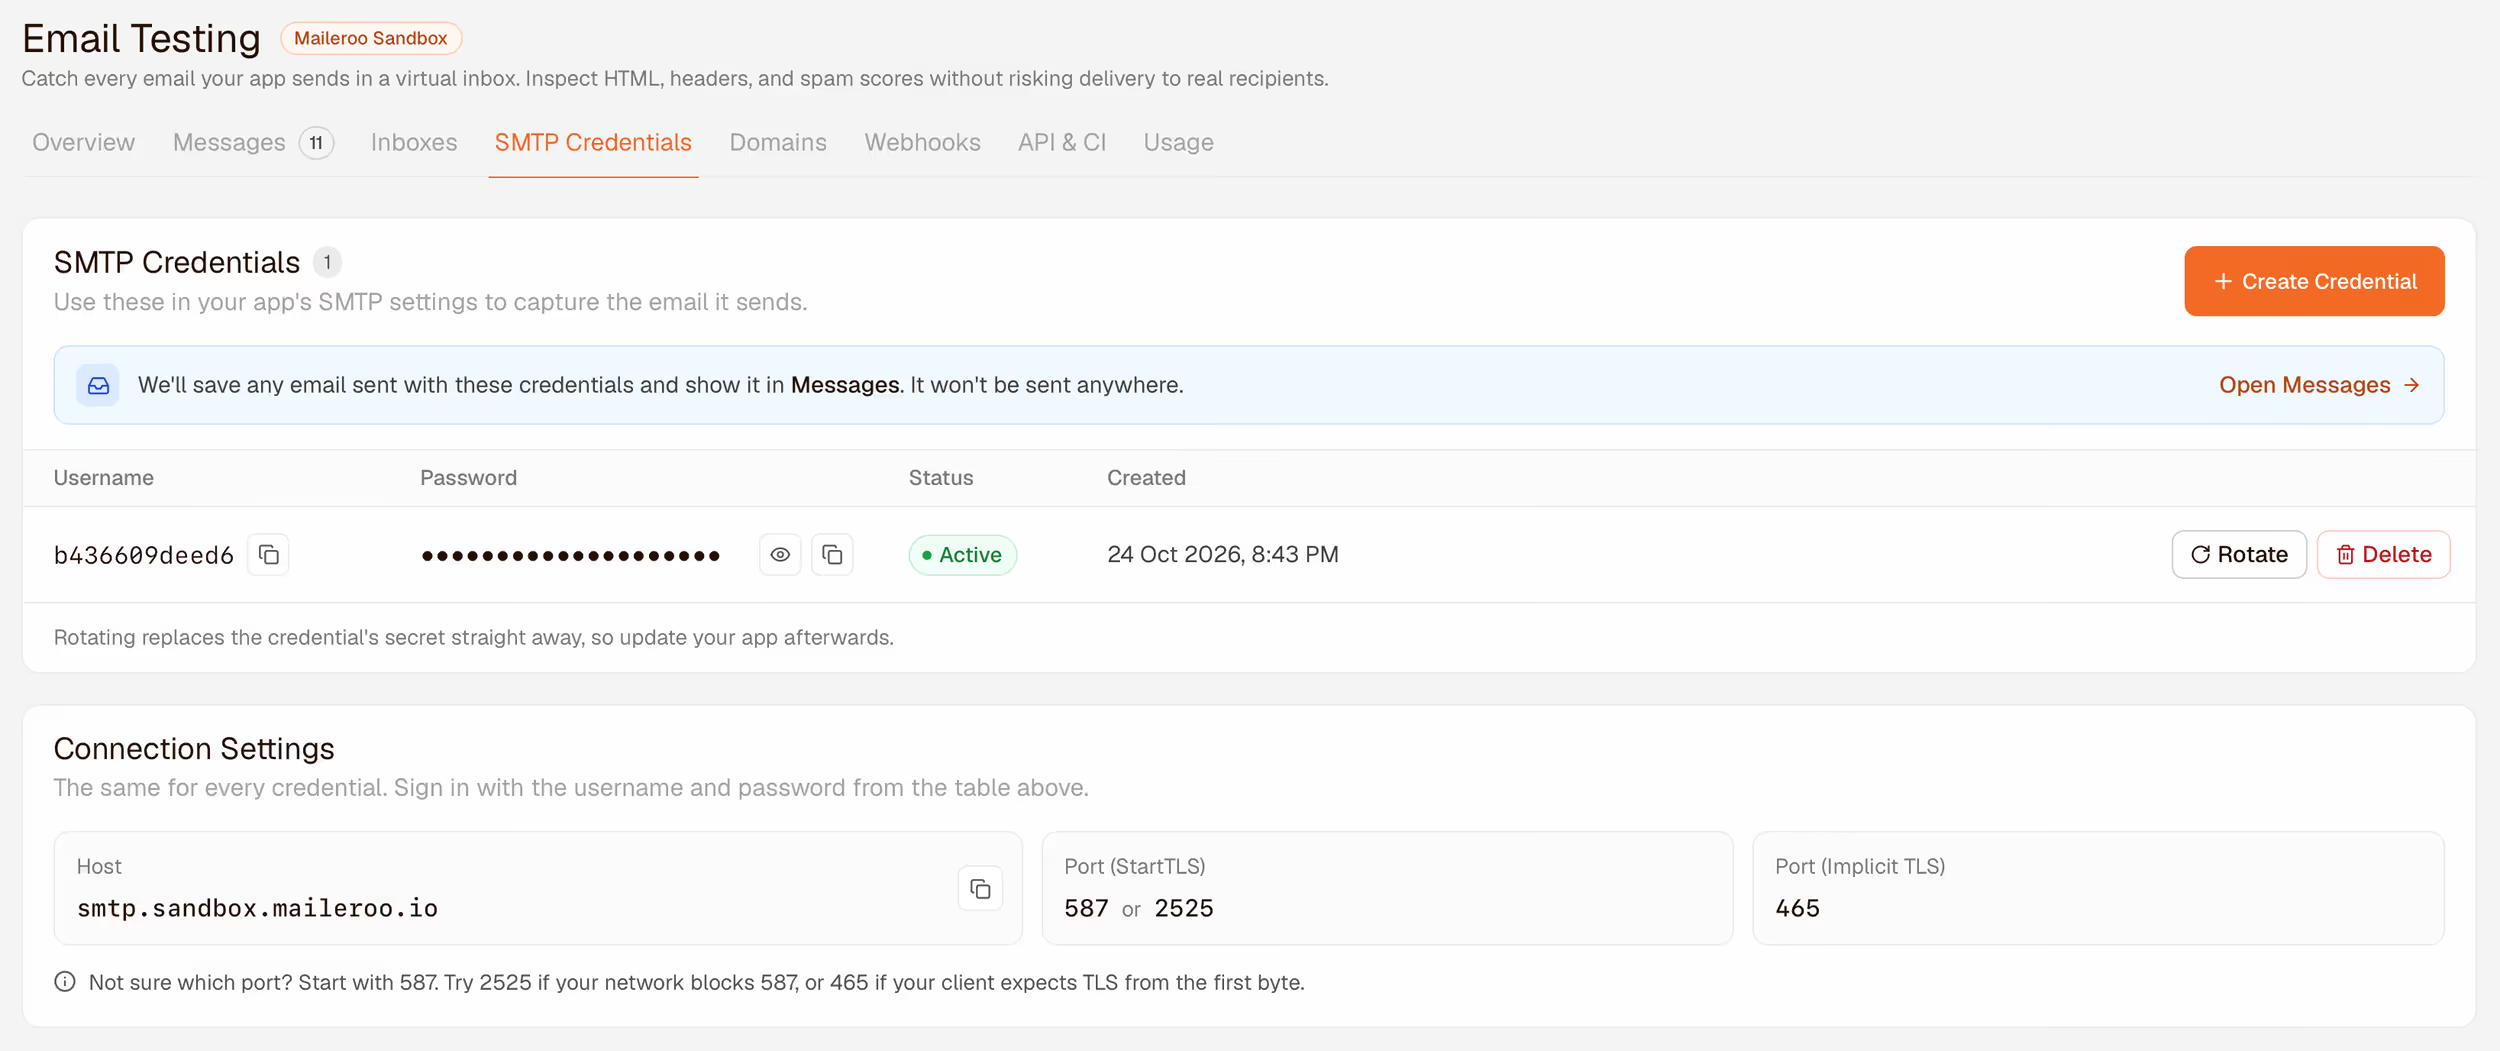
In the dashboard, open Email Testing. The Overview tab has a short setup guide. Choose Send with SMTP and click Create Credential.
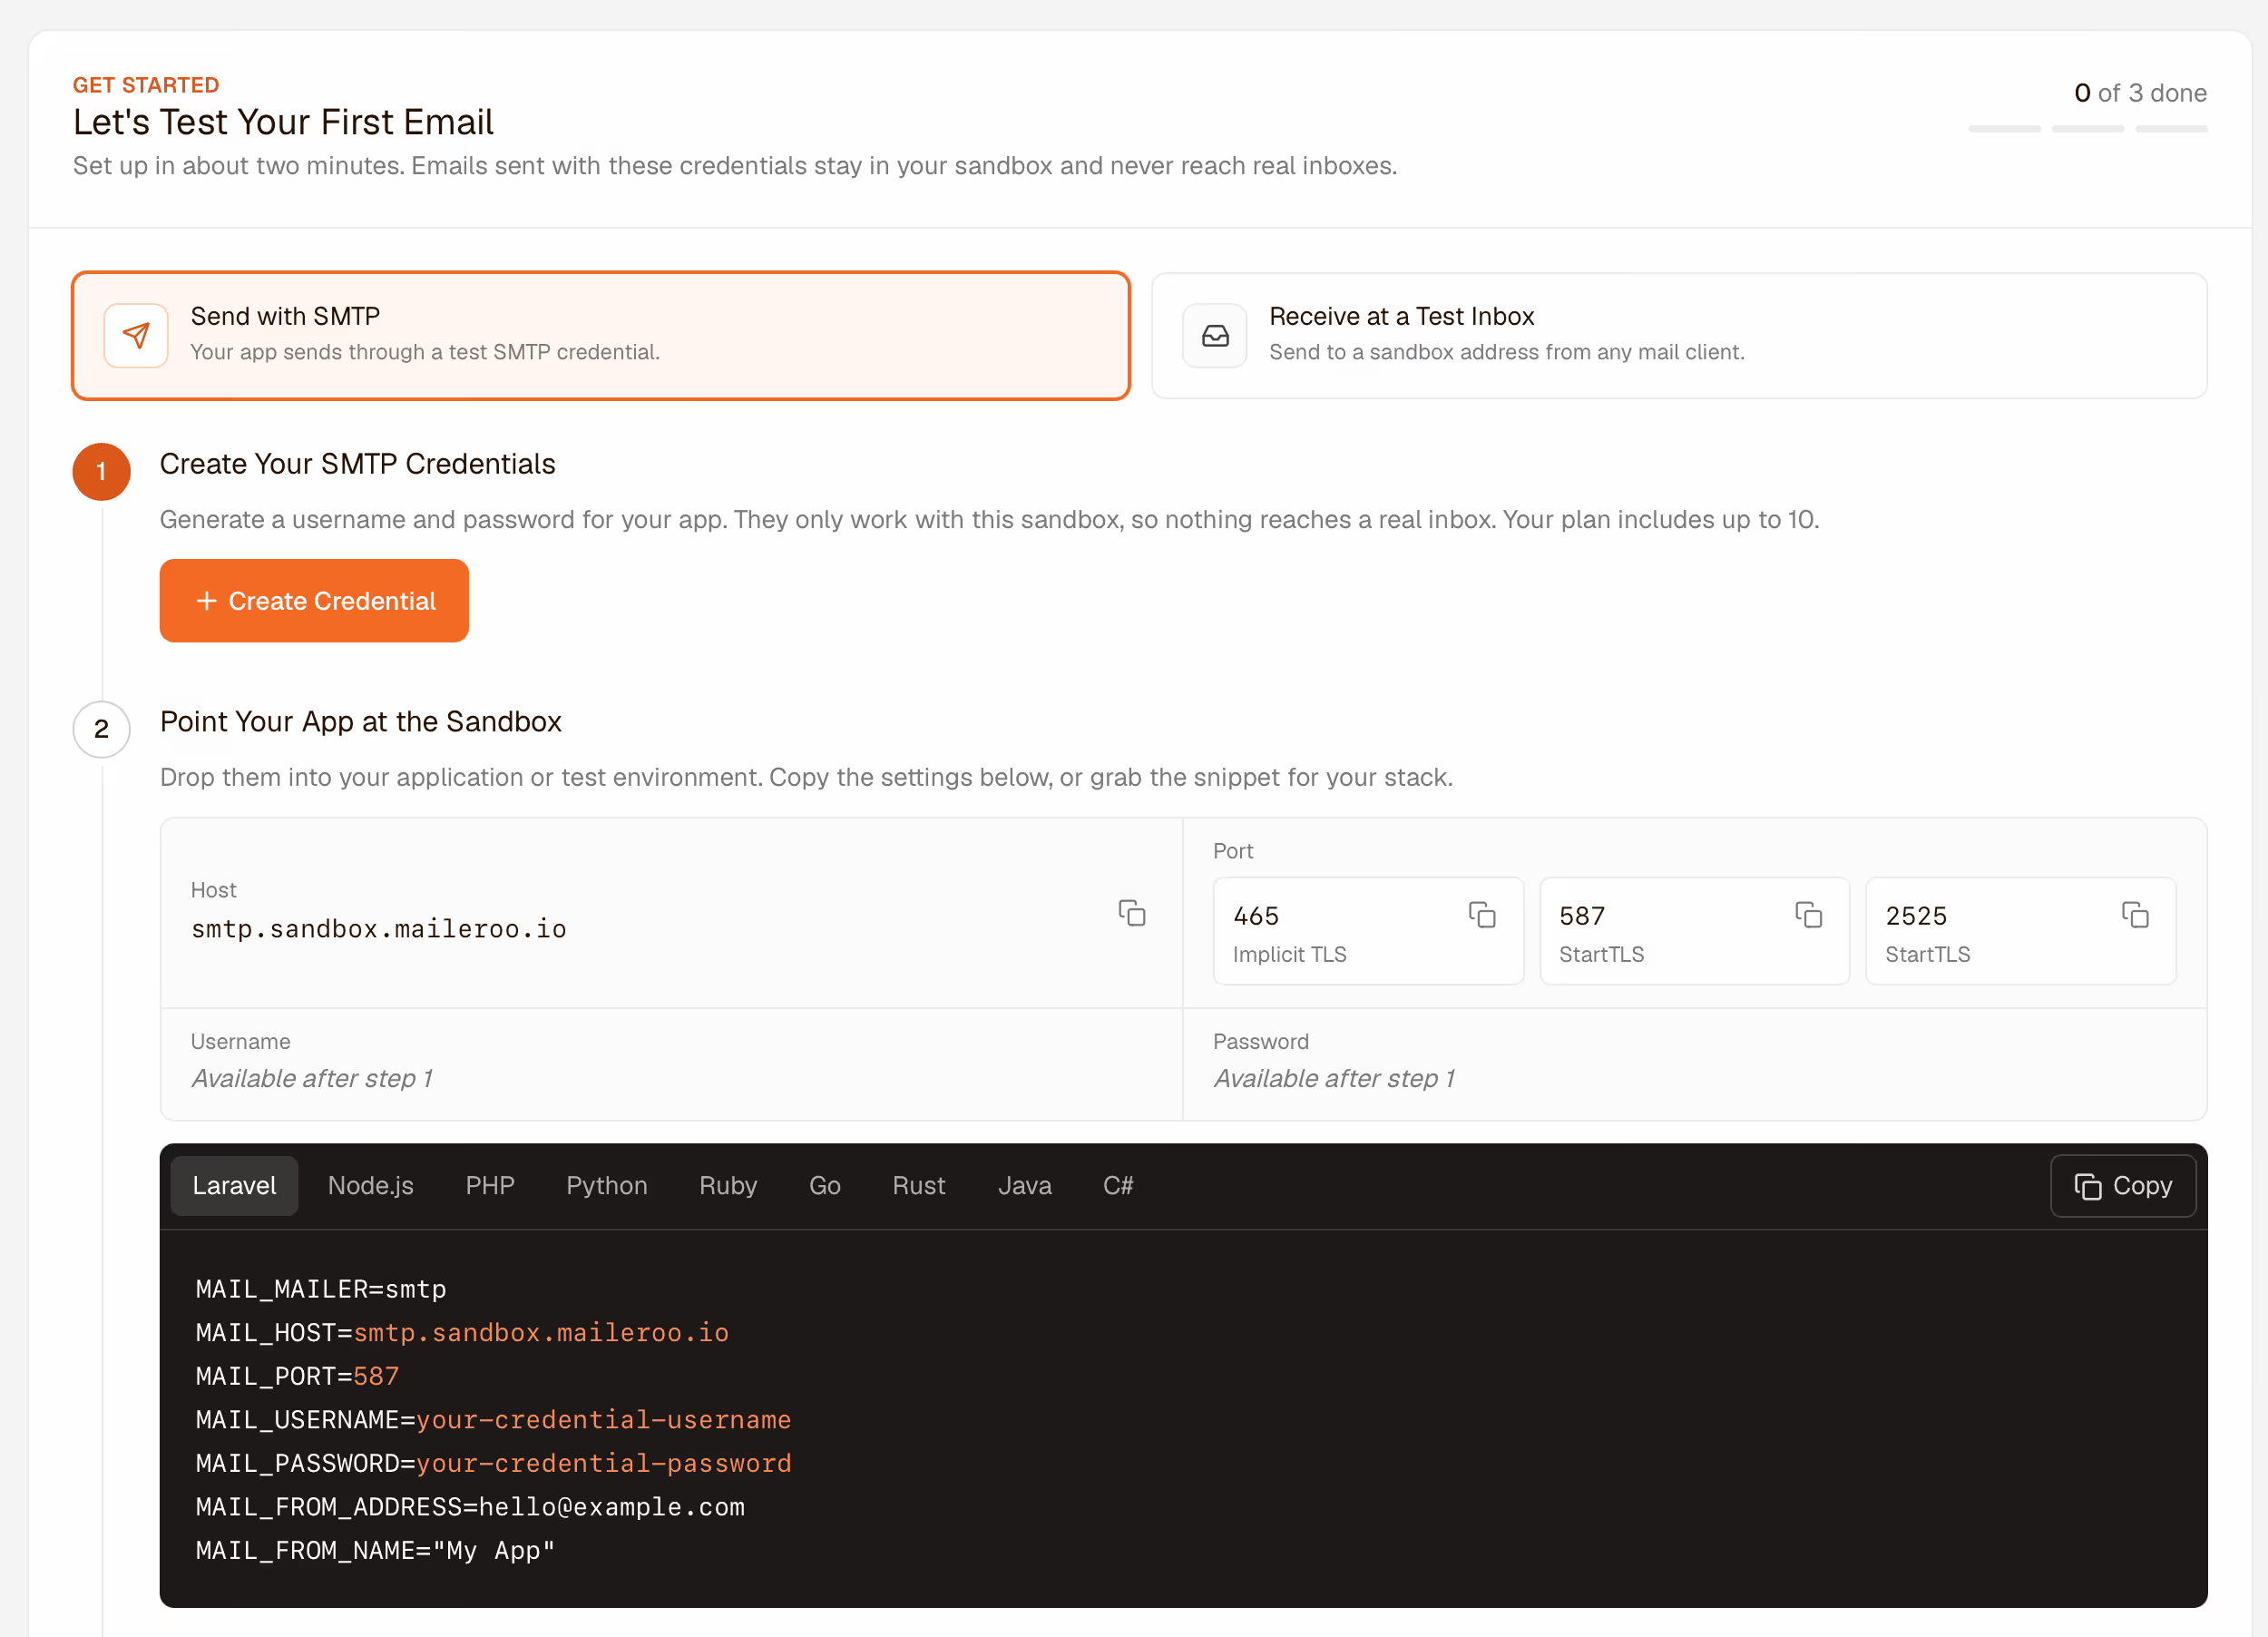
We generate a username and password and fill them into a ready-made Laravel .env snippet that you can copy.
You can manage credentials later in the SMTP Credentials tab. Rotate gives a credential a new password straight away, and Delete removes it. Creating one credential per environment (local, staging, CI) lets you see where each email came from and revoke one without touching the others. The free plan includes 3 credentials, and paid plans include more.
Point Laravel at the sink
Laravel's built-in SMTP mailer is all you need. Add these lines to .env in your project root:
MAIL_MAILER=smtpMAIL_HOST=smtp.sandbox.maileroo.ioMAIL_PORT=587MAIL_USERNAME=your-credential-usernameMAIL_PASSWORD=your-credential-passwordMAIL_FROM_ADDRESS="hello@ledgerly.maileroo.app"MAIL_FROM_NAME="Ledgerly"Port 587 uses STARTTLS, which means the connection starts plain and then switches to Transport Layer Security (TLS) encryption. Laravel handles that for you. If your network blocks port 587, use 2525. If your mail library expects encryption from the first byte, use 465.
Your code doesn't change. Mailables, notifications and queued mail all go through the same mailer:
Mail::to($user)->send(new InvoicePaid($invoice));See what you captured
Send an email from your app and open Messages. It appears within a few seconds, with a summary of the checks next to it.
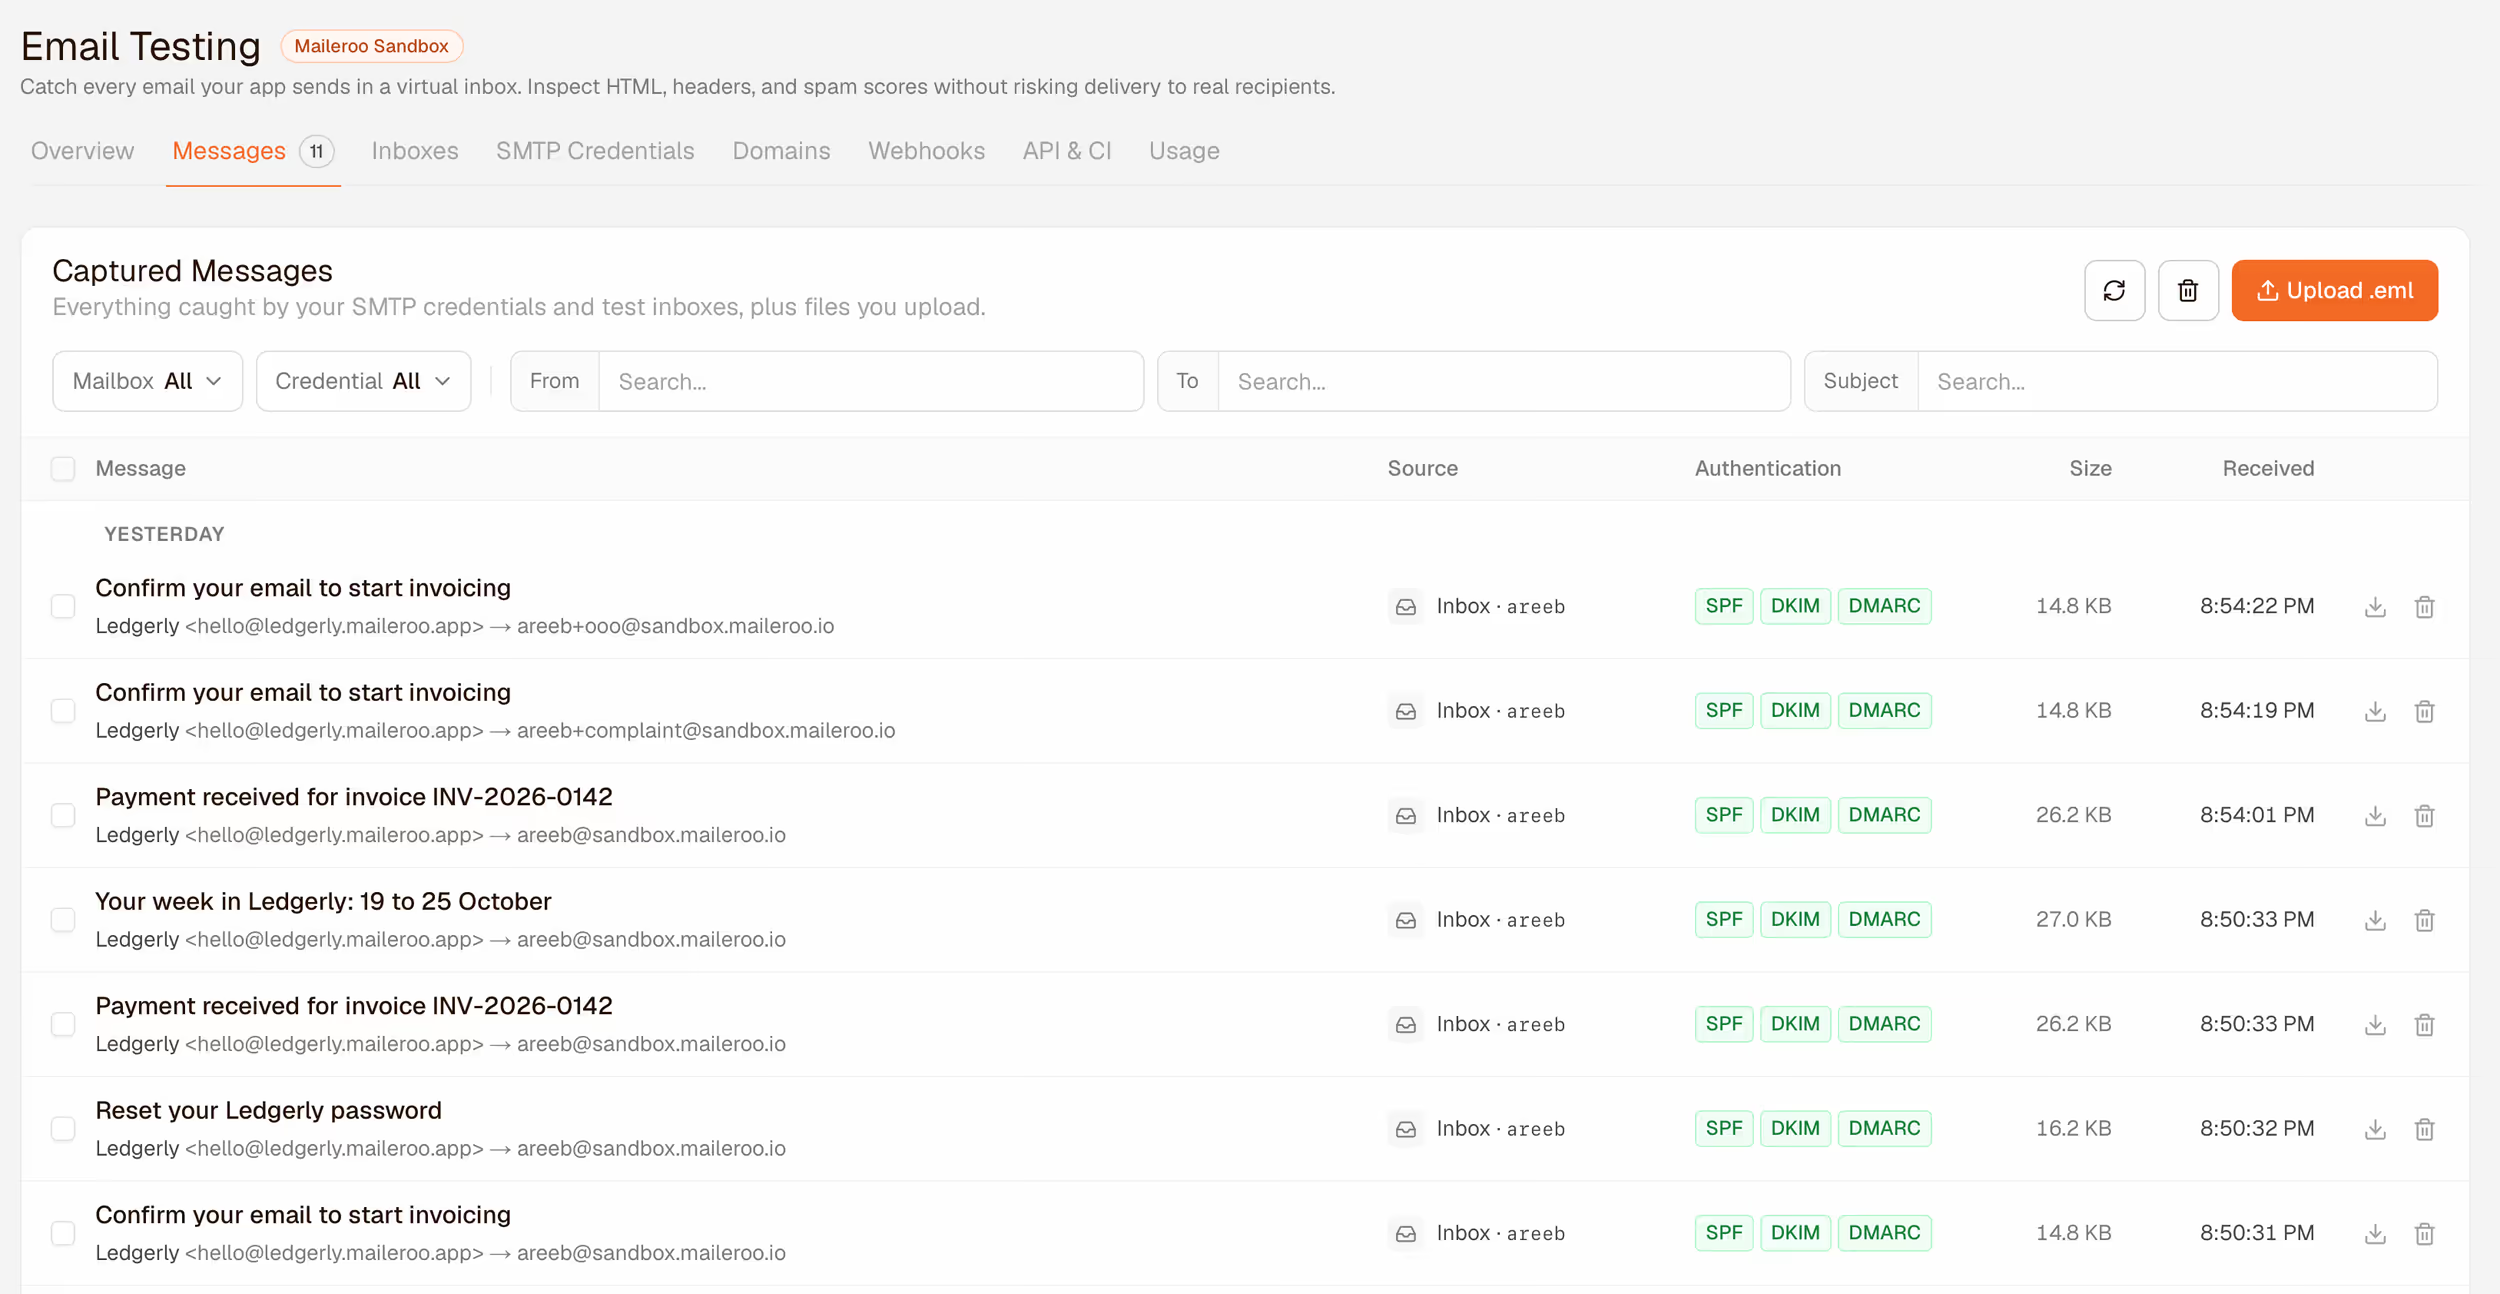
Each row shows where the message came from (a credential or a test inbox), whether it passed sender authentication, and its size. You can filter by inbox, credential, sender, recipient or subject, and you can upload an .eml file if you want to check an email that was sent somewhere else.
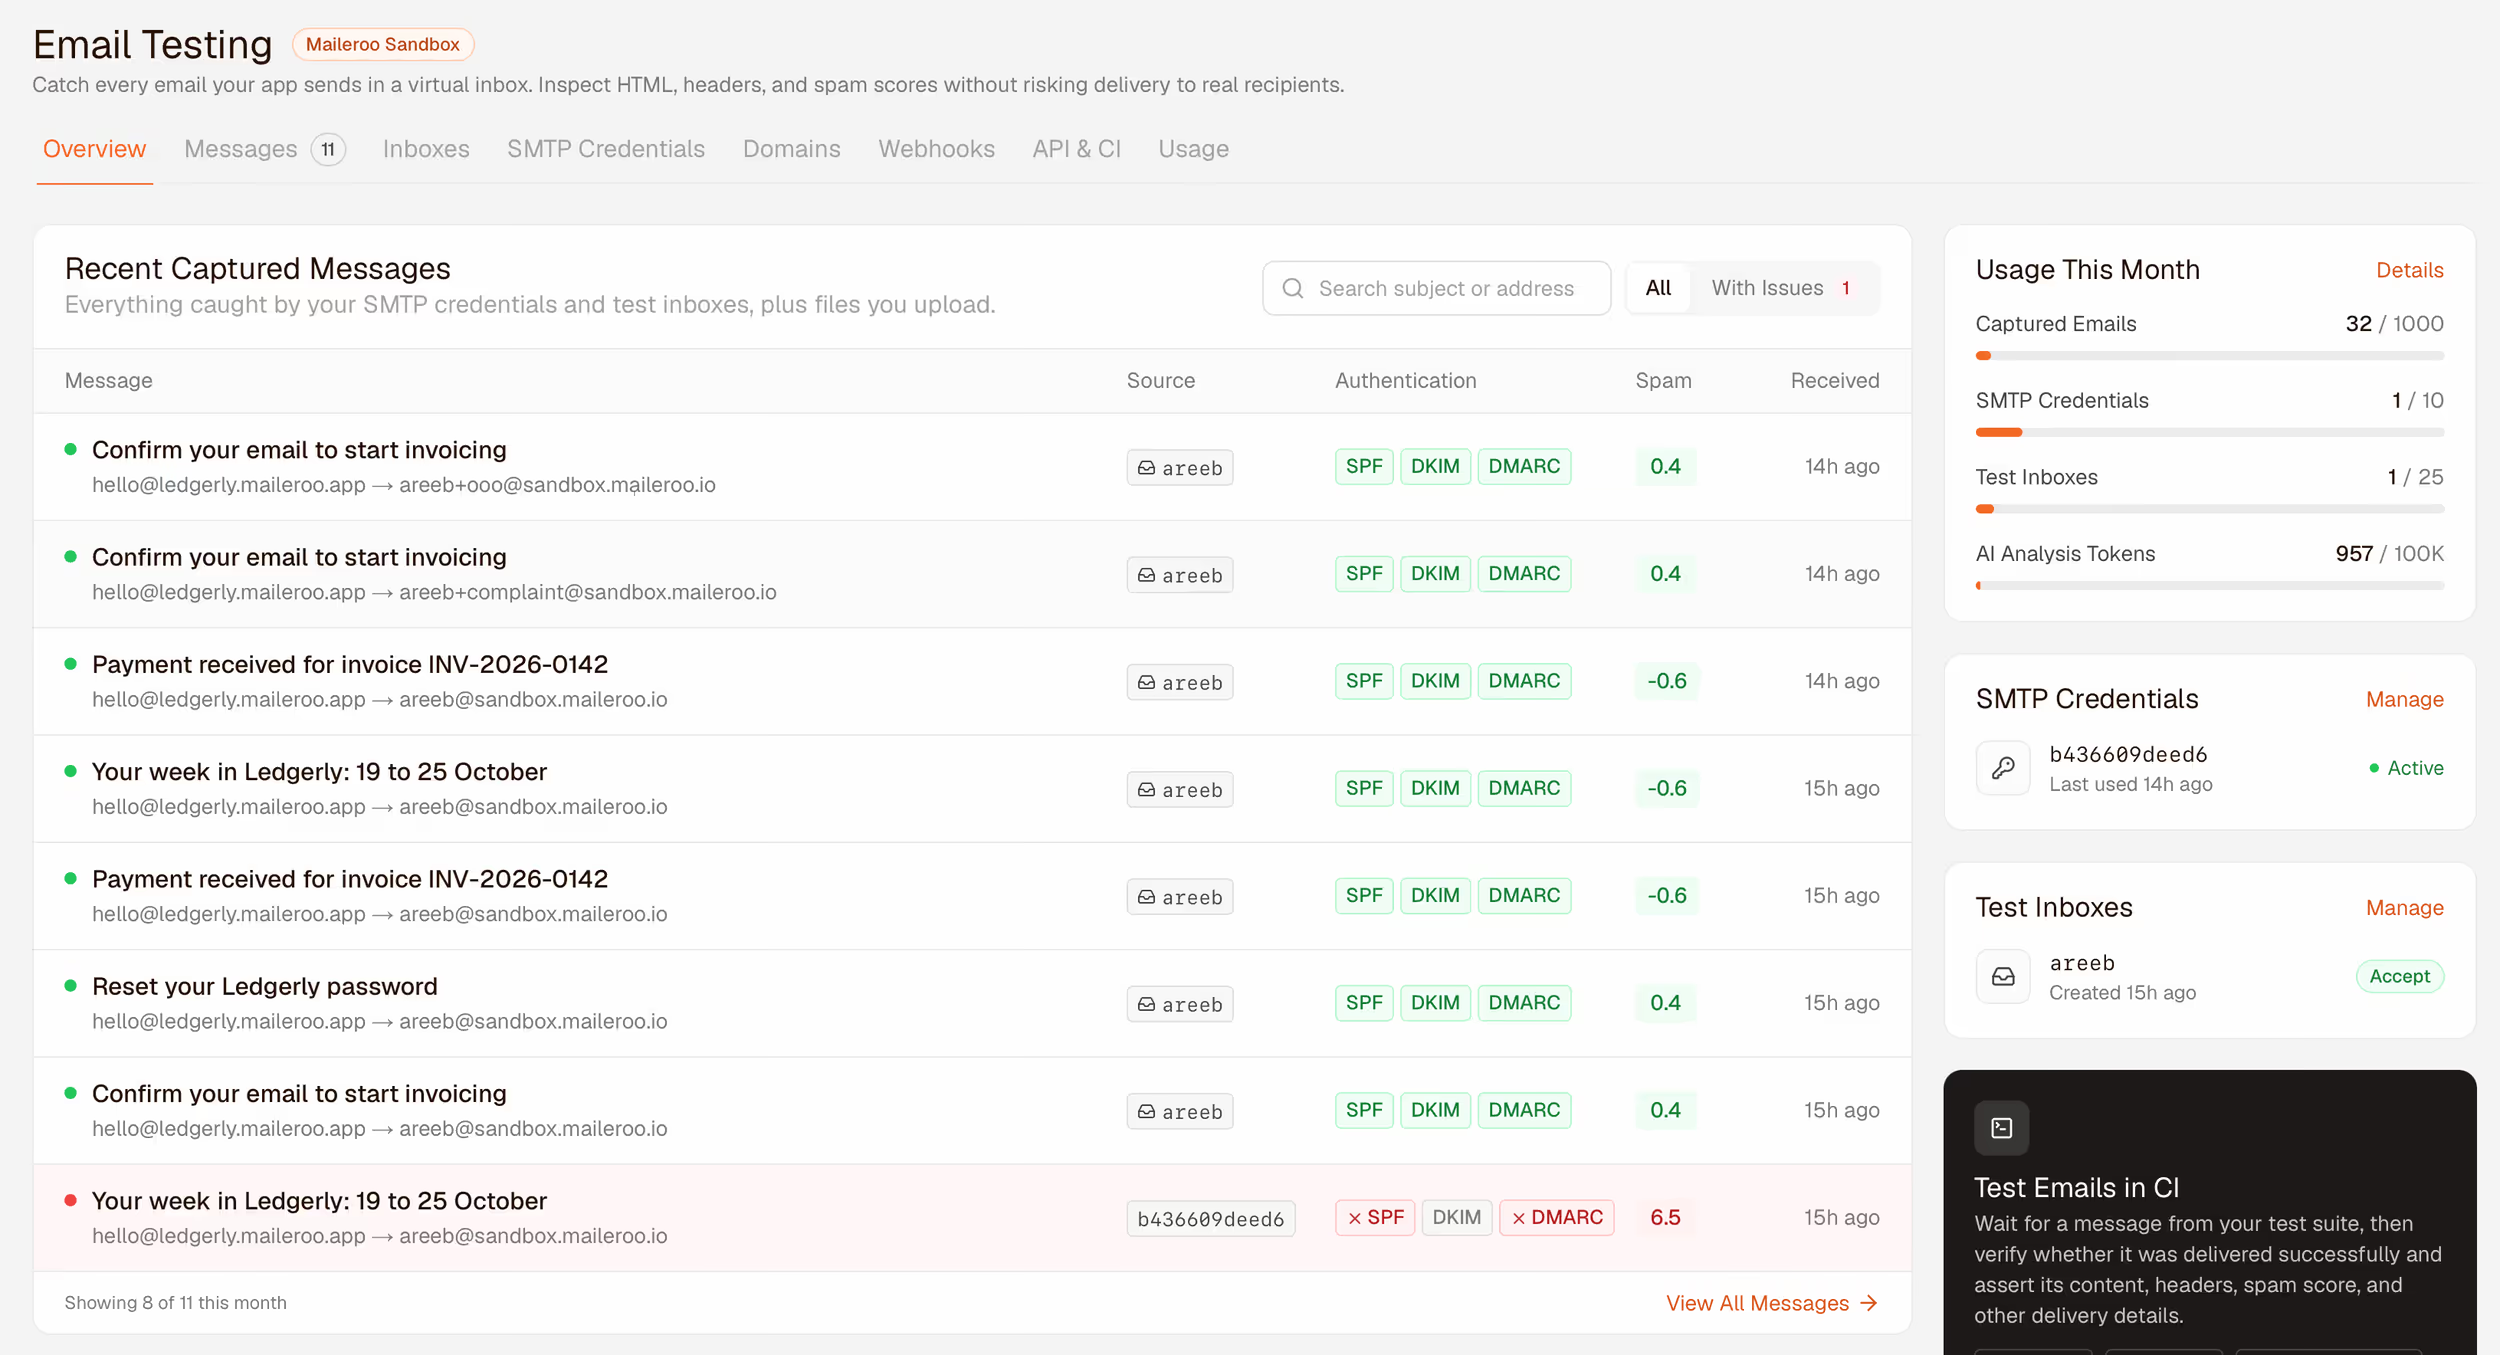
The Overview tab puts the most recent messages next to your usage for the month. The With Issues filter narrows the list to messages that failed a check.
Read what each check tells you
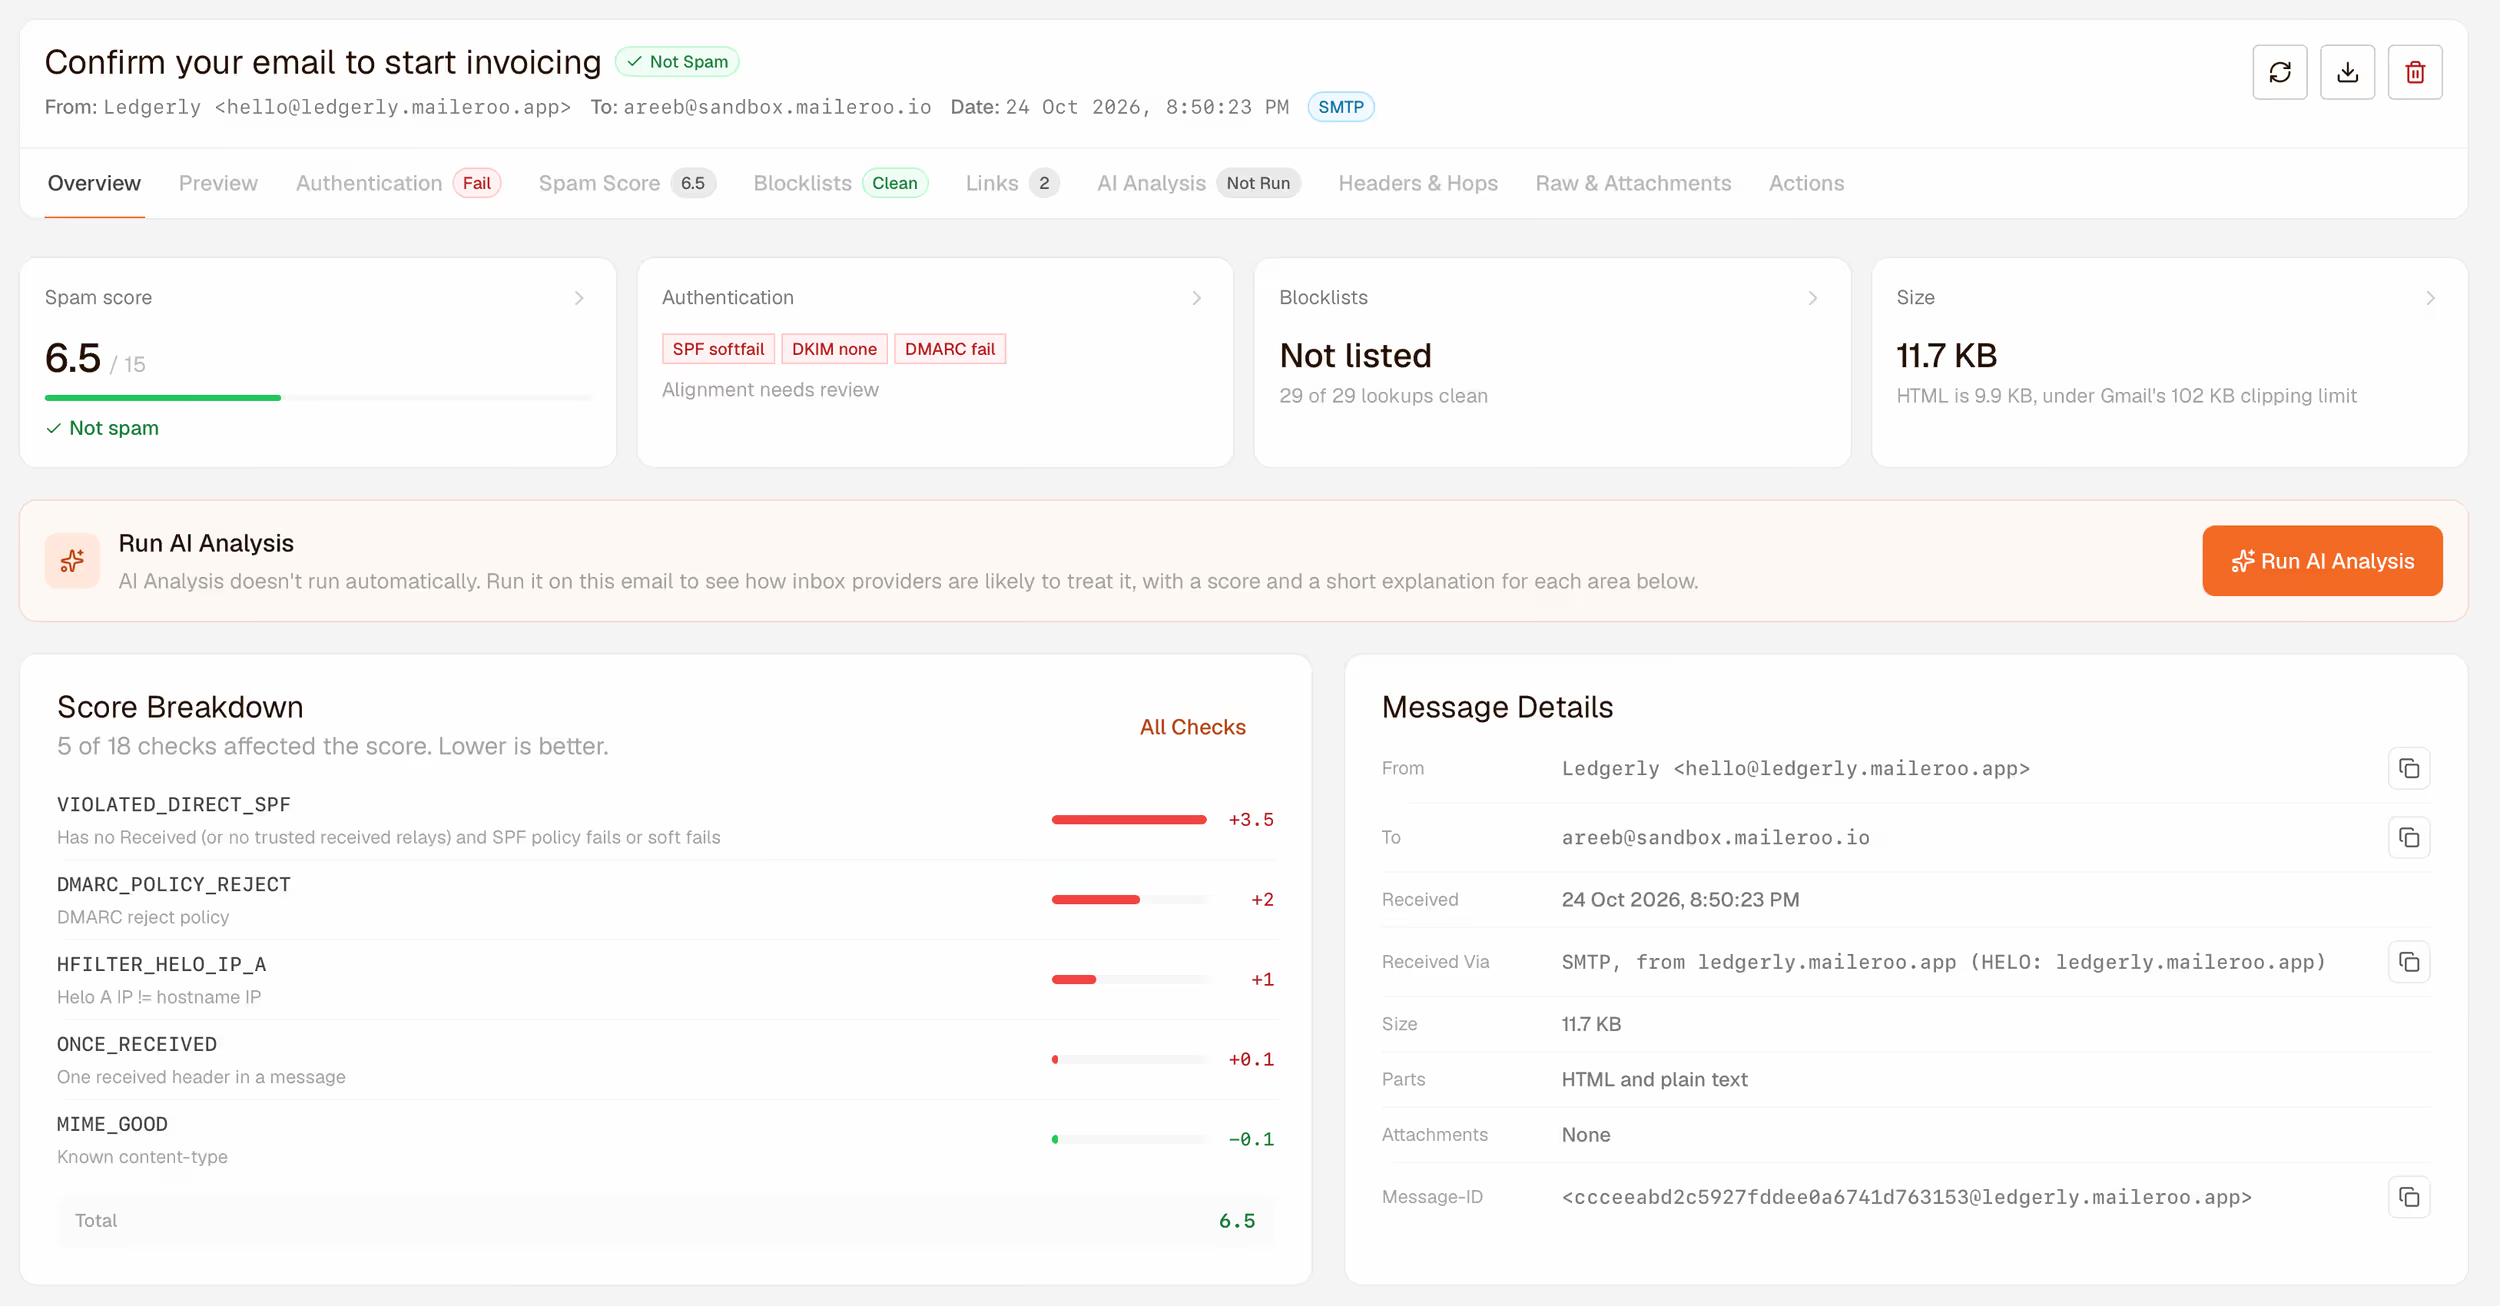
Open a message to see it in detail. The tabs across the top each cover one question about the email, and the badge on each tab gives you the short answer.
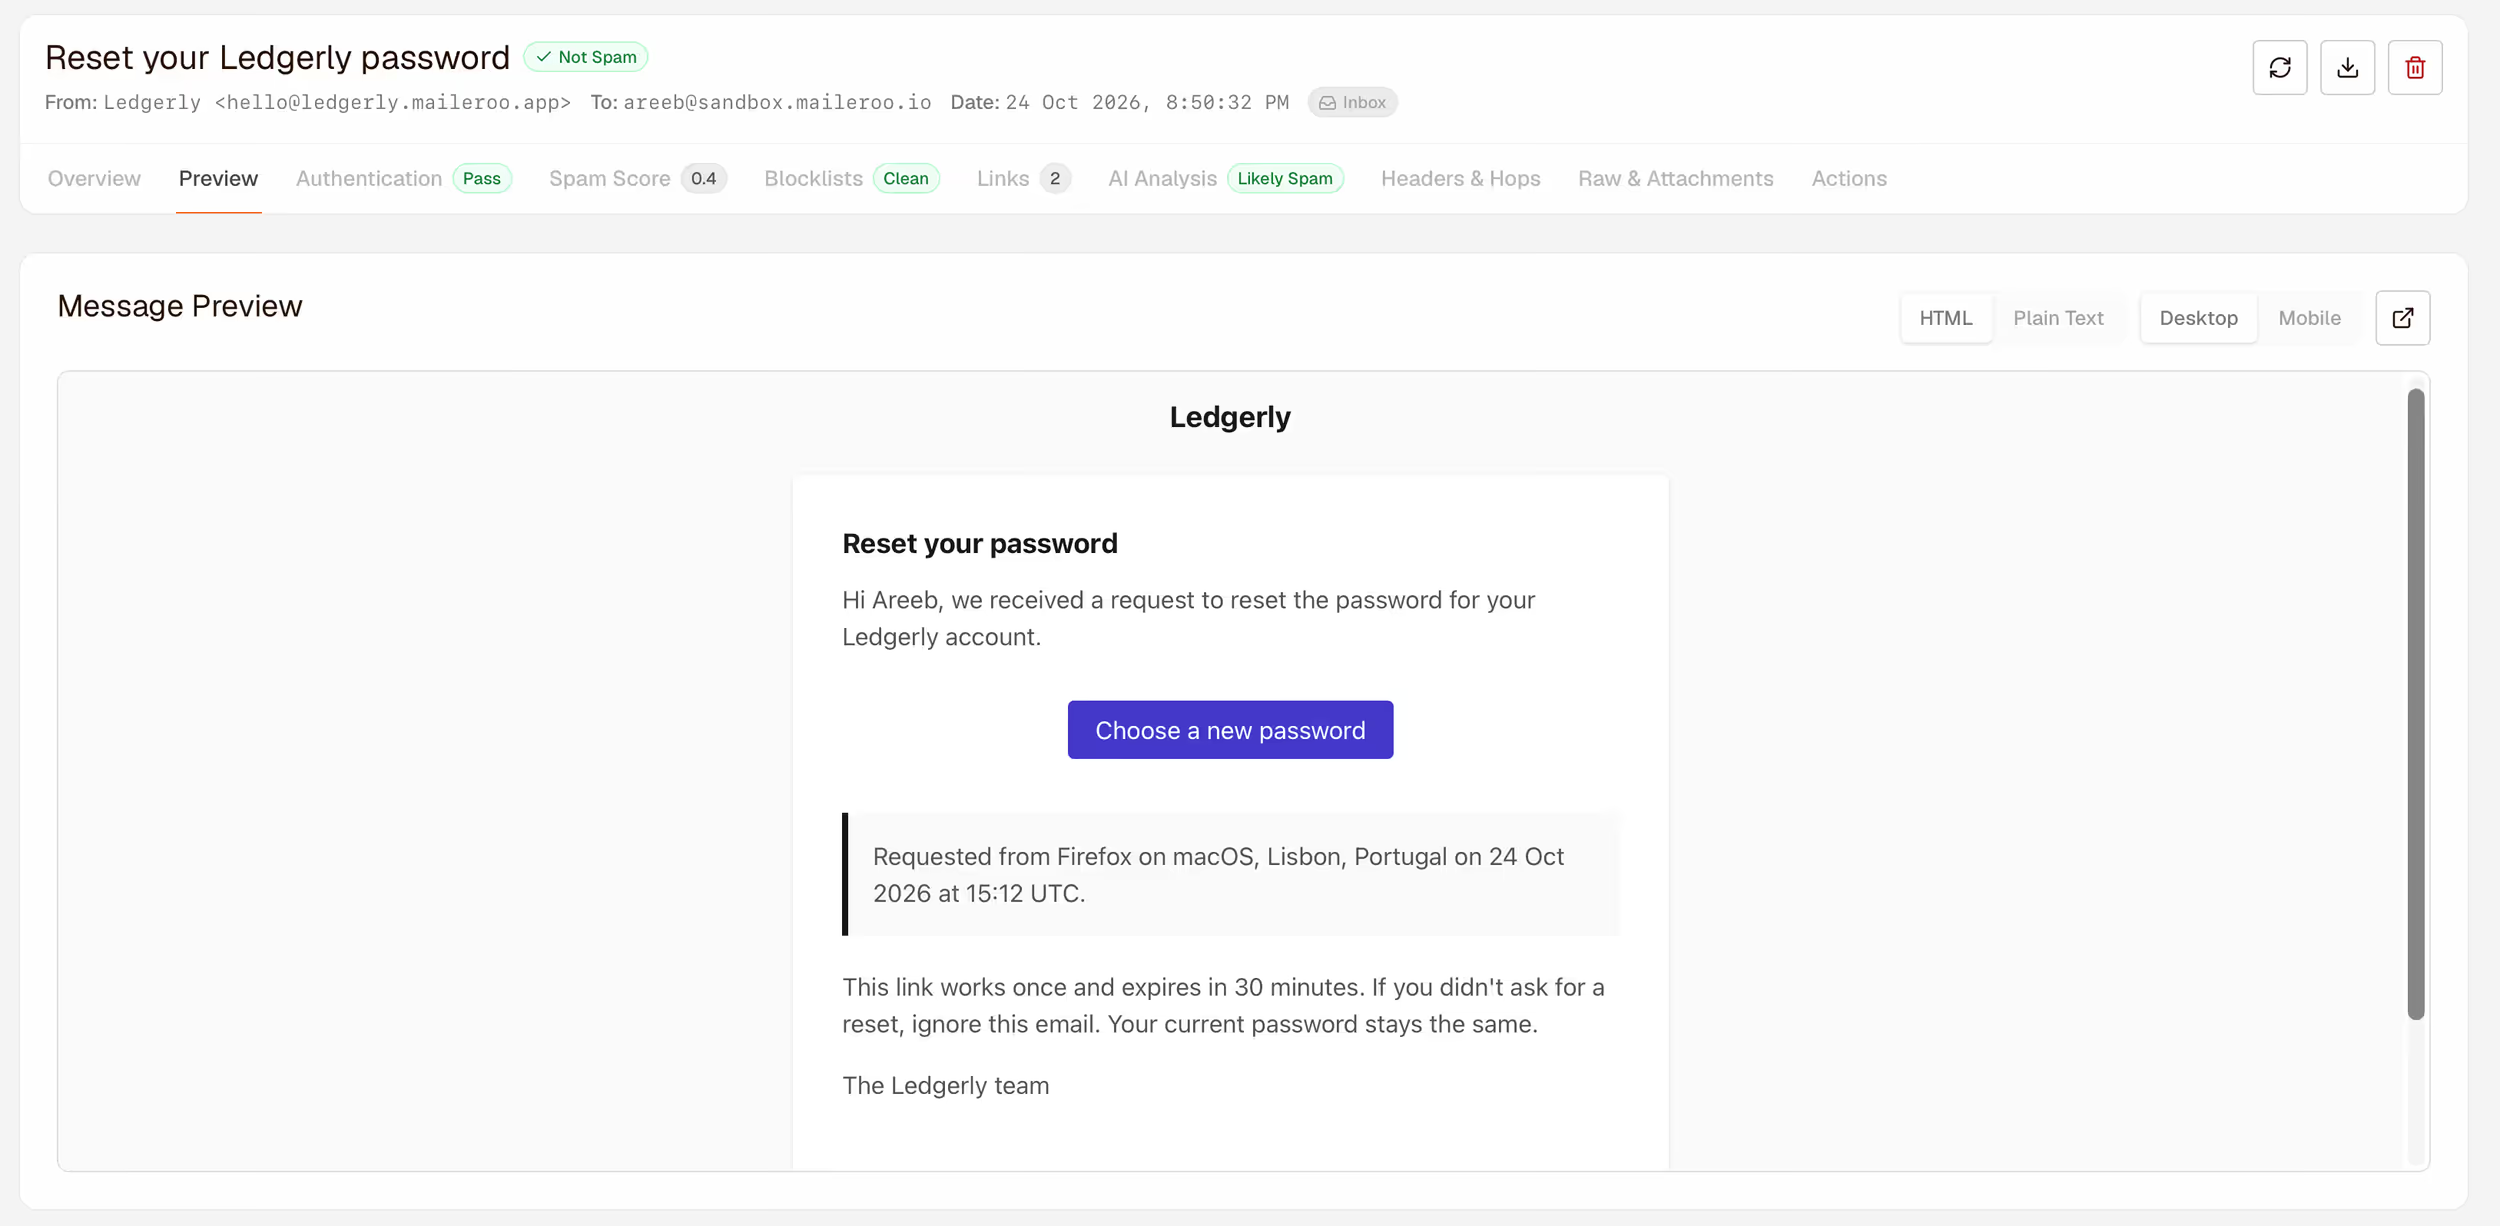
Preview: what the recipient sees
The Preview tab renders the email. You can switch between the HTML and plain-text versions, and between desktop and mobile widths.
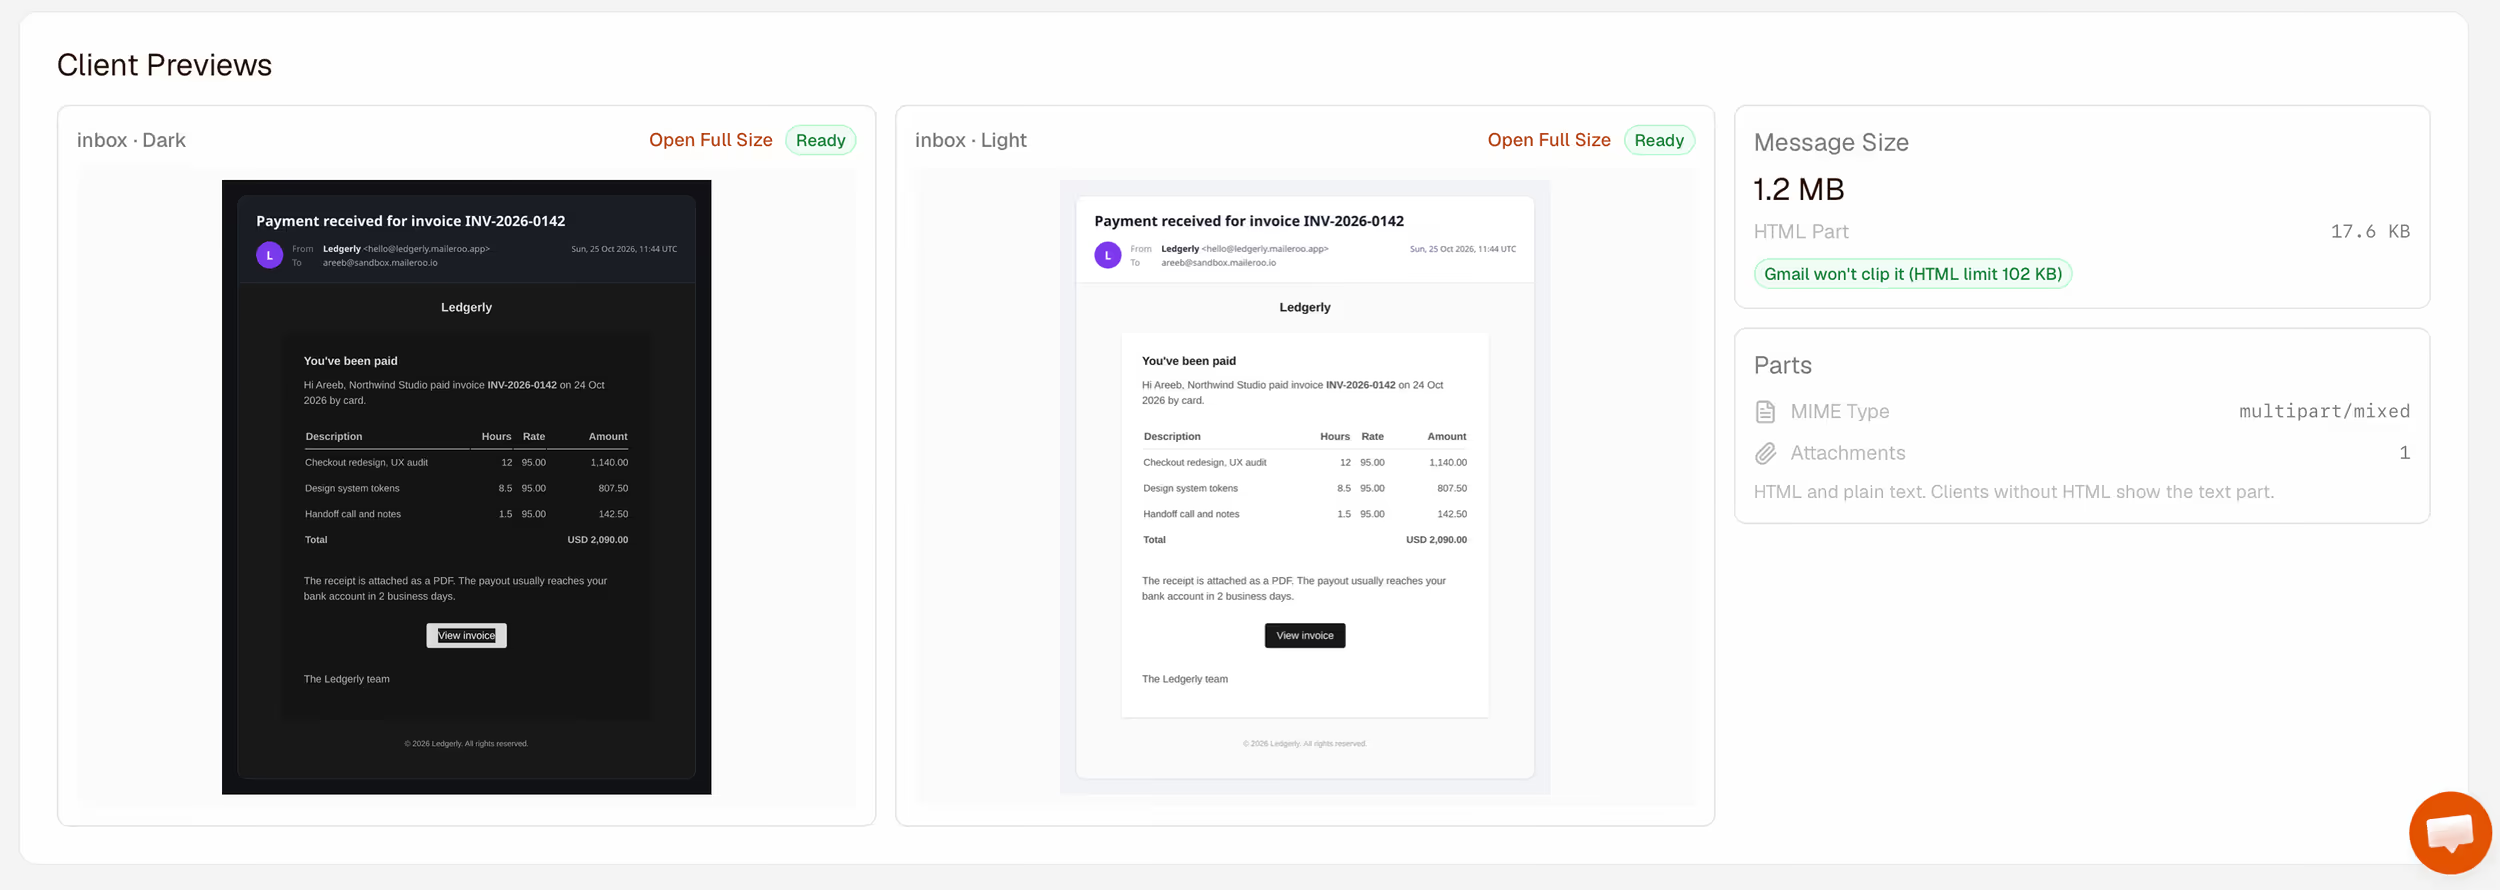
Further down, Client Previews shows the email rendered in an inbox frame in both light and dark mode. Many people read email in dark mode, and Gmail and Outlook recolor emails for it. Those recolored versions often look different from what you designed. The panel also shows the message size and whether Gmail will clip it (Gmail cuts off emails whose HTML is larger than 102 KB and shows a "View entire message" link instead).
Authentication: can the recipient trust the sender?
Mailbox providers check three things to decide whether an email really comes from the domain in its From address:
- Sender Policy Framework (SPF): is the server that sent the email allowed to send for this domain?
- DomainKeys Identified Mail (DKIM): was the email signed by the domain, and was it left unchanged on the way?
- Domain-based Message Authentication, Reporting and Conformance (DMARC): do SPF or DKIM match the From domain, and what should happen if they don't?
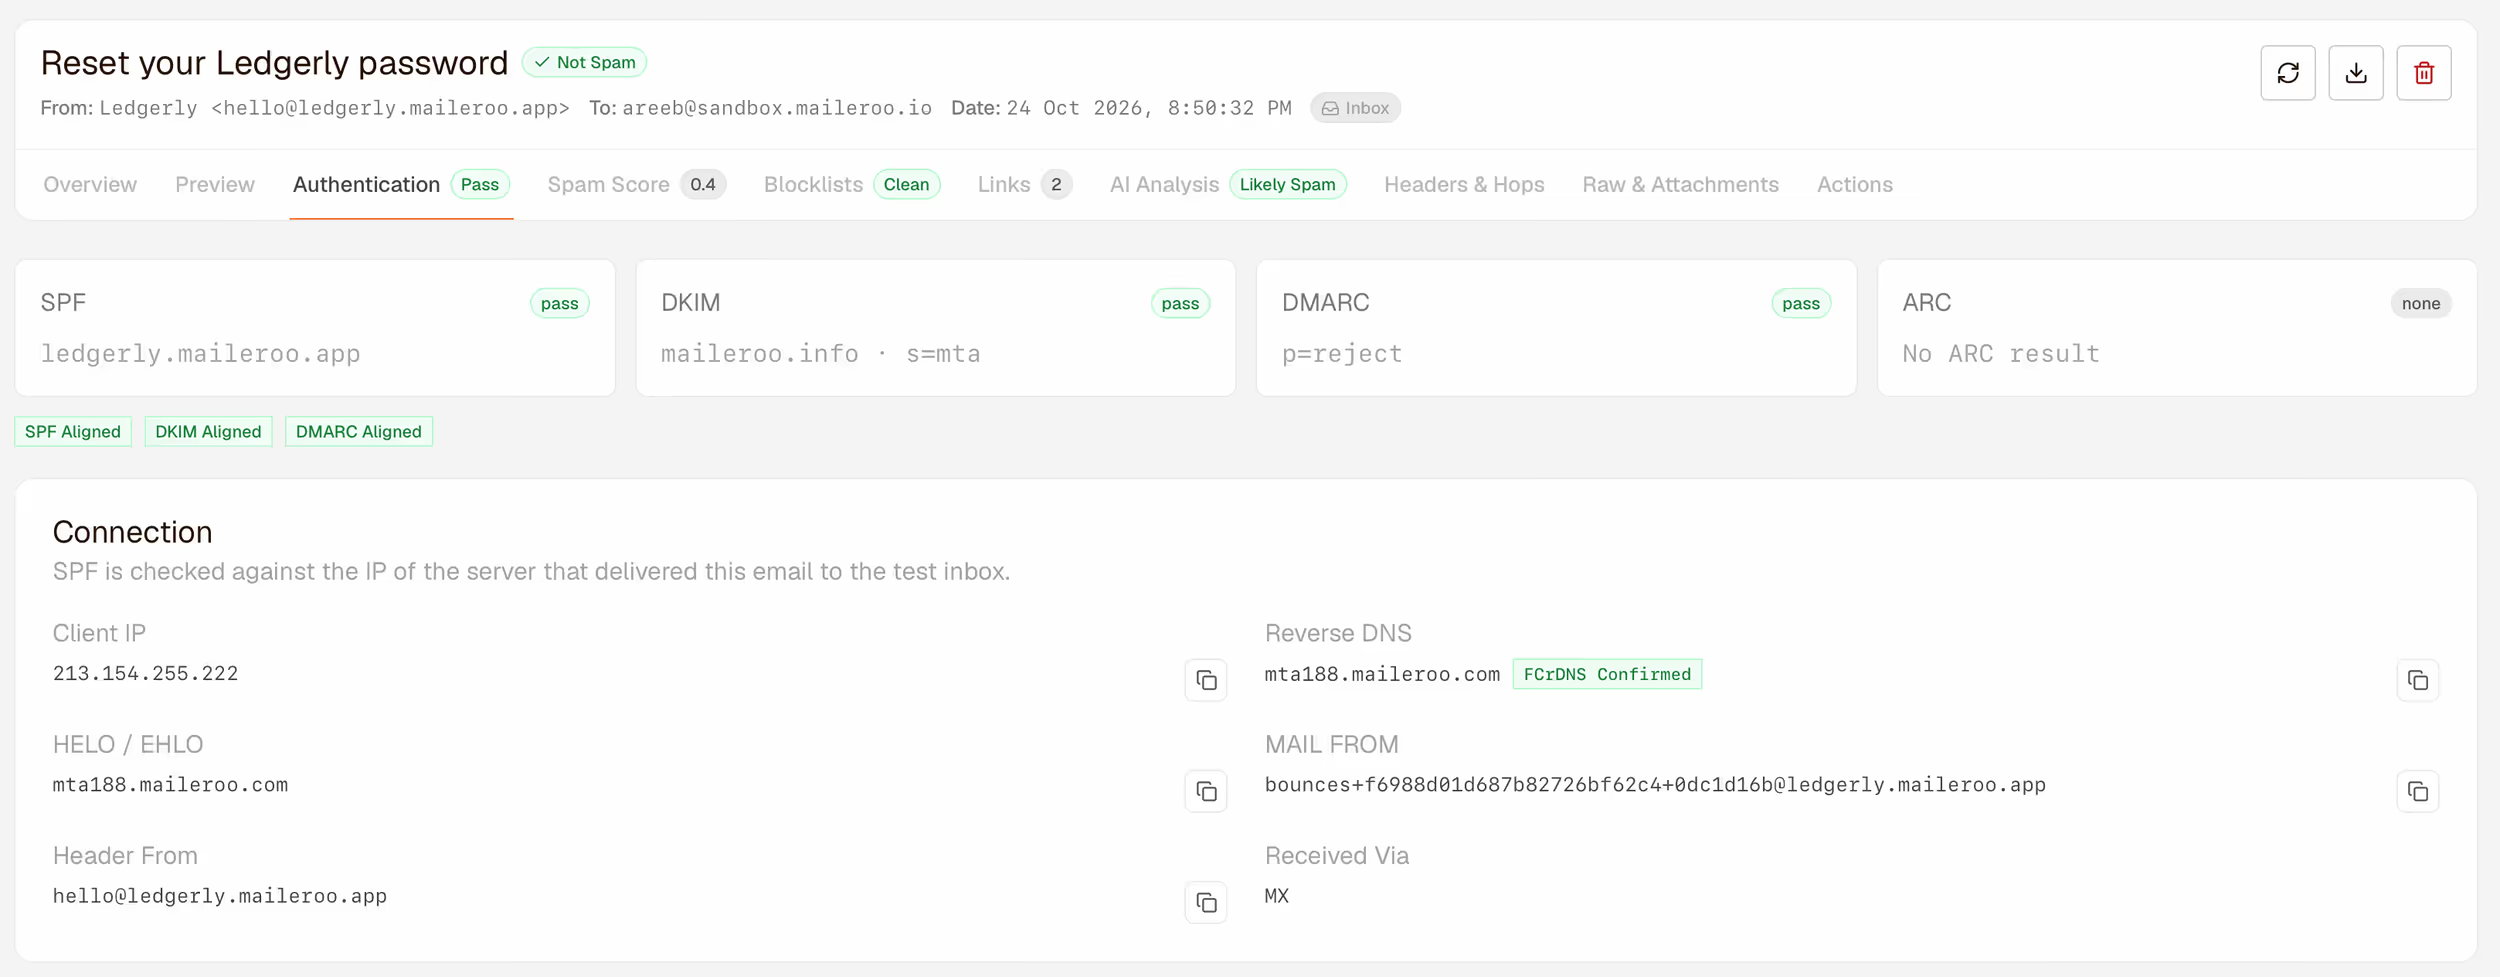
The Authentication tab shows the result of each, whether they align with the From domain, and the connection details behind them: the sending server's IP address, its reverse DNS name, and the envelope sender. It also shows Authenticated Received Chain (ARC), which matters when mail is forwarded.
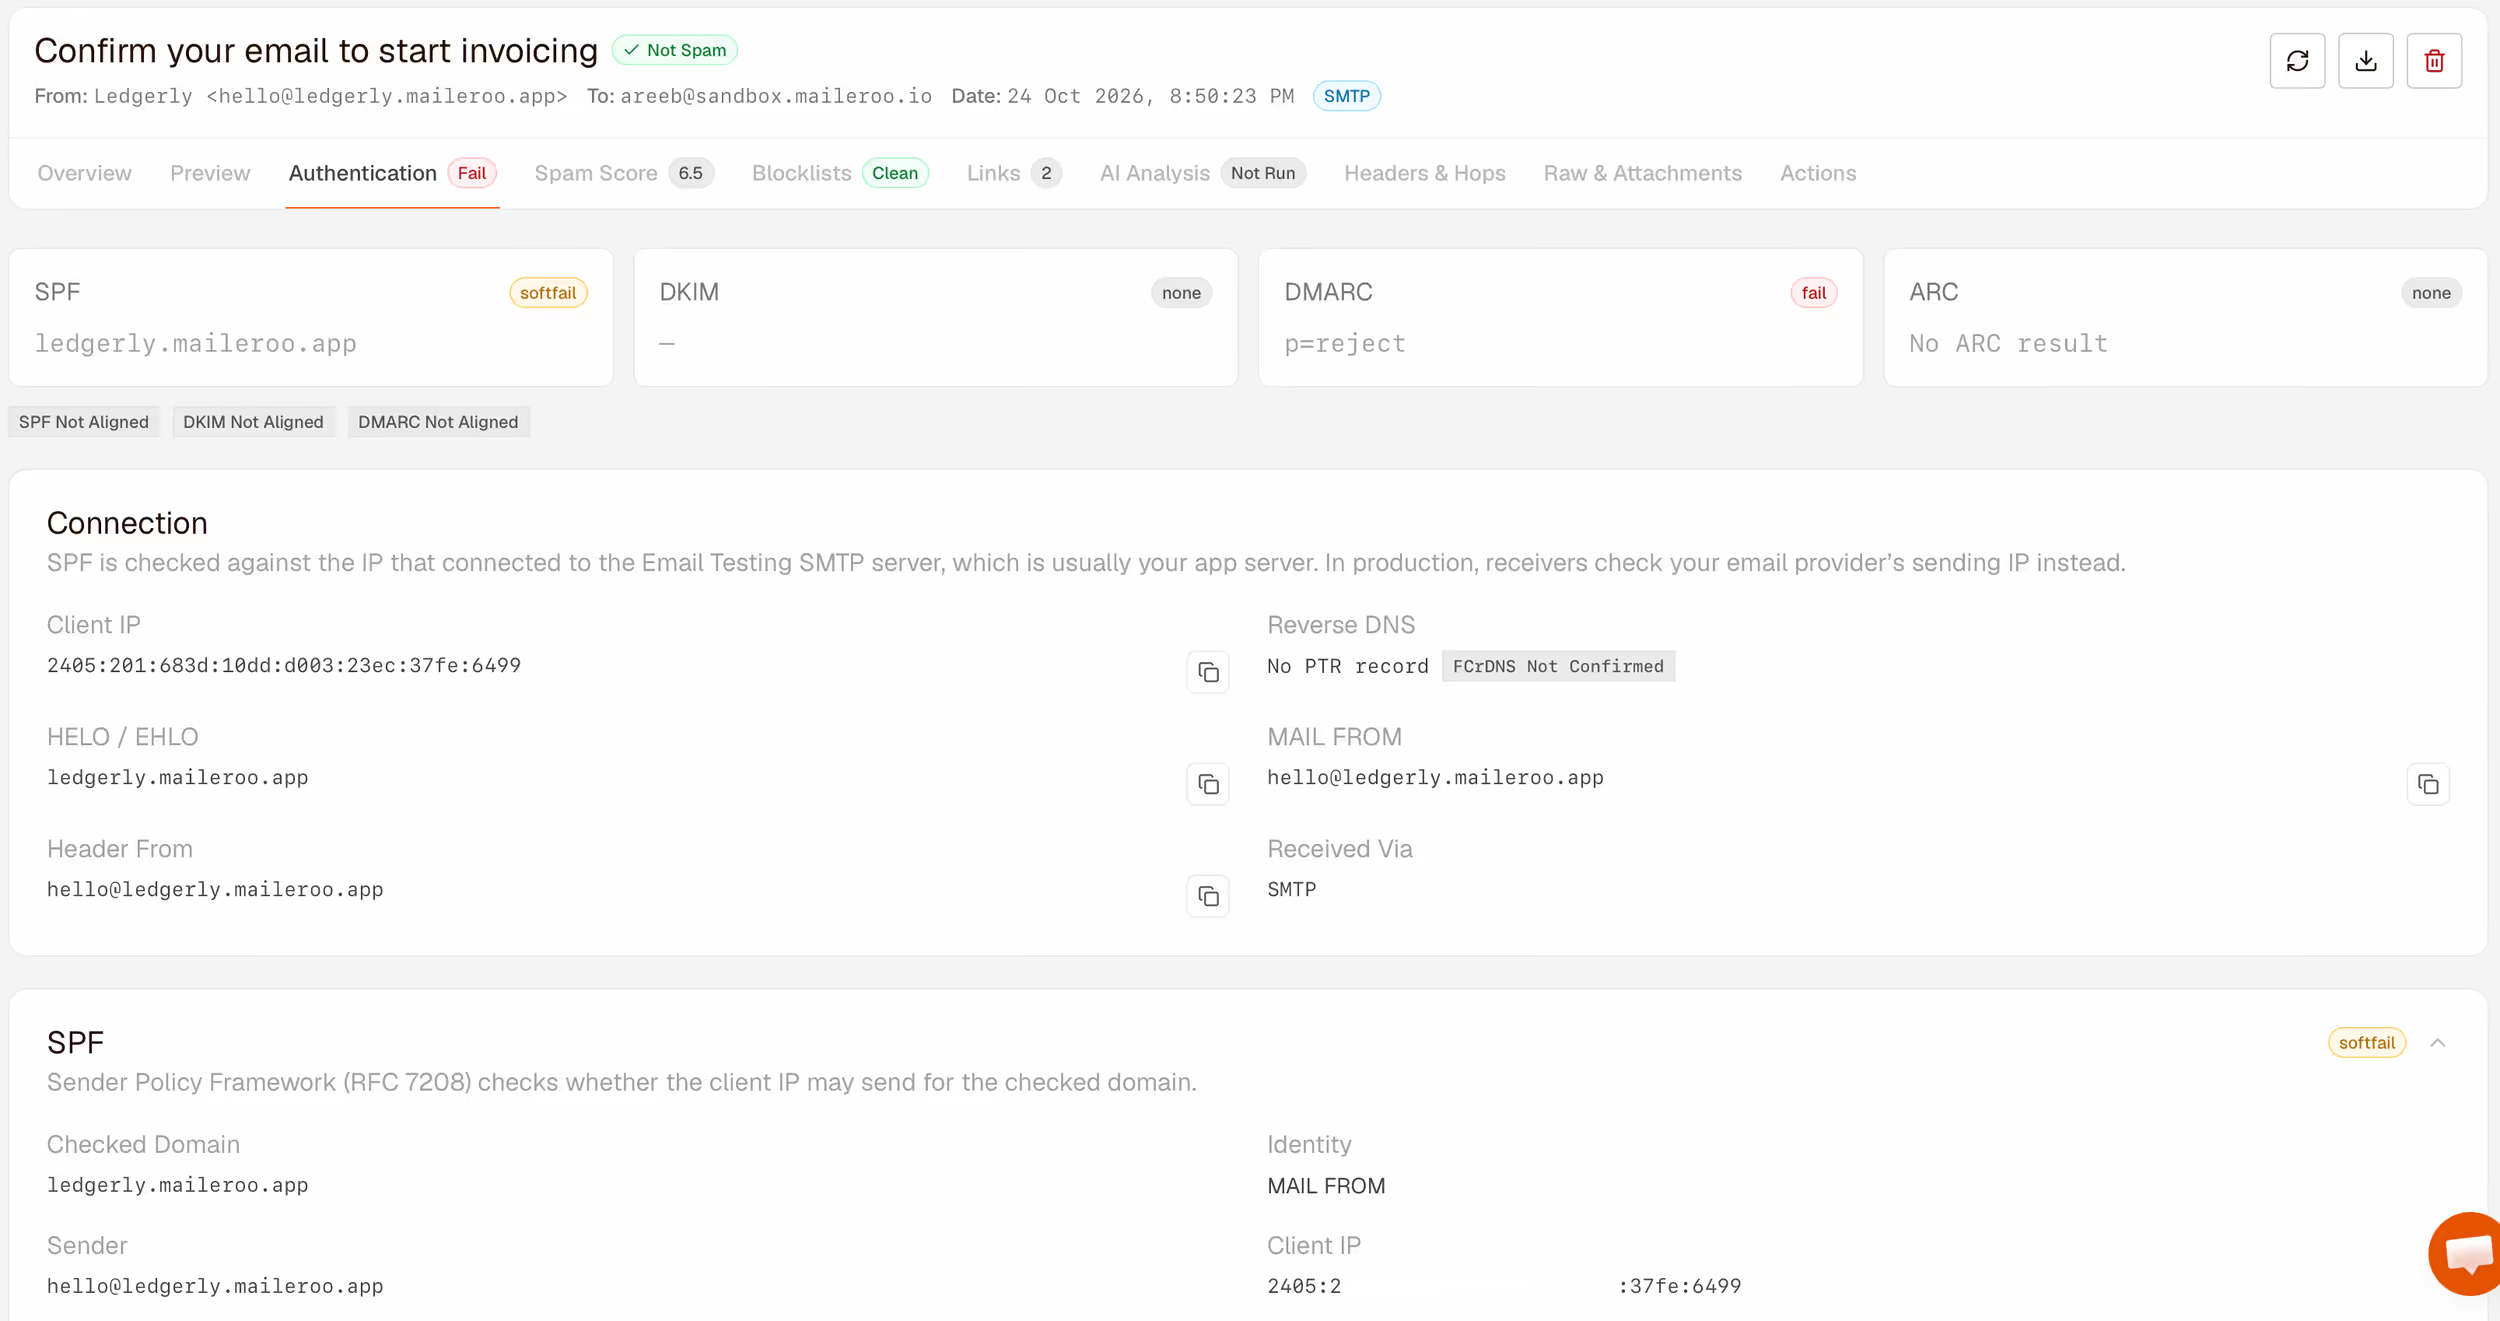
On a message caught by the SMTP sink, you'll see SPF softfail, no DKIM signature and a DMARC failure, as above. That's expected, and the next section explains why and shows how the results change when the email is sent for real.
Spam score: how a filter would rate it
We run every message through Rspamd, the open-source spam filter used by many mail servers. It applies hundreds of rules, and each rule that matches adds or removes points. Above 15 points, Rspamd would reject the message.
The Spam Score tab lists every rule that affected the score, what it means, and the evidence it found. Lower is better.
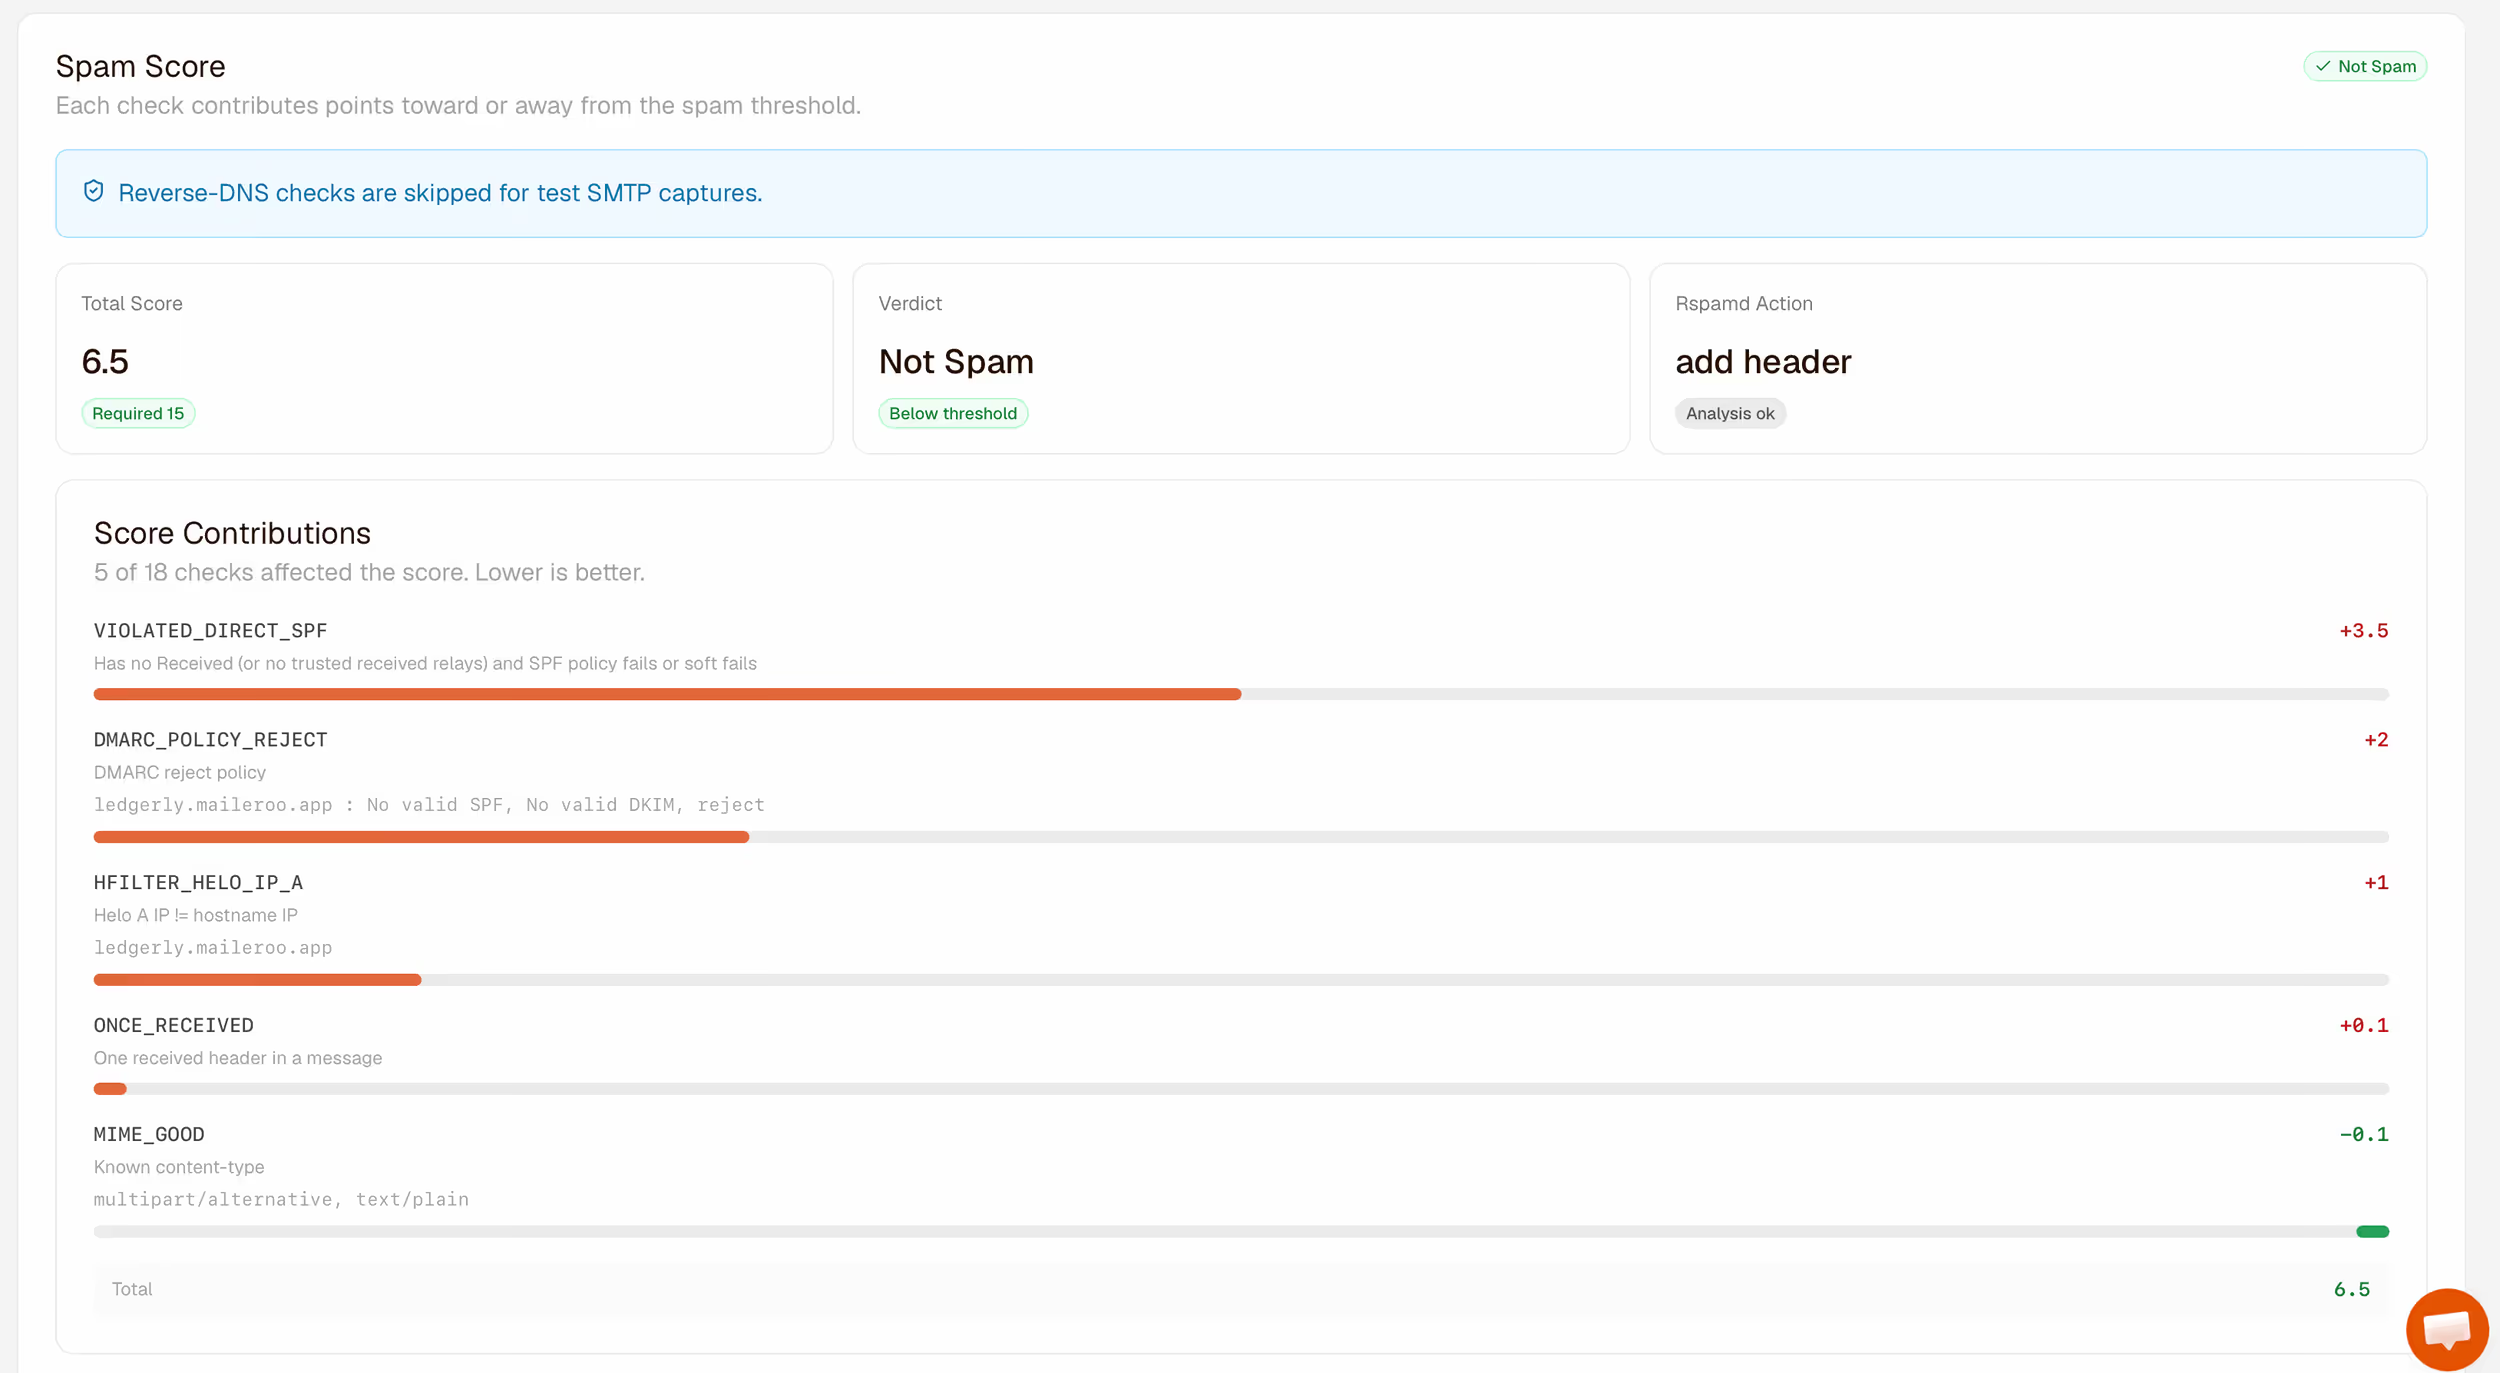
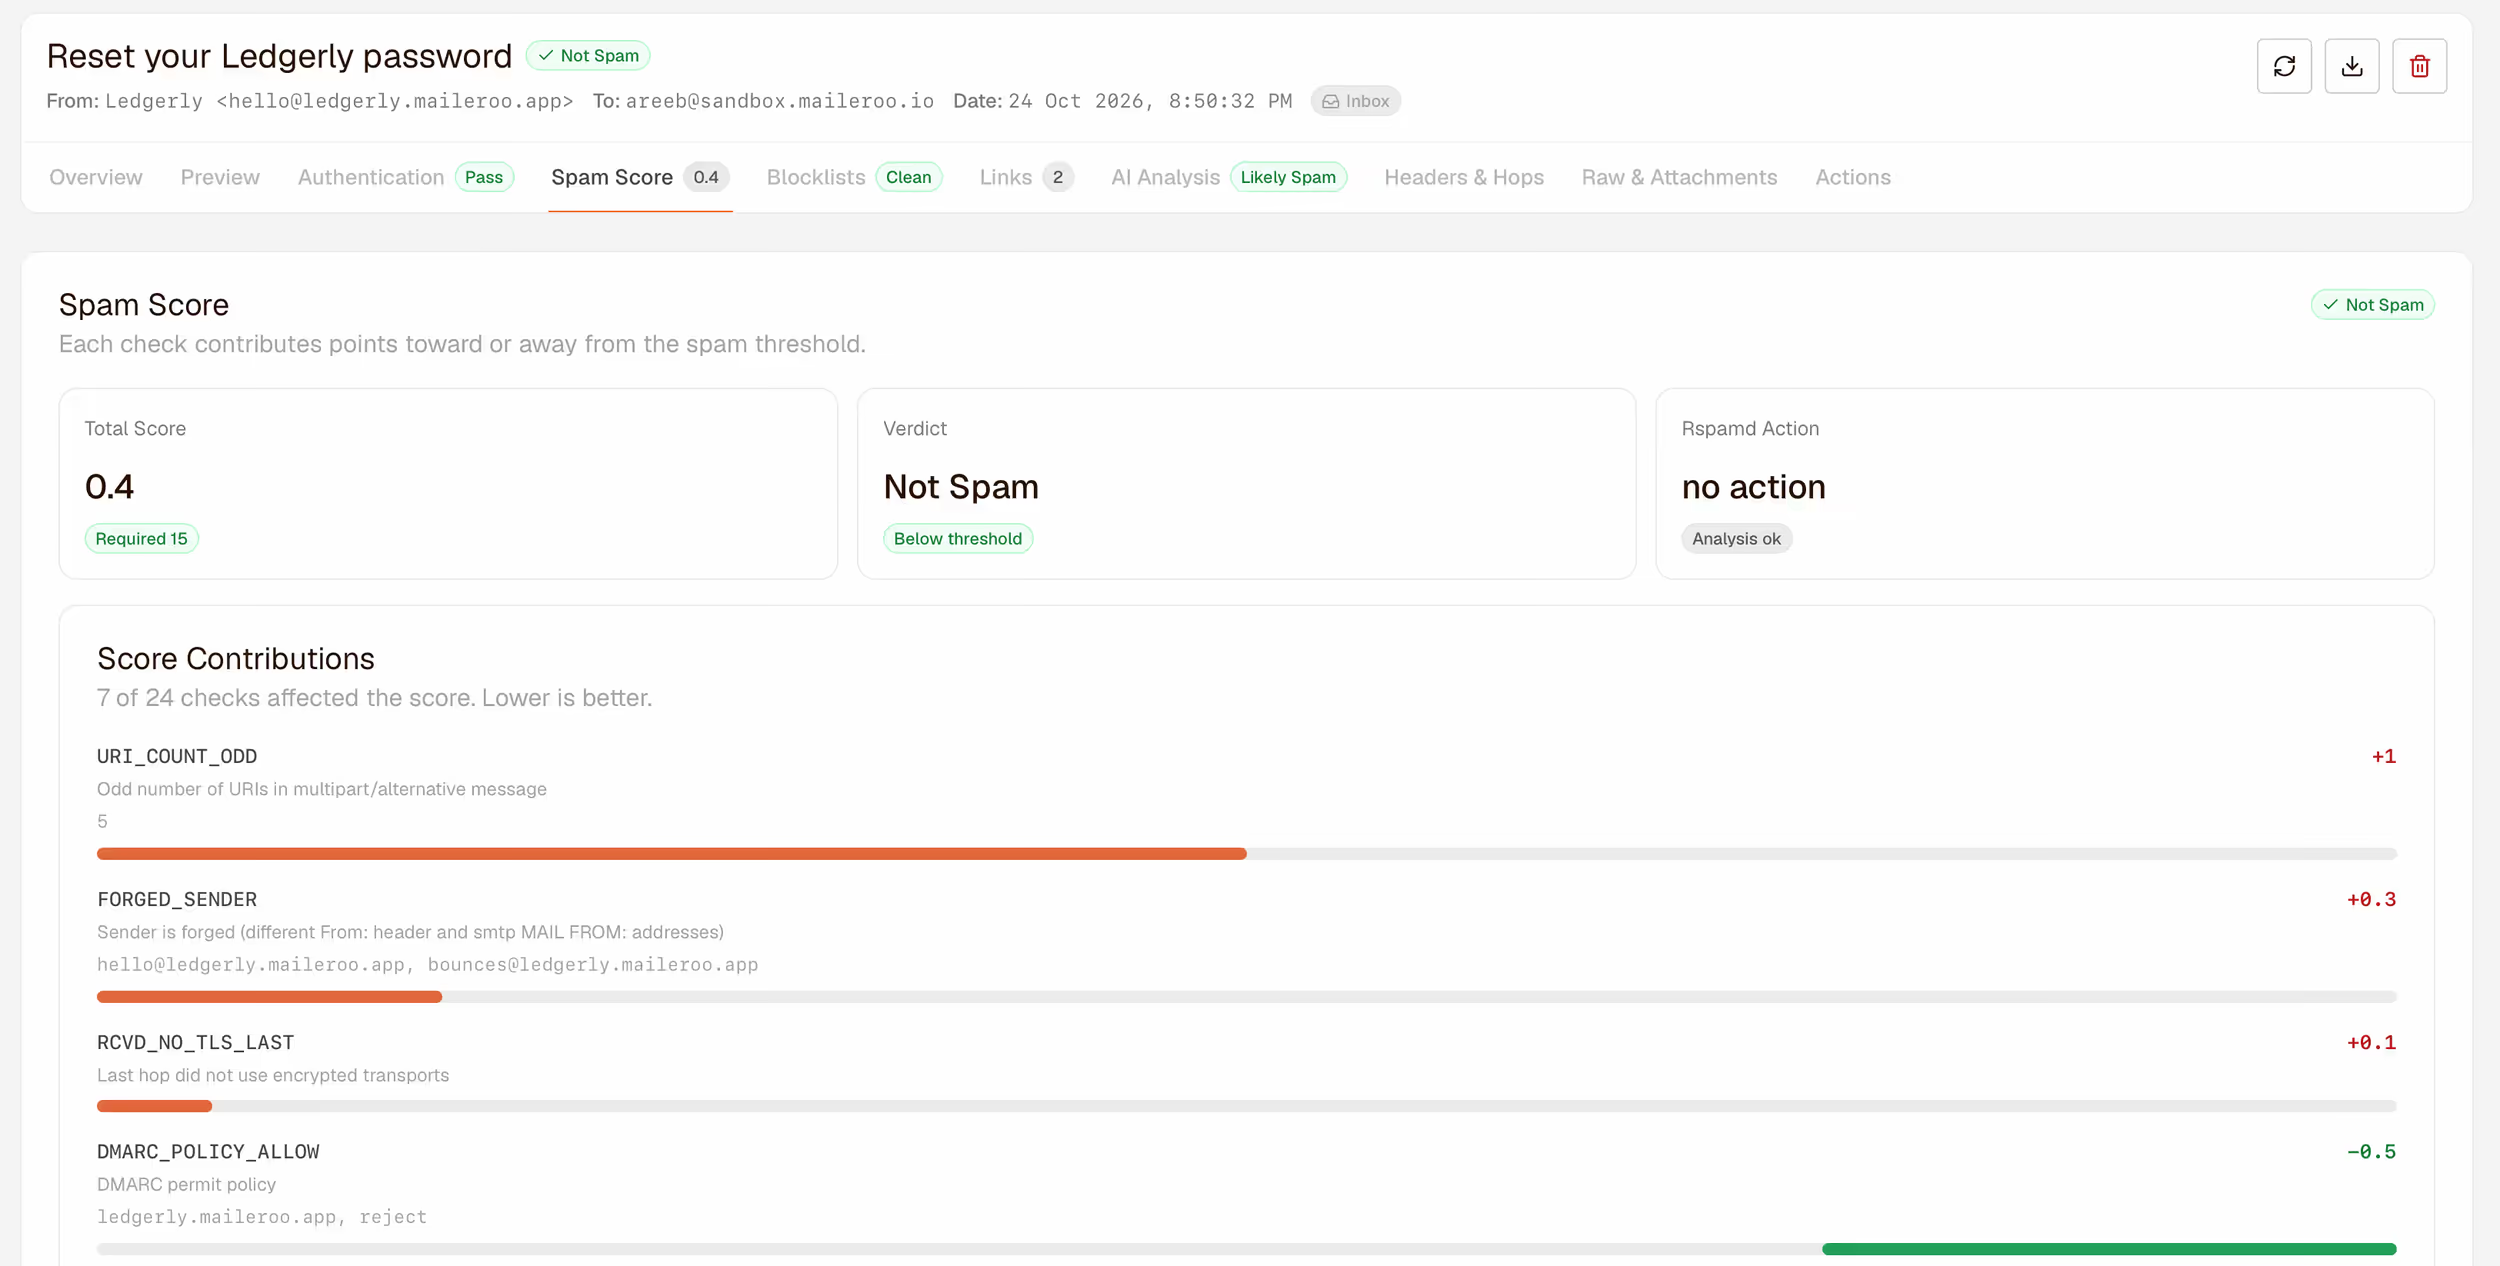
Almost all of this 6.5 comes from three rules about how the email was delivered (VIOLATED_DIRECT_SPF, DMARC_POLICY_REJECT and HFILTER_HELO_IP_A), not from what it says. They go away when the email is sent the way it will be in production.
Blocklists: is anything in the email on a spam list?
Blocklists are public lists of IP addresses and domains known for sending spam. Mail from a listed server, or containing links to a listed domain, is likely to be rejected or filtered. The Blocklists tab checks the sending IP address and every domain linked in the email against the major lists, such as Spamhaus, Barracuda and SpamCop.
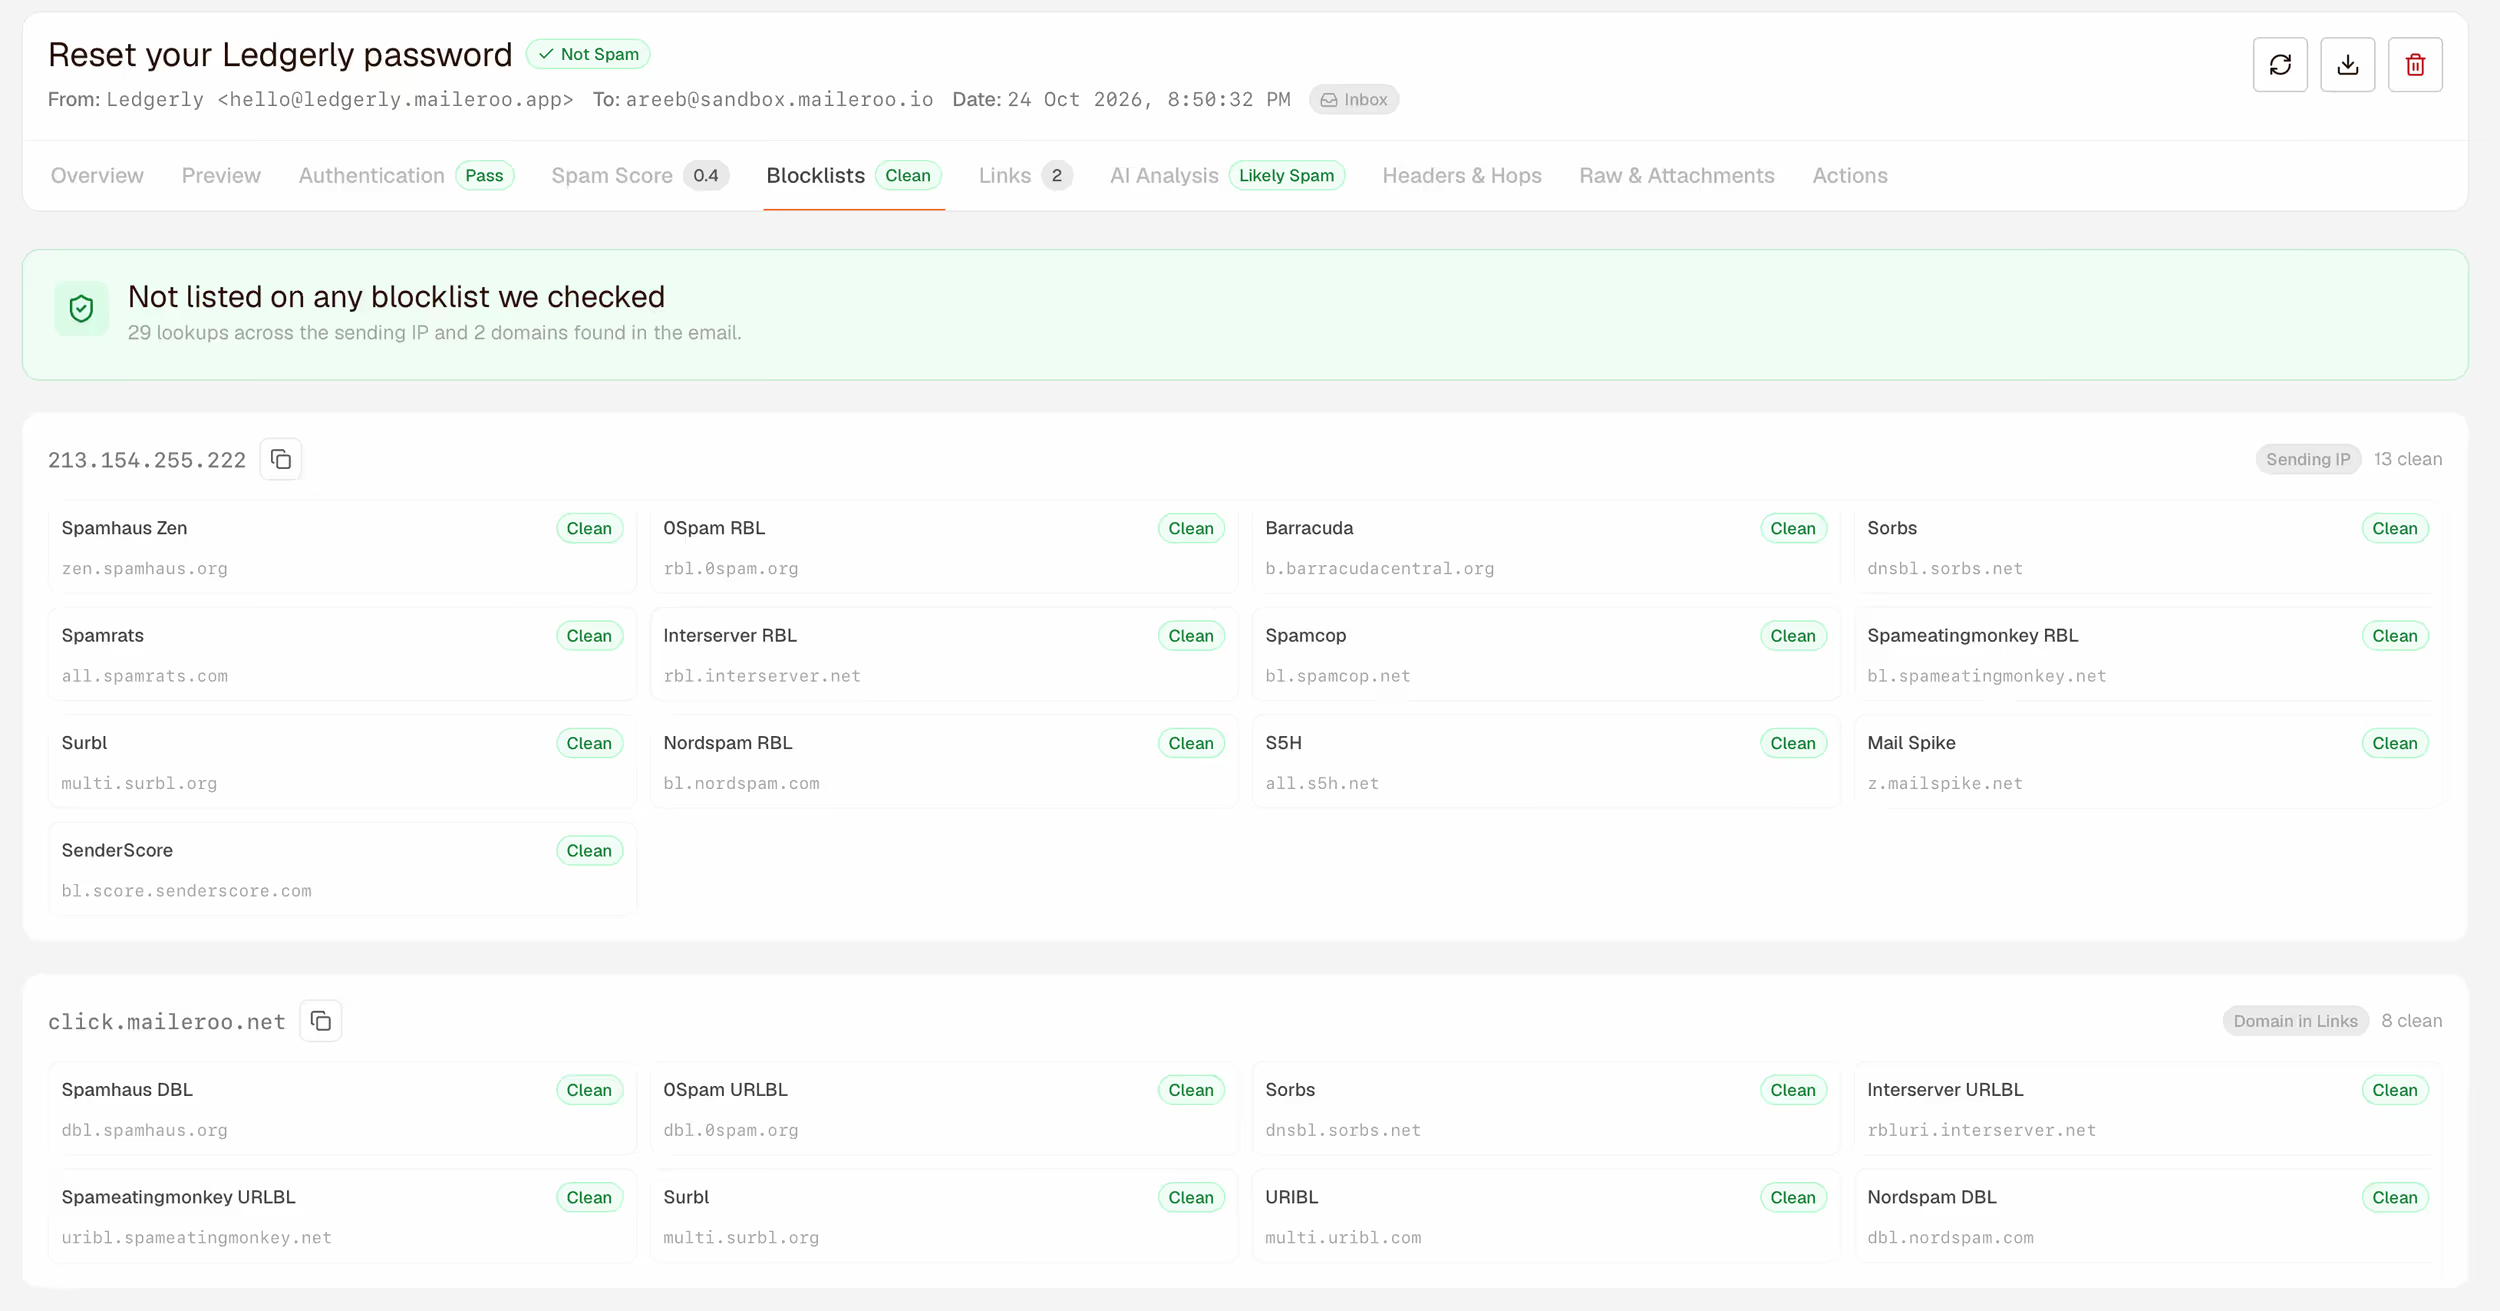
On a message from the SMTP sink, the sending IP address is your own connection's. Home and office connections are often on lists of addresses that shouldn't send mail directly, so a listing there doesn't mean anything is wrong with your production setup.
The remaining tabs cover the details: Links lists every link in the email, Headers & Hops shows the raw headers and the servers the email passed through, and Raw & Attachments lets you download the original message and its files.
Send real mail into a test inbox
When Laravel sends to the SMTP sink, your laptop or CI server connects to us directly and hands over the email. We check it the way a receiving mail server would, and from that point of view:
- SPF fails, because your domain's SPF record lists the servers allowed to send for it, and your laptop isn't one of them.
- DKIM is missing, because Laravel doesn't sign emails. Signing happens on the sending service, with a key published in your domain's DNS.
- DMARC fails, because it needs SPF or DKIM to pass for the From domain, and neither did.
Nothing is wrong with your email or your setup. The sink is telling you what a mailbox provider would see if your server delivered mail itself, which it won't do in production.
To see what a real mailbox provider will see, send the email through Maileroo's SMTP Relay to a test inbox. The relay is our sending service. When you verify a sending domain, its DNS records list our servers in SPF and publish a DKIM key for us to sign with. Mail sent through the relay leaves from those servers with that signature, so it passes. The test inbox then receives it from the internet like any other mailbox and runs the same checks. On the Laravel side, the only difference is which SMTP server the mailer connects to.
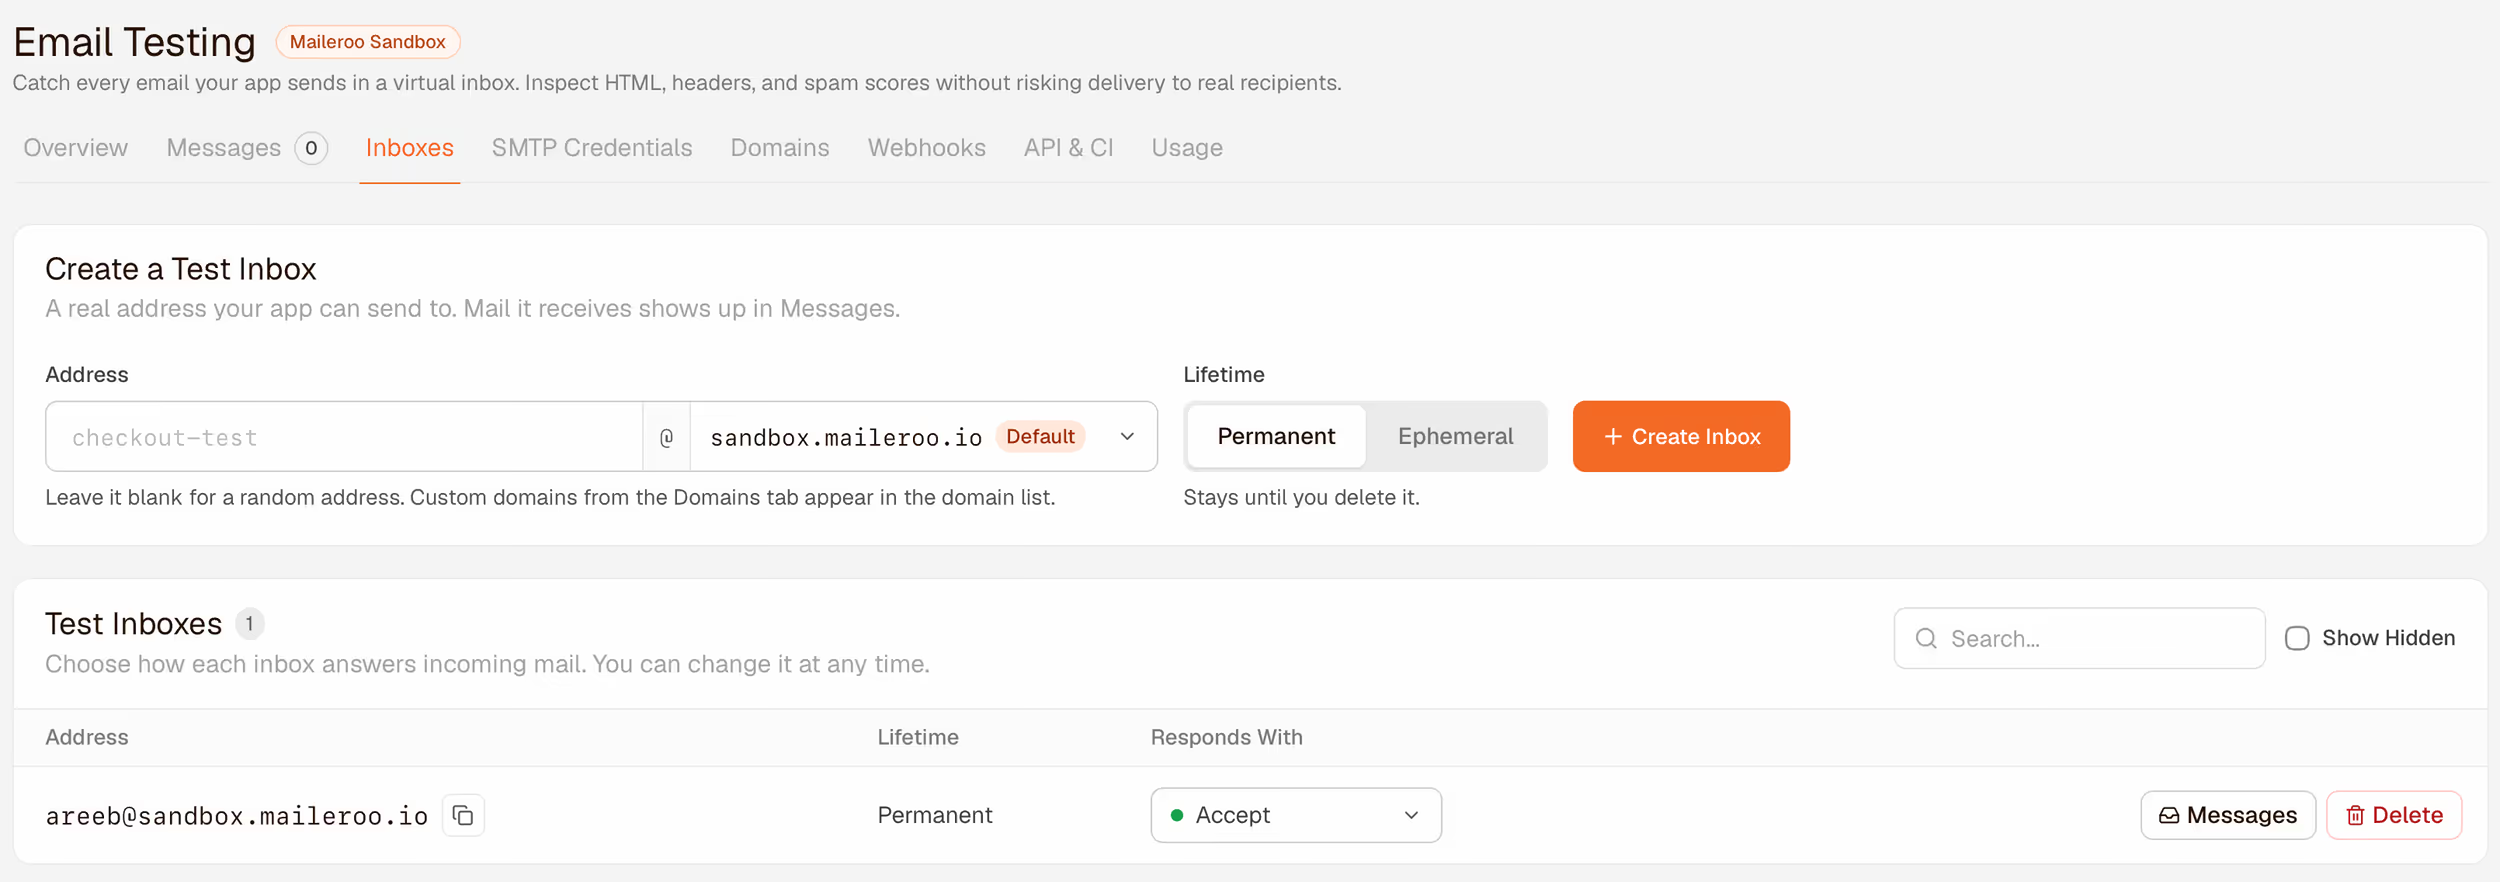
Create a test inbox
On the Overview tab, choose Receive at a Test Inbox, type a name such as jack and click Create Inbox. The address jack@sandbox.maileroo.io is ready immediately.
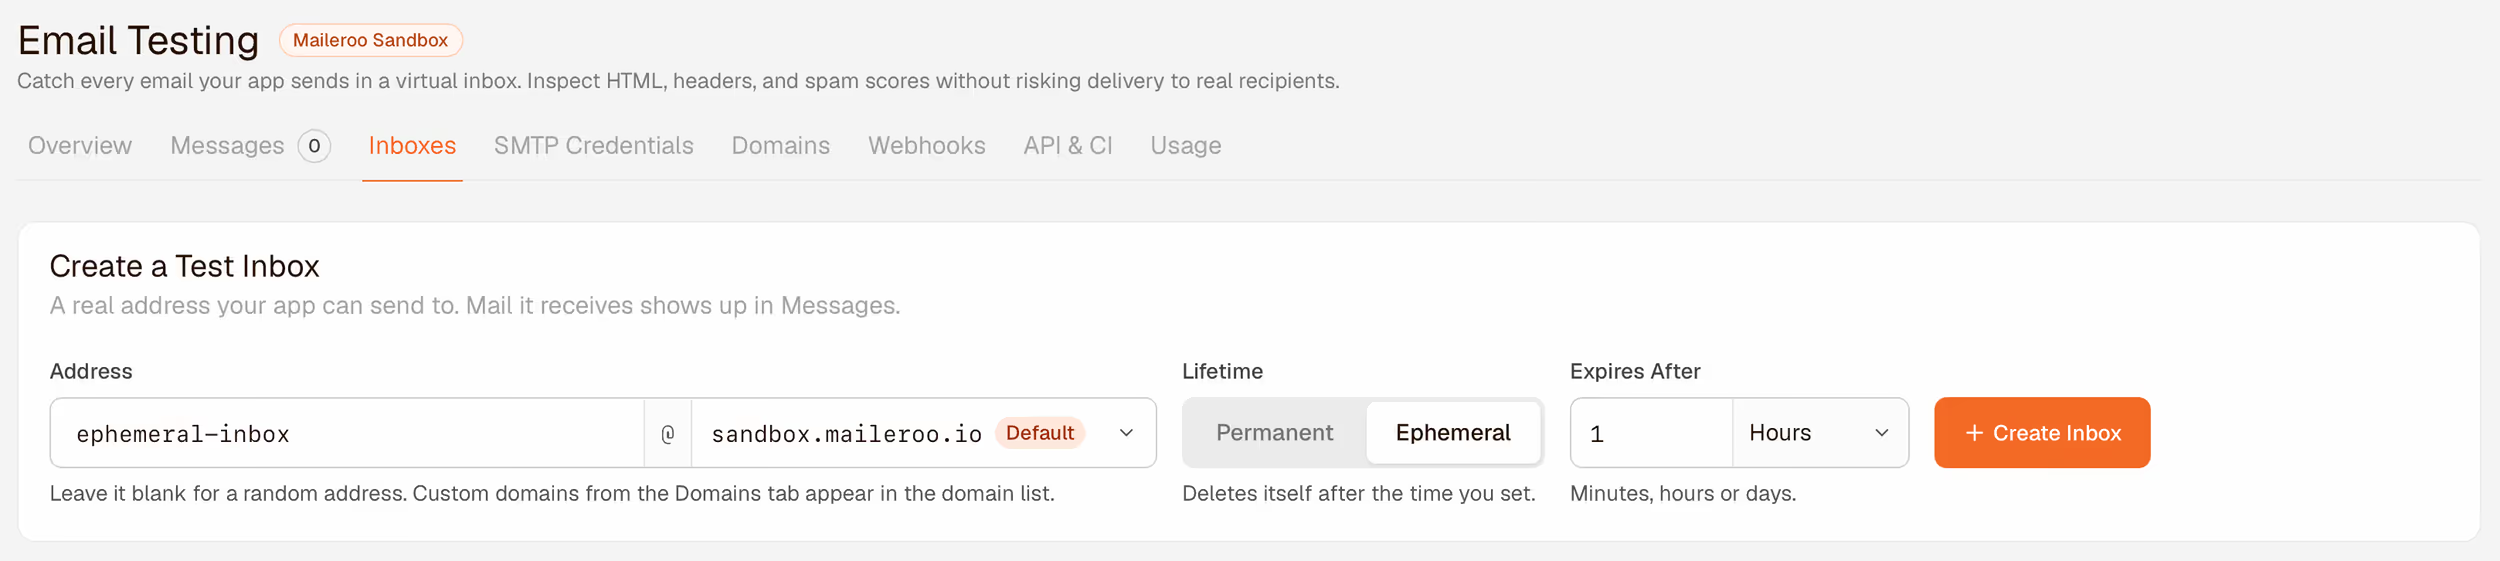
The Inboxes tab gives you more options. A permanent inbox stays until you delete it. An ephemeral inbox deletes itself after the time you set, in minutes, hours or days, which suits automated tests that need a fresh address each time. The free plan includes 5 test inboxes.
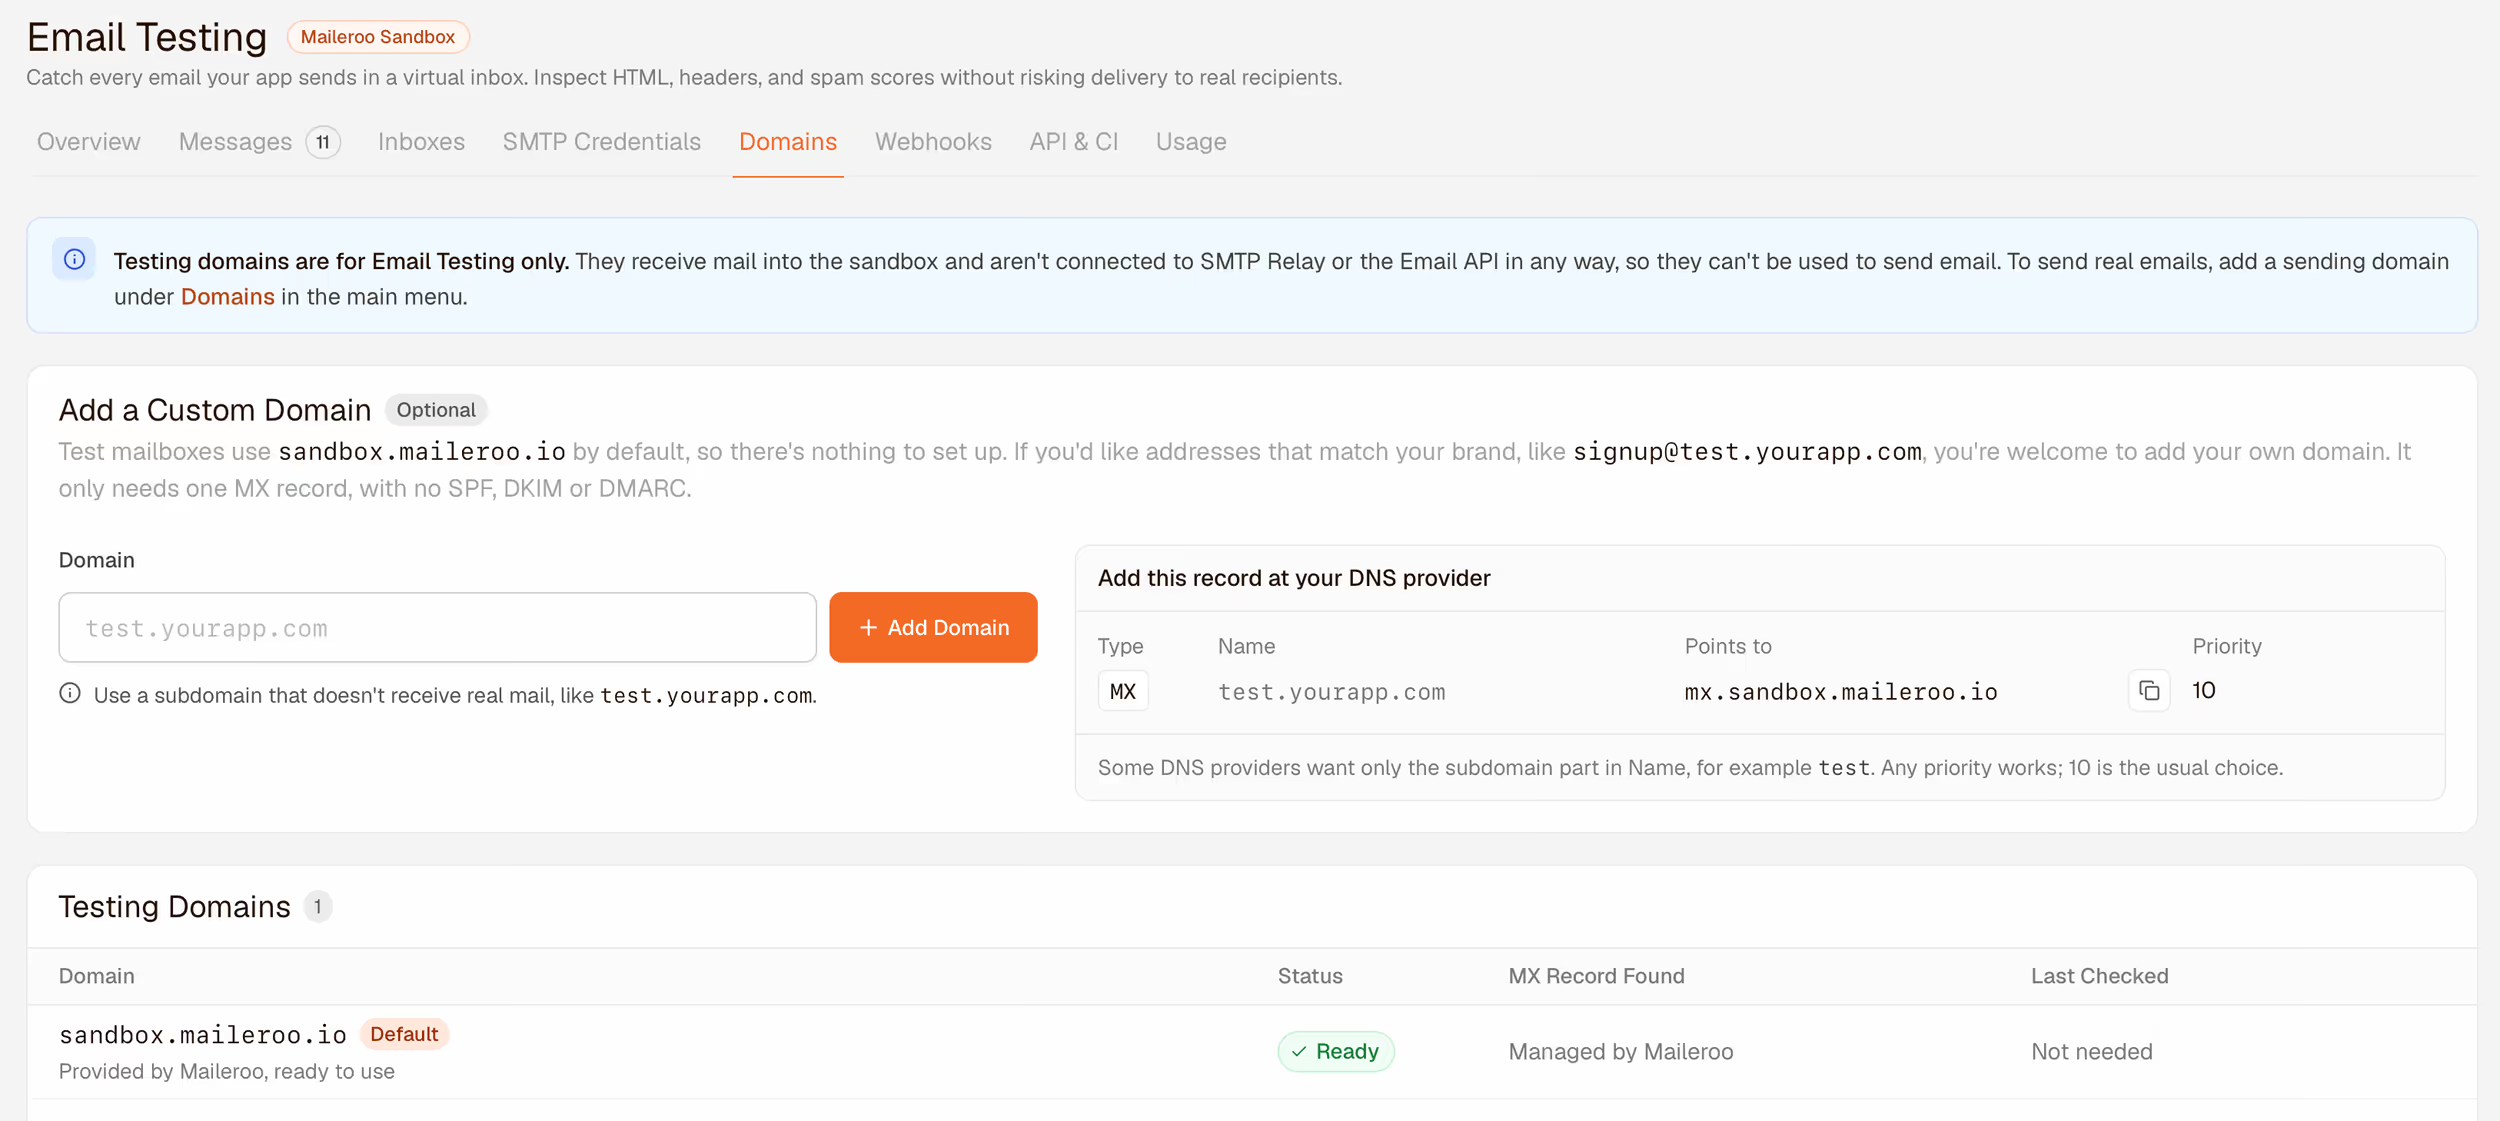
Test inboxes use our sandbox.maileroo.io domain by default. If you'd like addresses on your own domain, such as signup@test.yourapp.com, add the domain in the Domains tab. It needs one MX (mail exchanger) record, the DNS record that tells the internet which server receives mail for a domain. No SPF, DKIM or DMARC setup is needed for a testing domain.
Send to the test inbox through the relay
With Laravel's SMTP mailer connected to the relay instead of the sink, send the email to your test inbox. Your code stays the same:
Mail::to('jack@sandbox.maileroo.io')->send(new InvoicePaid($invoice));In production, the same settings deliver to your real customers, and nothing else in your code changes.
Compare the two
Here are Ledgerly's confirmation and password reset emails, each sent both ways. Both emails got the same results:
| SMTP sink | Sent through the relay to a test inbox | |
|---|---|---|
| Spam score (rejected at 15) | 6.5 | 0.4 |
| SPF | softfail | pass |
| DKIM | none | pass |
| DMARC | fail | pass |
Through the relay, the Authentication tab shows all three passing and aligned, and the connection now comes from one of our sending servers, with a confirmed reverse DNS name:
The delivery rules from the sink are gone from the spam score, and DMARC_POLICY_ALLOW now counts in the email's favor:
Use the SMTP sink day to day, to check what your app produces: content, links, size and rendering. Send through the relay to a test inbox when you change your domain setup or a template that matters, and want to know how a real inbox will treat it.
Two things emaol testing catches in a typical Laravel app
Look again at the Client Previews screenshot above. It's Ledgerly's payment receipt, an ordinary Laravel Markdown mailable with a PDF attached, and it shows two problems that are easy to miss when you open the email in your own inbox.
An attachment that makes the email 1.2 MB
The Message Size card says 1.2 MB, while the HTML part is only 17.6 KB. The difference is the one attachment, the PDF receipt. Gmail's clipping limit only applies to the HTML, so Gmail wouldn't complain, but a 1.2 MB receipt is slower to deliver, can hit size limits on the receiving side, and looks unusual to some filters.
Attachments are the usual reason a transactional email gets heavy, and you won't notice it from the inbox, where a PDF is just an icon. Email Testing puts the total size next to the HTML size on every message, so the gap stands out. It doesn't decide for you how big is too big, but you can: the size_lte check in the CI test later on fails the build when an email goes over your limit.
If you generate PDFs with barryvdh/laravel-dompdf, a common cause is the font. With the default settings, dompdf embeds the whole DejaVu Sans font file in every PDF, which is where this receipt's weight came from. Switching the PDF template to a font that every PDF reader already has fixes it:
- body { font-family: DejaVu Sans, sans-serif; }+ body { font-family: Helvetica, Arial, sans-serif; }The PDF dropped to 1,860 bytes and the whole email to 26,816 bytes, about 2% of its old size. Helvetica is one of the 14 standard PDF fonts, so nothing is embedded. It covers Latin characters only, so if your documents need other scripts, keep an embedded font and look at dompdf's font subsetting option.
Buttons that break in dark mode
The same screenshot shows the second problem. The light preview looks fine, but in the dark preview the View invoice button turns light grey with its label sitting in a black box. Every email that we sent with Laravel's default button had the same problem. Here it is at full size (Open Full Size) in the confirmation email:
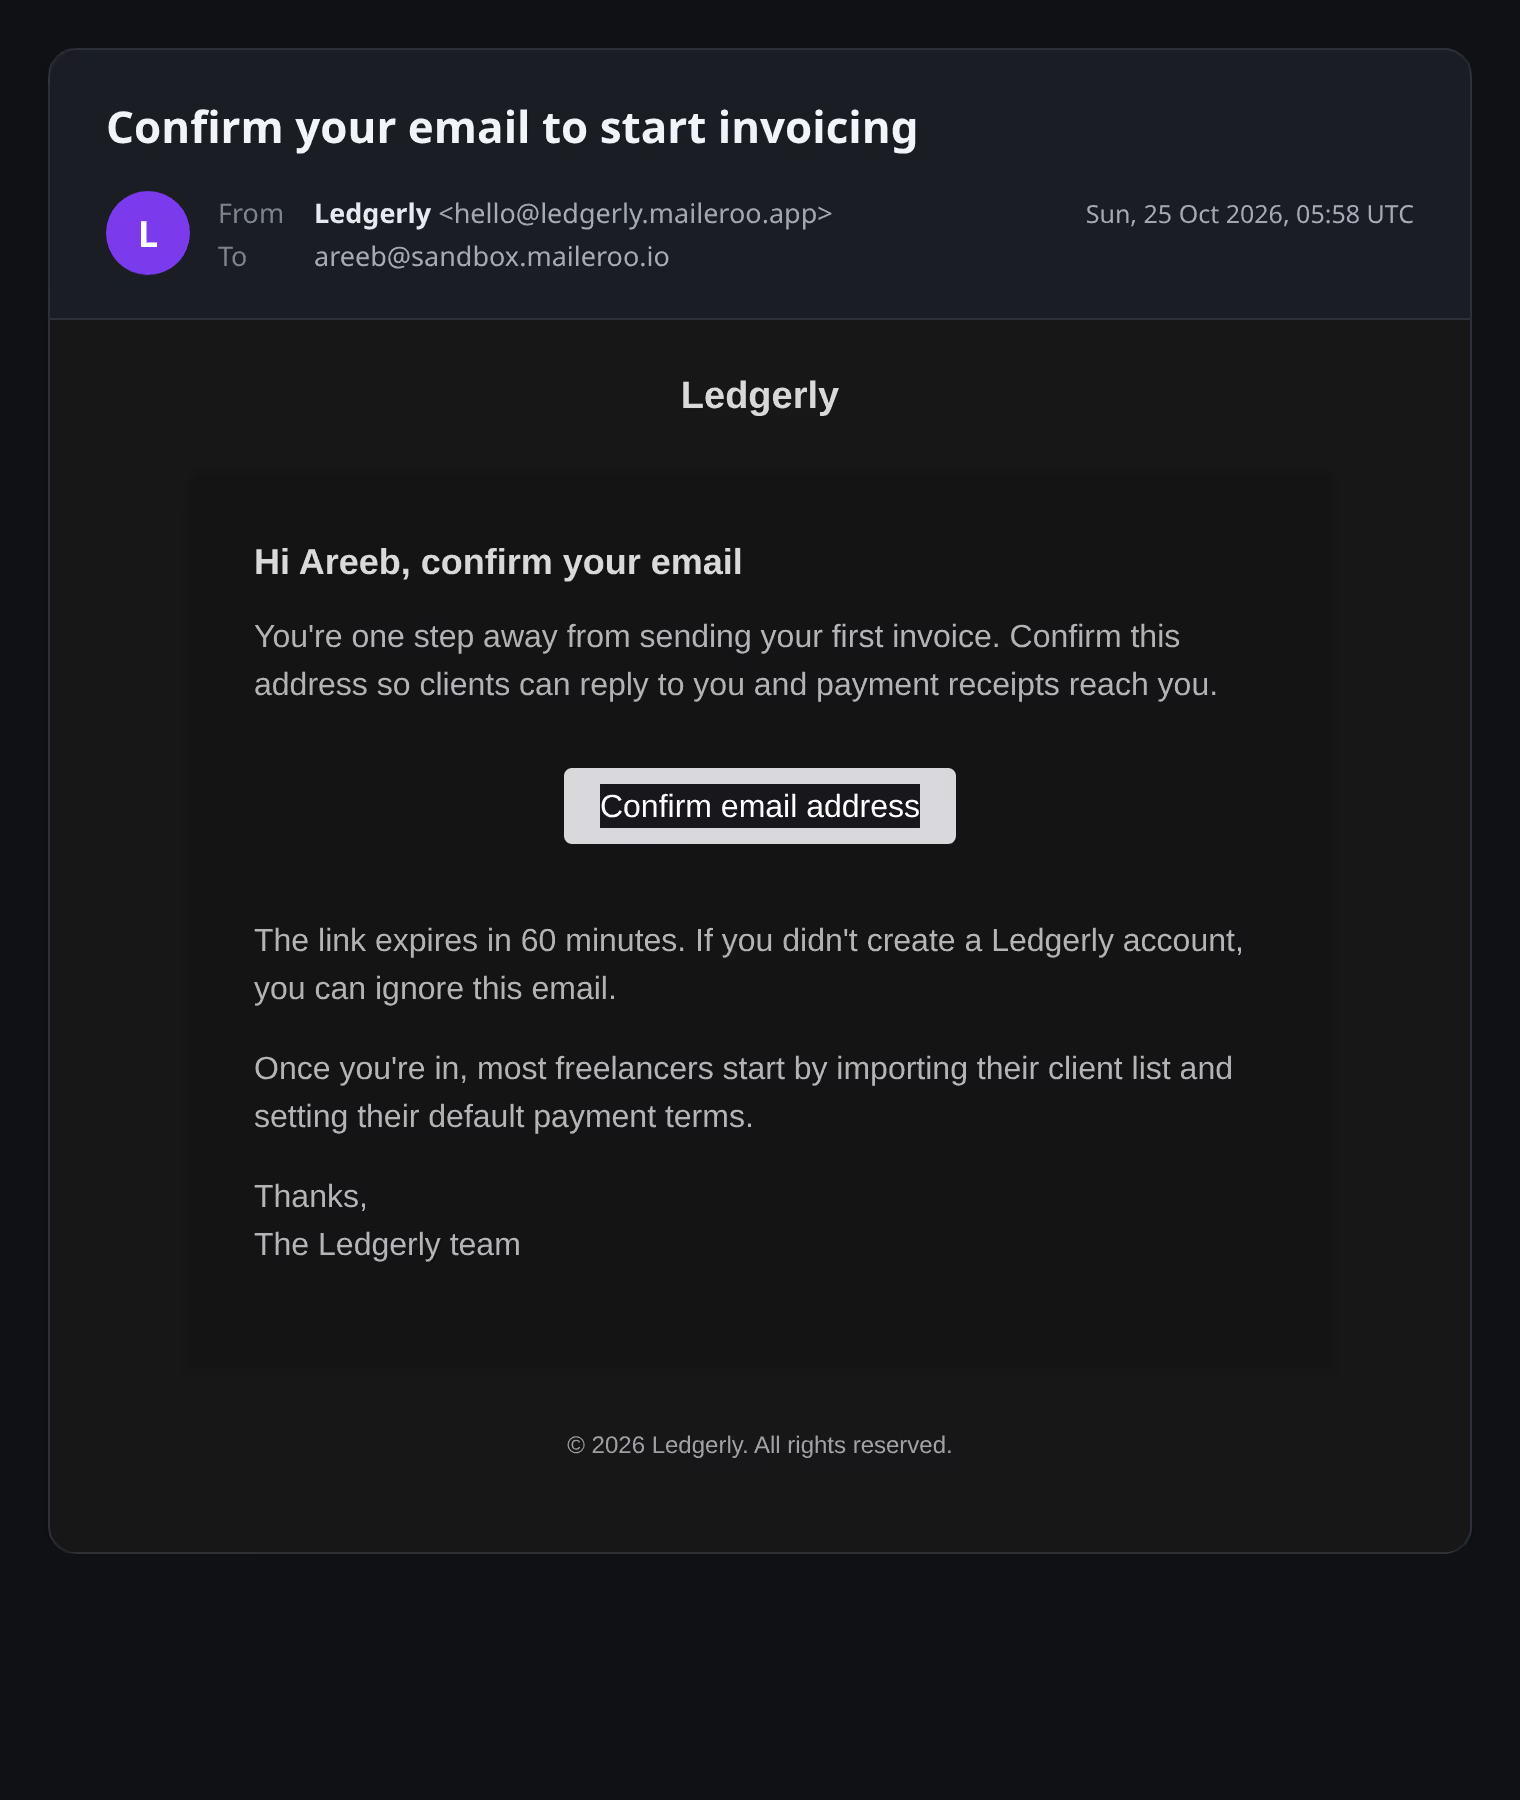
Laravel's default mail theme draws the button color with thick borders in the same color as the background:
.button-primary { background-color: #18181b; border-bottom: 8px solid #18181b; border-left: 18px solid #18181b; border-right: 18px solid #18181b; border-top: 8px solid #18181b;}Dark-mode recoloring treats borders and backgrounds differently, so the two drift apart. Publish Laravel's mail views with php artisan vendor:publish --tag=laravel-mail, then use padding instead of borders in resources/views/vendor/mail/html/themes/default.css:
.button-blue,.button-primary { background-color: #4338ca; padding: 8px 18px;}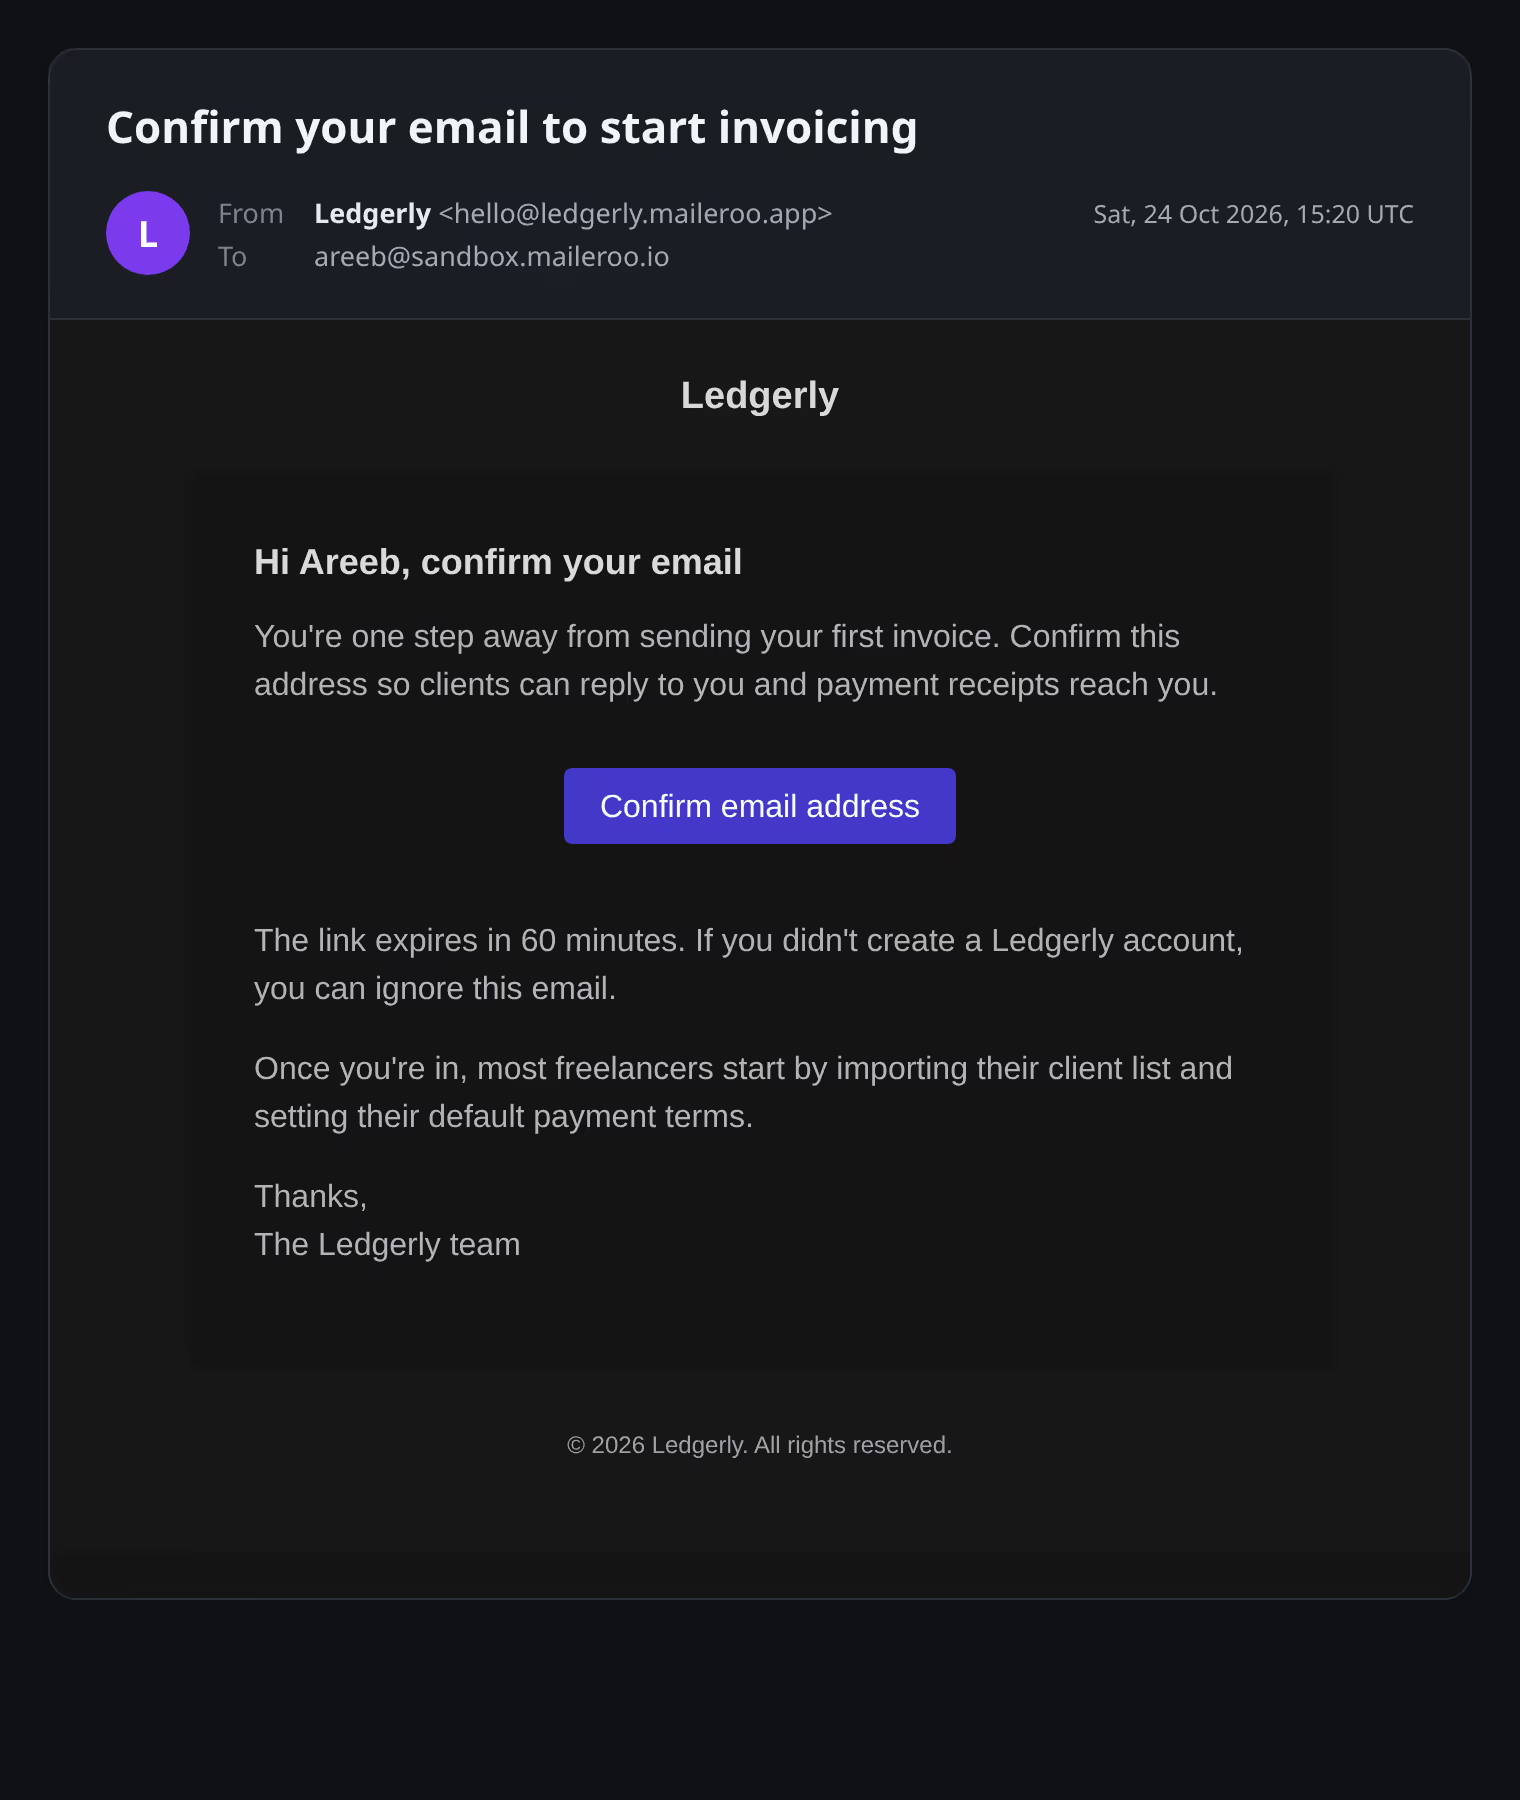
Ask AI Analysis for a second opinion
Rspamd applies fixed rules. AI Analysis reads the email the way a person or a modern filter might and tells you how inbox providers are likely to treat it. It doesn't run automatically, because most emails don't need it. Open a message, go to the AI Analysis tab and click Run AI Analysis.
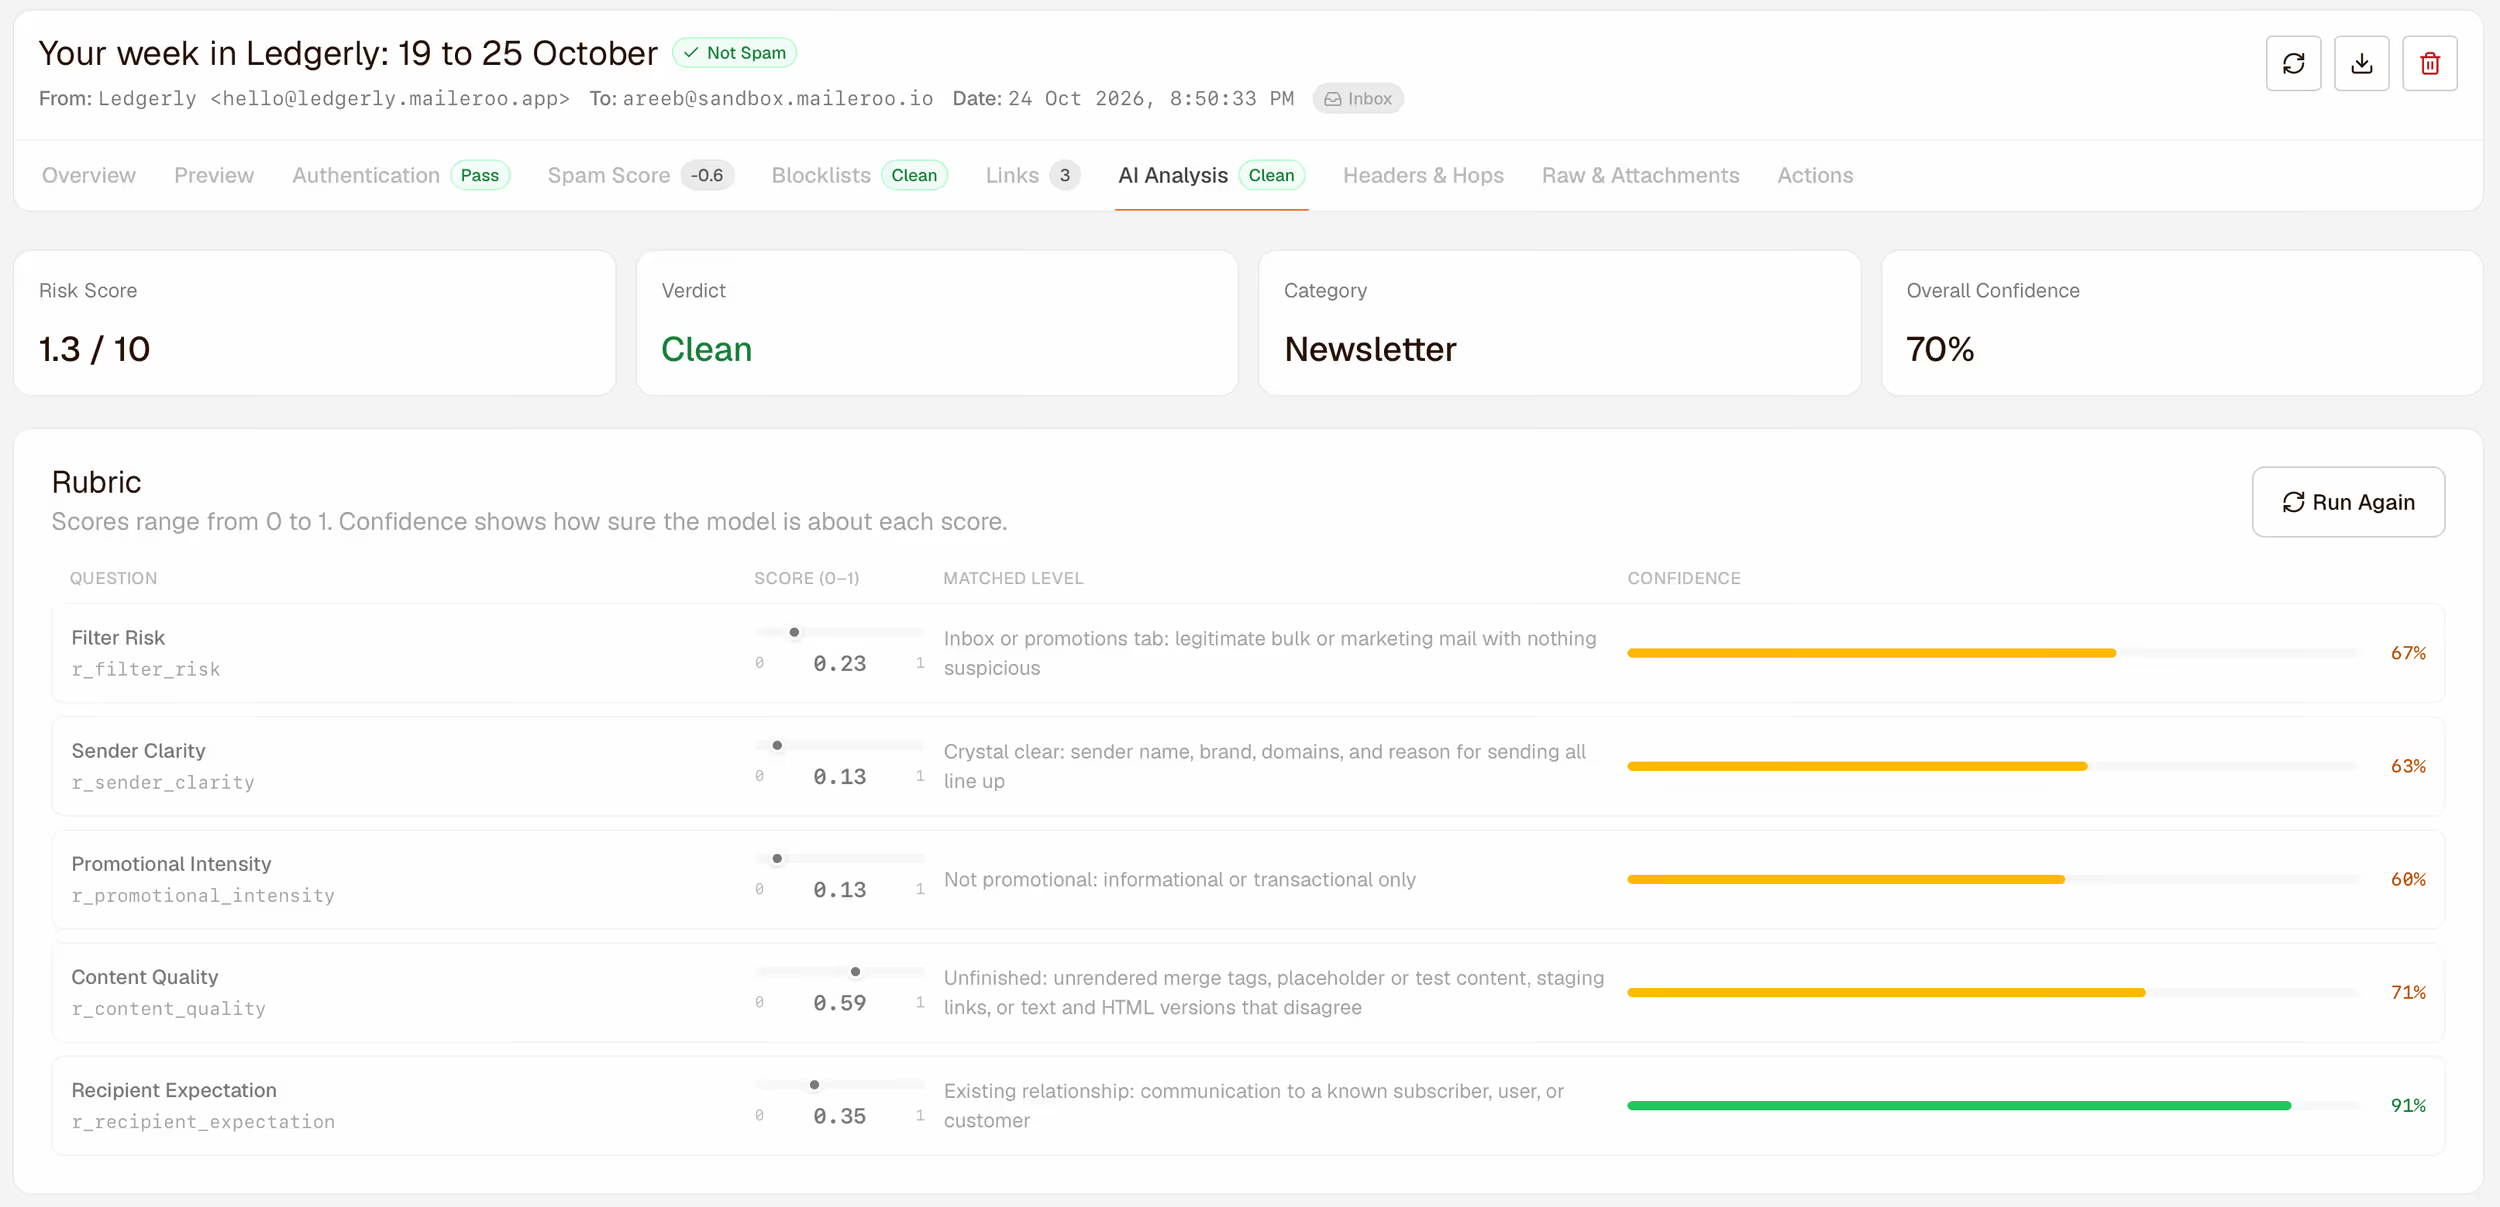
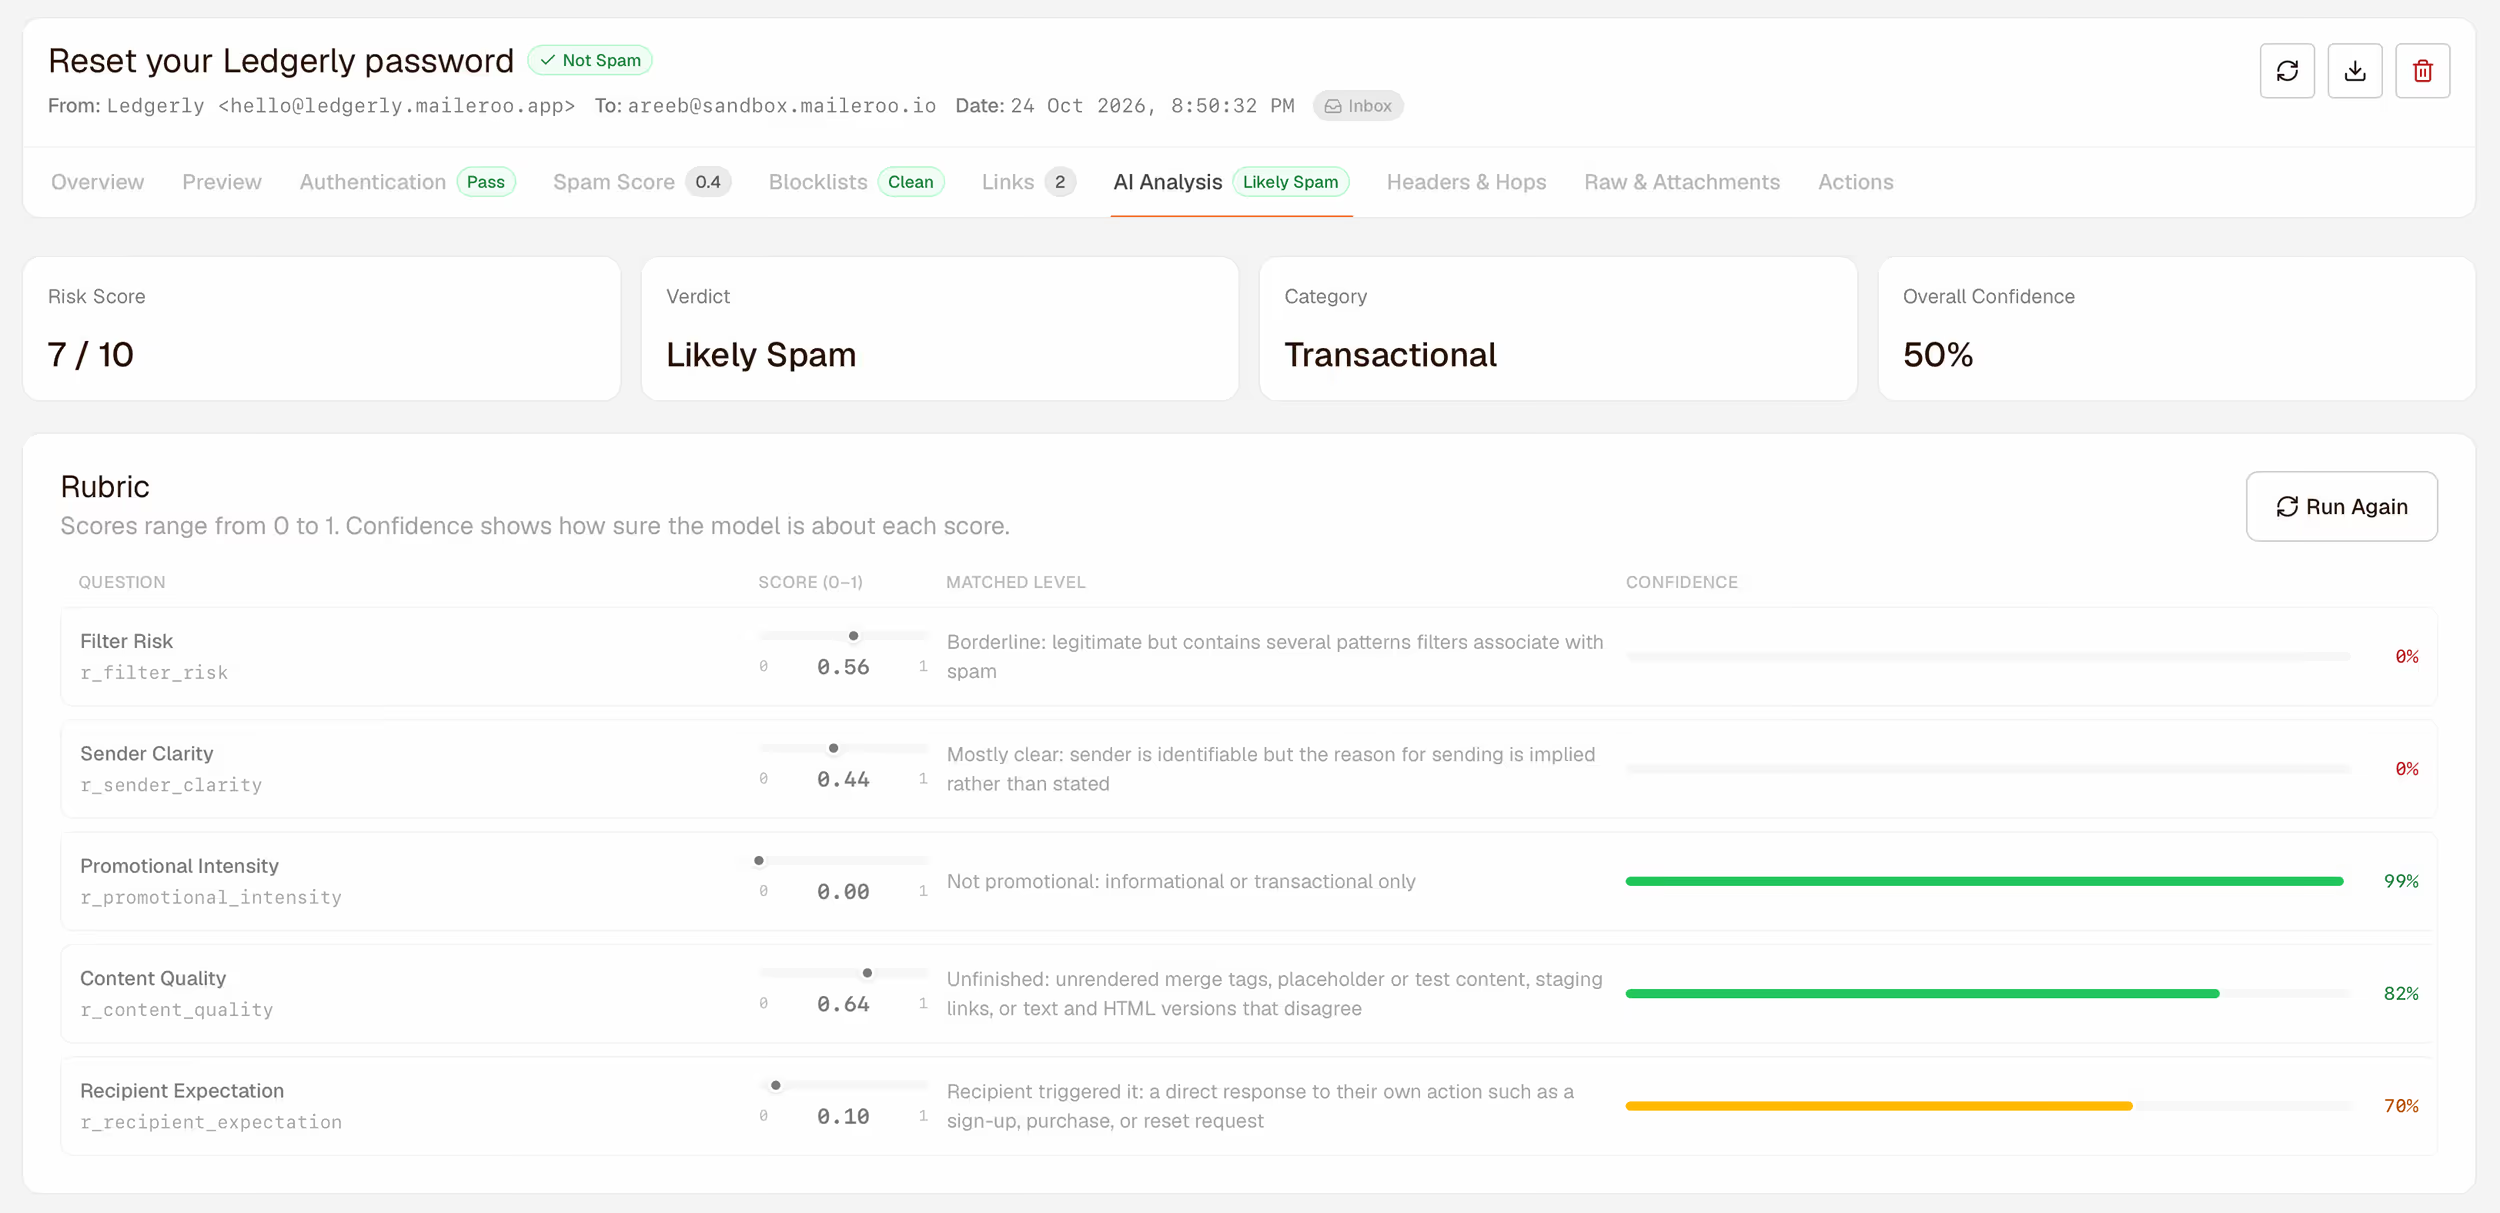
You get a risk score from 0 to 10, a verdict from "clean" to "spam", the type of email it thinks it is, and five questions it scored: filter risk, sender clarity, promotional intensity, content quality and whether the recipient expects the email. Each comes with the model's confidence.
Ledgerly's weekly summary is a typical result. It scored 1.3 out of 10, "clean", and the model recognized it as a newsletter going to an existing customer:
The password reset, sent from the same domain, scored 7, "likely spam", with a confidence of 50%:
Below the rubric, Signals Found lists what pushed the score up or down. For the reset, the two biggest were that it reads like a phishing attempt and that the brand named in the email doesn't match the domains in its links:
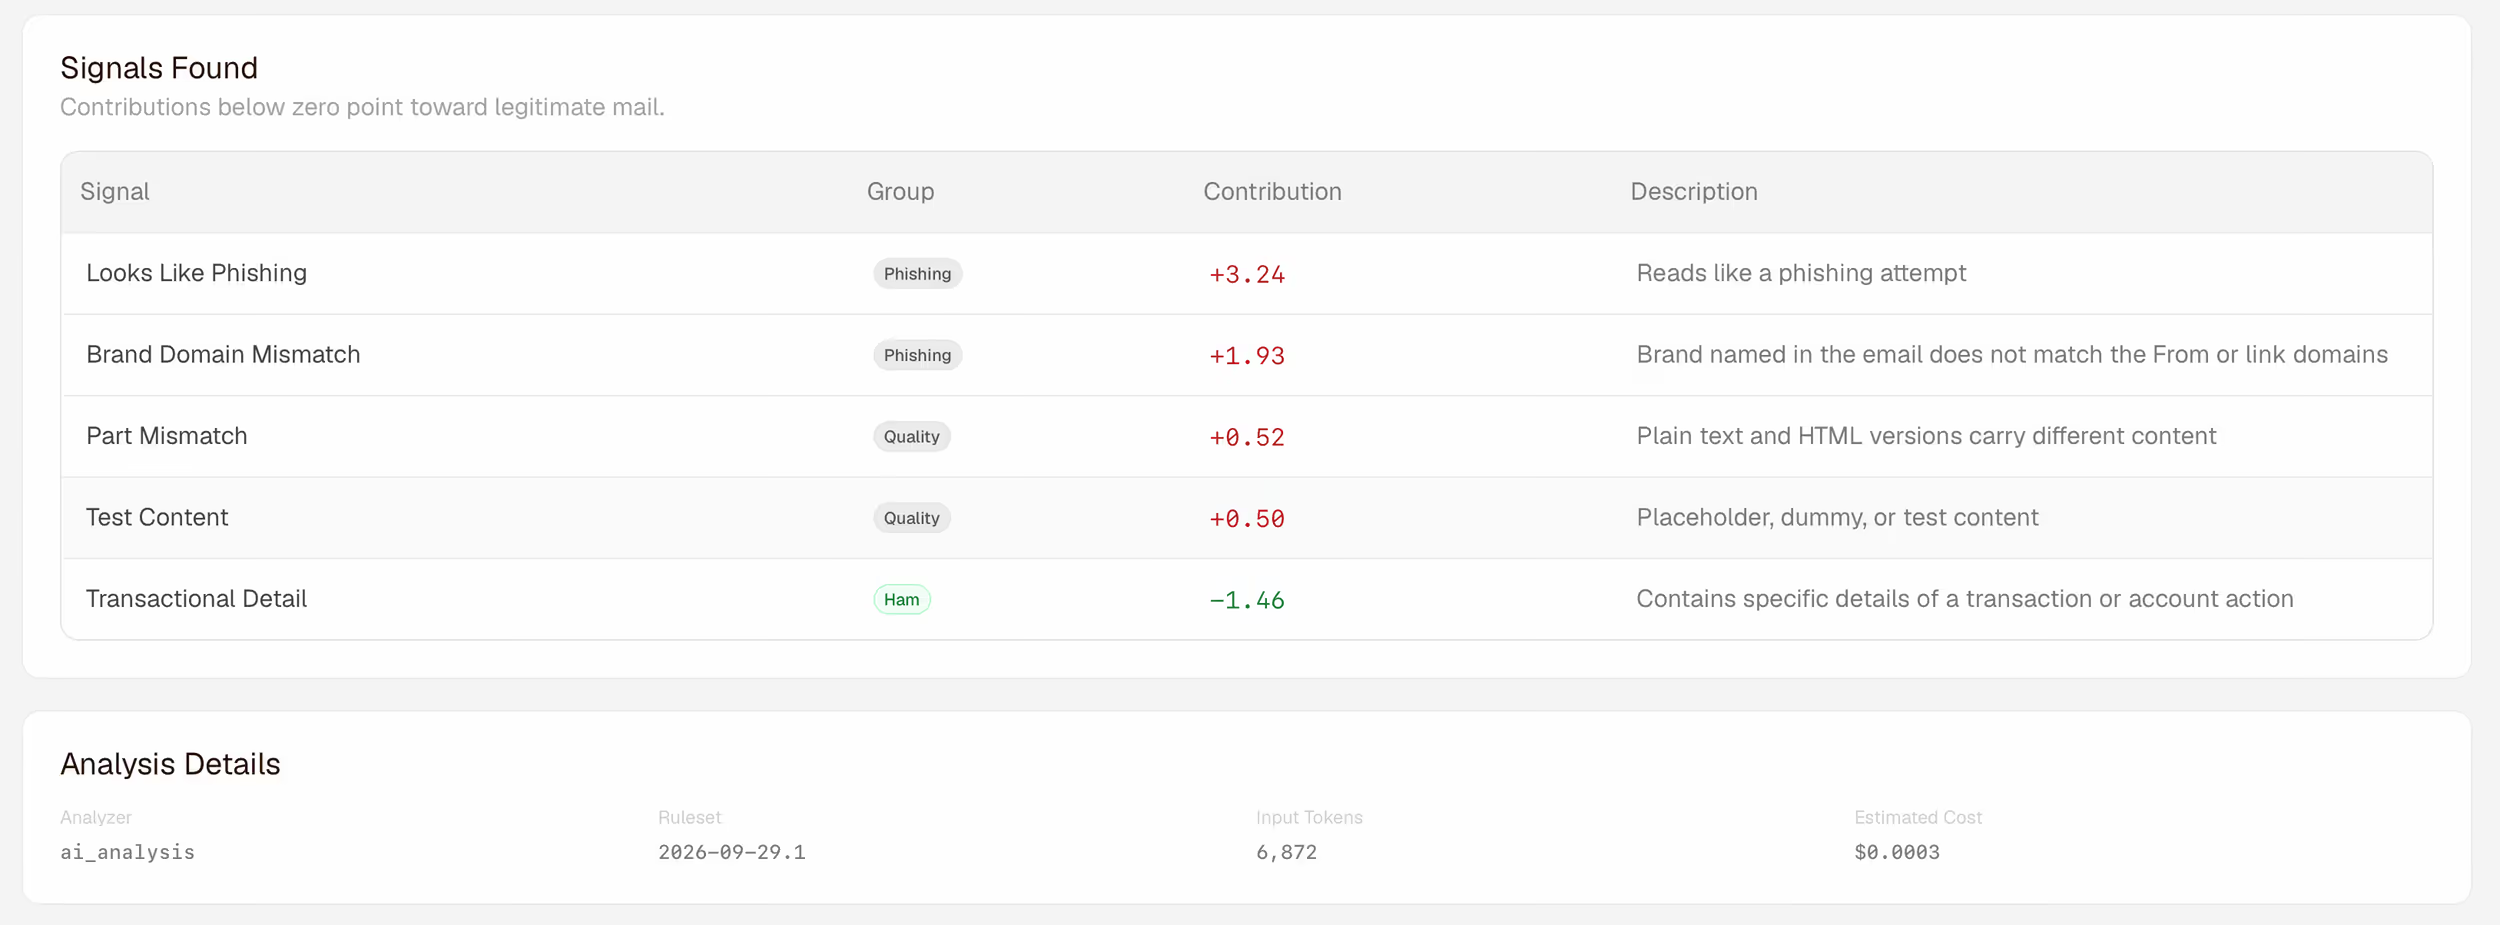
The brand mismatch comes from open and click tracking. When tracking is on for a sending domain, we rewrite each link to pass through our tracking domain so we can count clicks, and we add a small invisible image to count opens. In a password reset, a link that goes through another domain is exactly what phishing emails look like. With tracking turned off for the domain, the same email scored 4.2. The rest comes from the nature of password resets, which phishing emails imitate, and from Ledgerly sending from a maileroo.app subdomain instead of a domain matching its brand.
Tracking shows up in the other checks too. The tracking image has no alt text, so the accessibility score drops slightly, and the image's address makes Rspamd add one point for an uneven number of links between the HTML and text versions.
For security emails such as password resets and sign-in links:
- Send them from a separate sending sub-domain with tracking turned off, and keep tracking on the domain you use for product emails and newsletters.
- Send from a domain that matches your brand, such as
mail.ledgerly.com, and point links at your app on the same brand domain, such asledgerly.com, so the sender, the brand and the links all agree. - Say why the email was sent and what to do if the reader didn't ask for it.
Treat AI Analysis as advice. It's most useful on emails where trust matters, such as password resets, sign-in links and payment requests. The free plan includes 25 AI Analysis runs a month, and the Basic plan includes 500.
Test what happens after delivery
Your app's job doesn't end when an email is sent. It should stop mailing an address that no longer exists, unsubscribe people who report spam, and not mistake an out-of-office reply for a real answer. Those situations are hard to create on demand with real mailboxes, so Email Testing lets you trigger them yourself, either by acting on a captured email or by sending to a tagged address.
Act as the recipient
The Actions tab does what a recipient would do with an email: open it, click one or all of its links, unsubscribe, reply, send an out-of-office reply, or file a spam complaint in Abuse Reporting Format (ARF), the standard format mailbox providers use to report spam.
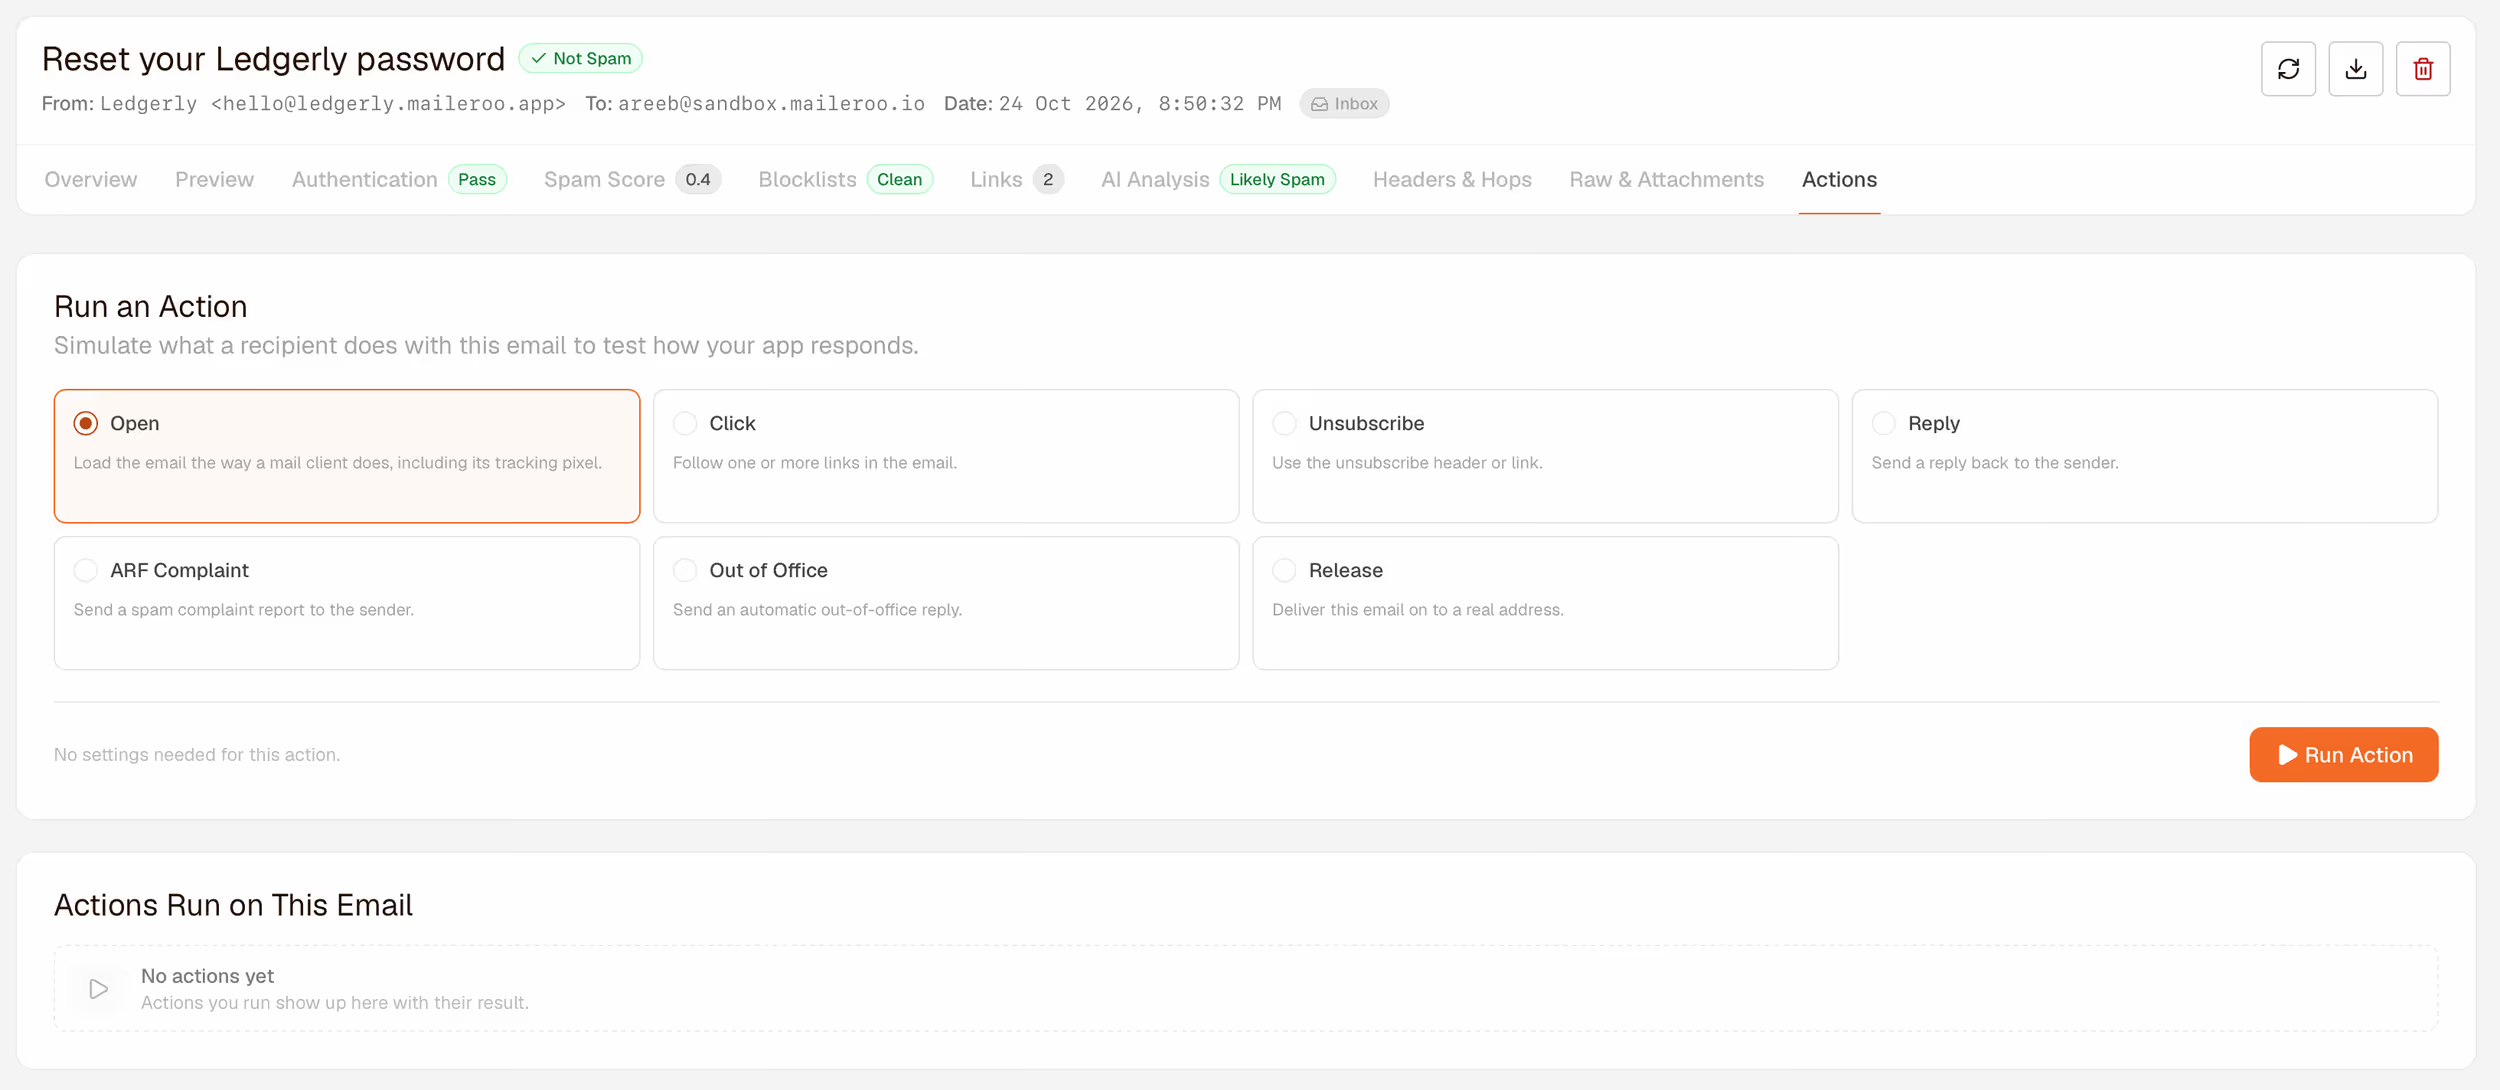
Each action reports its result. An open loads the images, including the tracking pixel. A click follows each link and records the HTTP status and final address, which makes it a quick way to find broken links and links that still point at localhost.
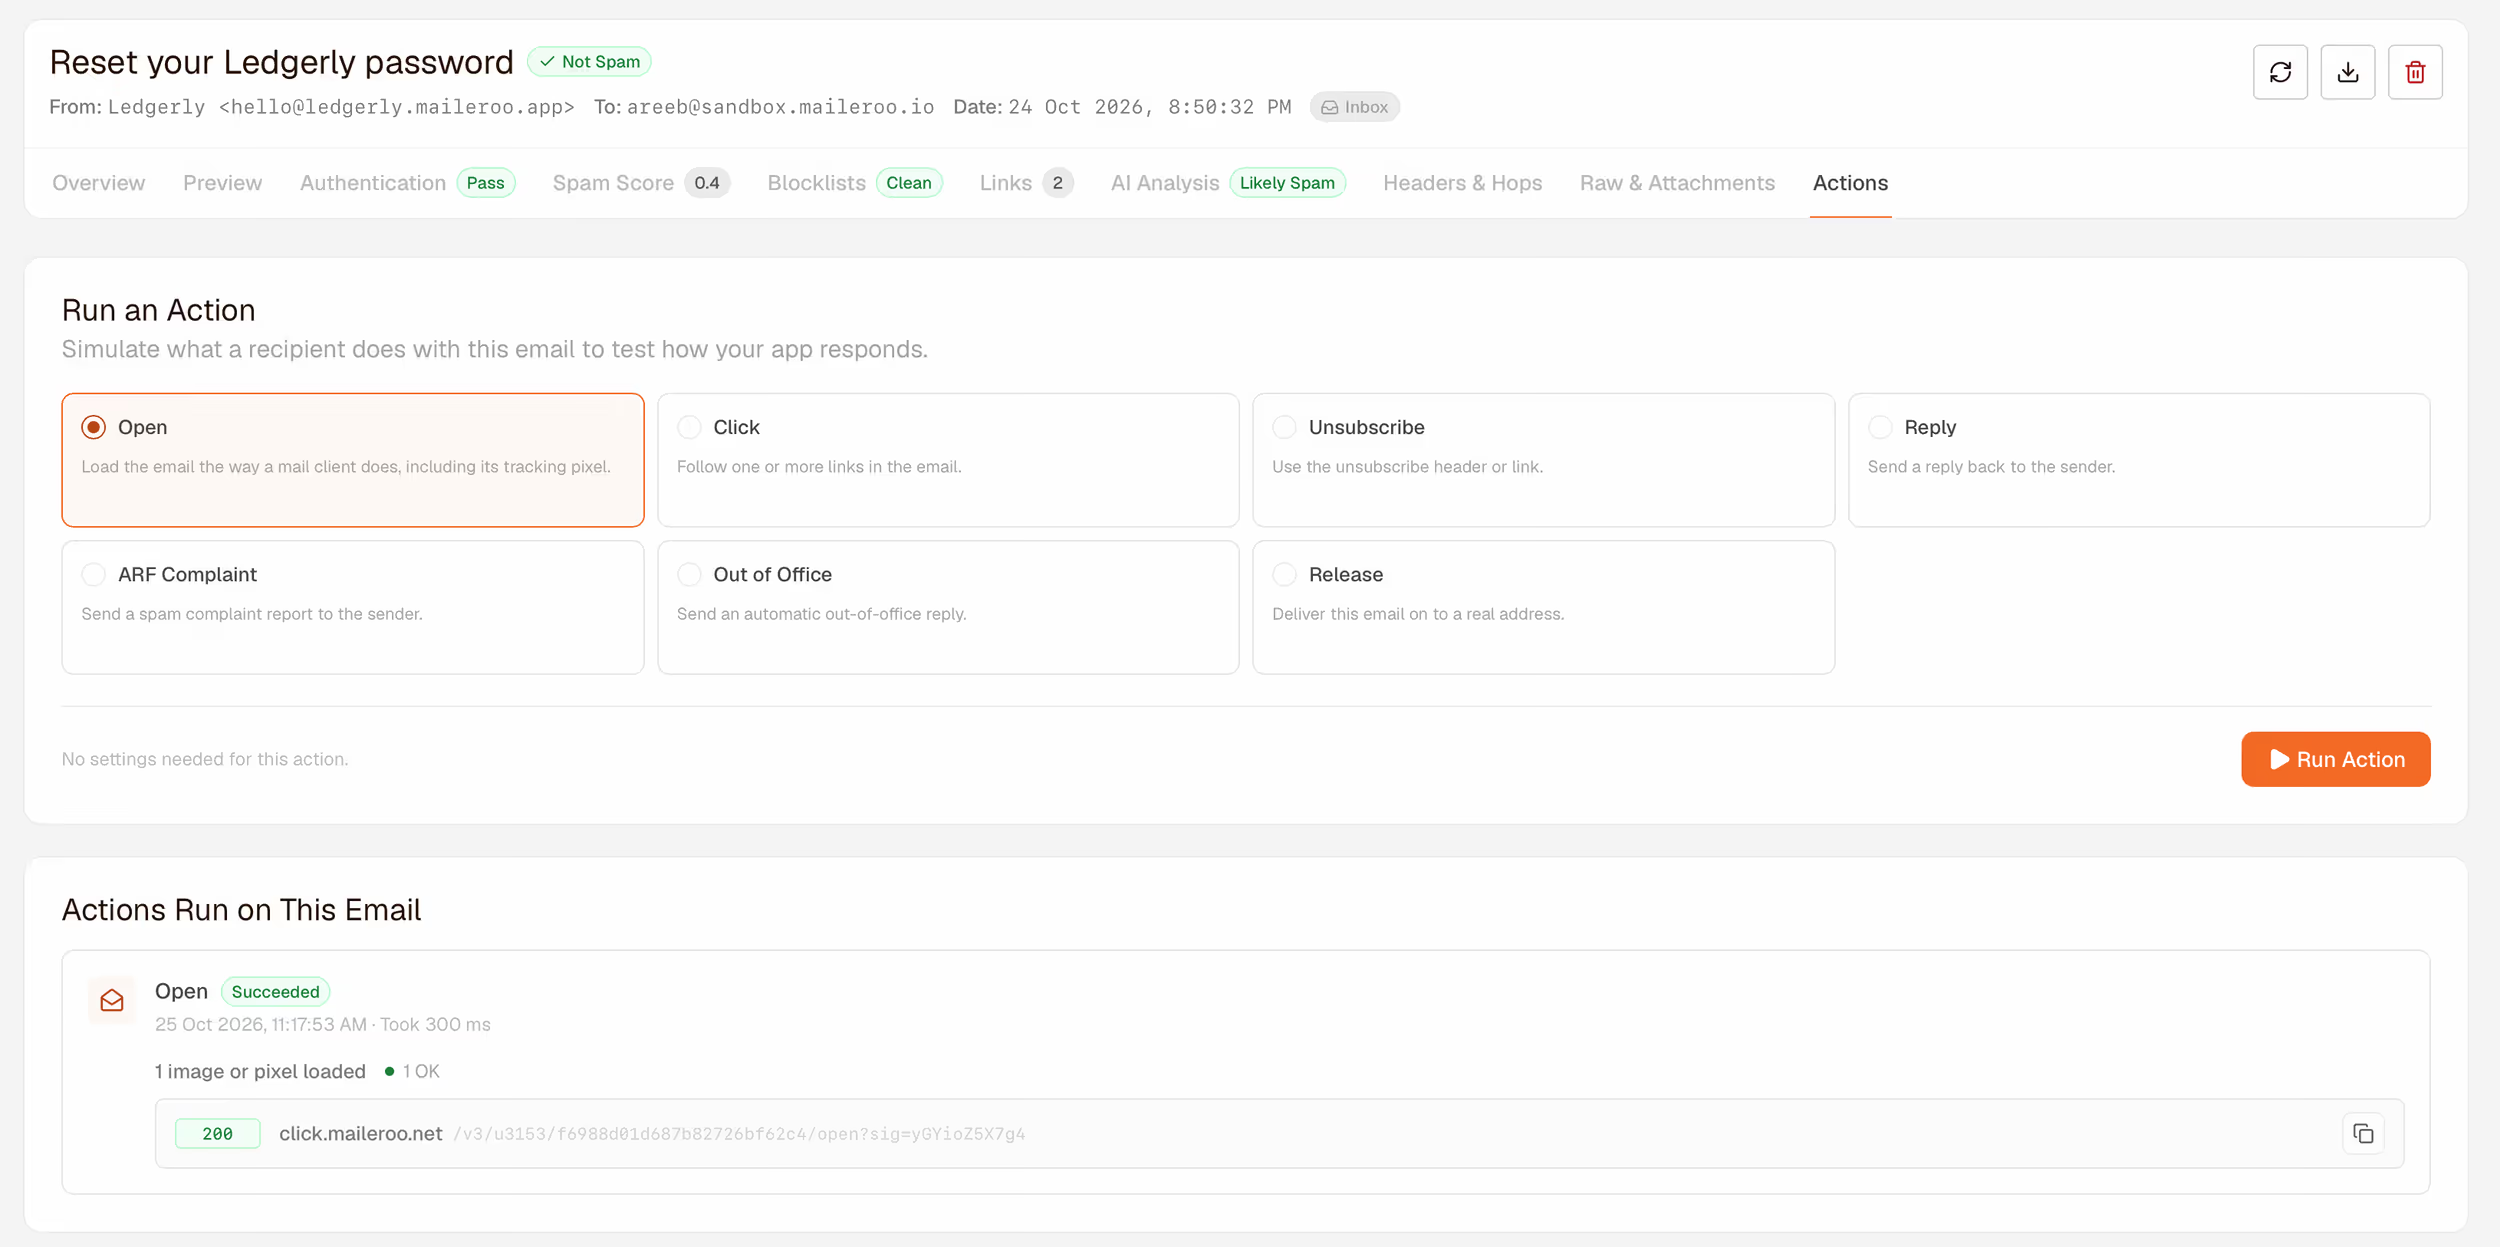
On a message sent through the relay, these actions count in the sending domain's open and click statistics, so you can check your tracking end to end.
The last action, Release, sends a captured email on to a real address through one of your verified sending domains. Use it to show a client or colleague an email exactly as your app produced it, without triggering it again in the app. Released emails count toward your sending quota, with up to 50 releases an hour.
Actions are included from the Basic plan. Every action is also available through the API, which the CI section introduces. This clicks every link in a captured email, using a key with the email_testing.messages.write scope:
$result = Http::withToken(config('services.maileroo.key')) ->post("https://api.maileroo.com/v1/email-testing/messages/{$messageId}/actions", [ 'type' => 'click', 'data' => ['links' => 'all'], ]) ->throw() ->json('data');Bounces and complaints with tagged addresses
A test inbox can answer incoming mail in different ways. Add a tag after a plus sign to choose the answer for one email, without changing the inbox:
| Address | What happens |
|---|---|
jack+hardbounce@sandbox.maileroo.io |
Rejected permanently (550), as if the mailbox didn't exist |
jack+softbounce@sandbox.maileroo.io |
Rejected temporarily (450), as if the mailbox were full |
jack+complaint@sandbox.maileroo.io |
Accepted, then reported as spam |
jack+ooo@sandbox.maileroo.io |
Accepted, then answered with an out-of-office reply |
You can also set an inbox's default answer with Responds With on the Inboxes tab.
Tags apply to mail that arrives at a test inbox, so send these through the relay.
When you send to jack+hardbounce@sandbox.maileroo.io, Laravel's send() returns as soon as the relay accepts the email, so as far as your app knows, the email was sent. The bounce happens afterwards, between our servers and the receiving one. Within a minute it shows in your sending statistics, and the address goes on your suppression list, the list of addresses we won't send to again.
Your app needs to hear about that bounce too, for example to mark the customer's address as invalid. That's what our sending webhooks are for: under Webhooks in the main menu, you give us a URL in your app, and we call it whenever an email bounces or is reported as spam. A tagged address lets you trigger that call whenever you like, so you can check that your webhook handler does the right thing without waiting for a real customer's mailbox to disappear.
Because the address is now suppressed, sending to it again is skipped, and no new bounce happens.
A soft bounce is treated as temporary, the same way a full mailbox would be: it isn't recorded as a bounce and the address isn't suppressed.
Check emails automatically in CI
Everything so far happens in the dashboard. The same features are available through the Email Testing API, a REST API you call over HTTPS with an API key. There's no package to install: Laravel's HTTP client is enough.
The API is what lets you check emails in continuous integration (CI), the automated tests that run on every push. Laravel's Mail::fake() tells you a Mailable was sent to the right person, but it never renders the email or sends it anywhere, so it can't notice a 1.2 MB attachment, a broken link or an email that a spam filter would score badly. With the API, a test can send the real email to the SMTP sink, read the results of our checks, and fail the build when something is wrong. The oversized receipt from earlier would have failed a test before it reached a customer.
API & CI
The API & CI tab in Email Testing has what you need to start: the base URL, the authorization header, and a link to the API documentation.
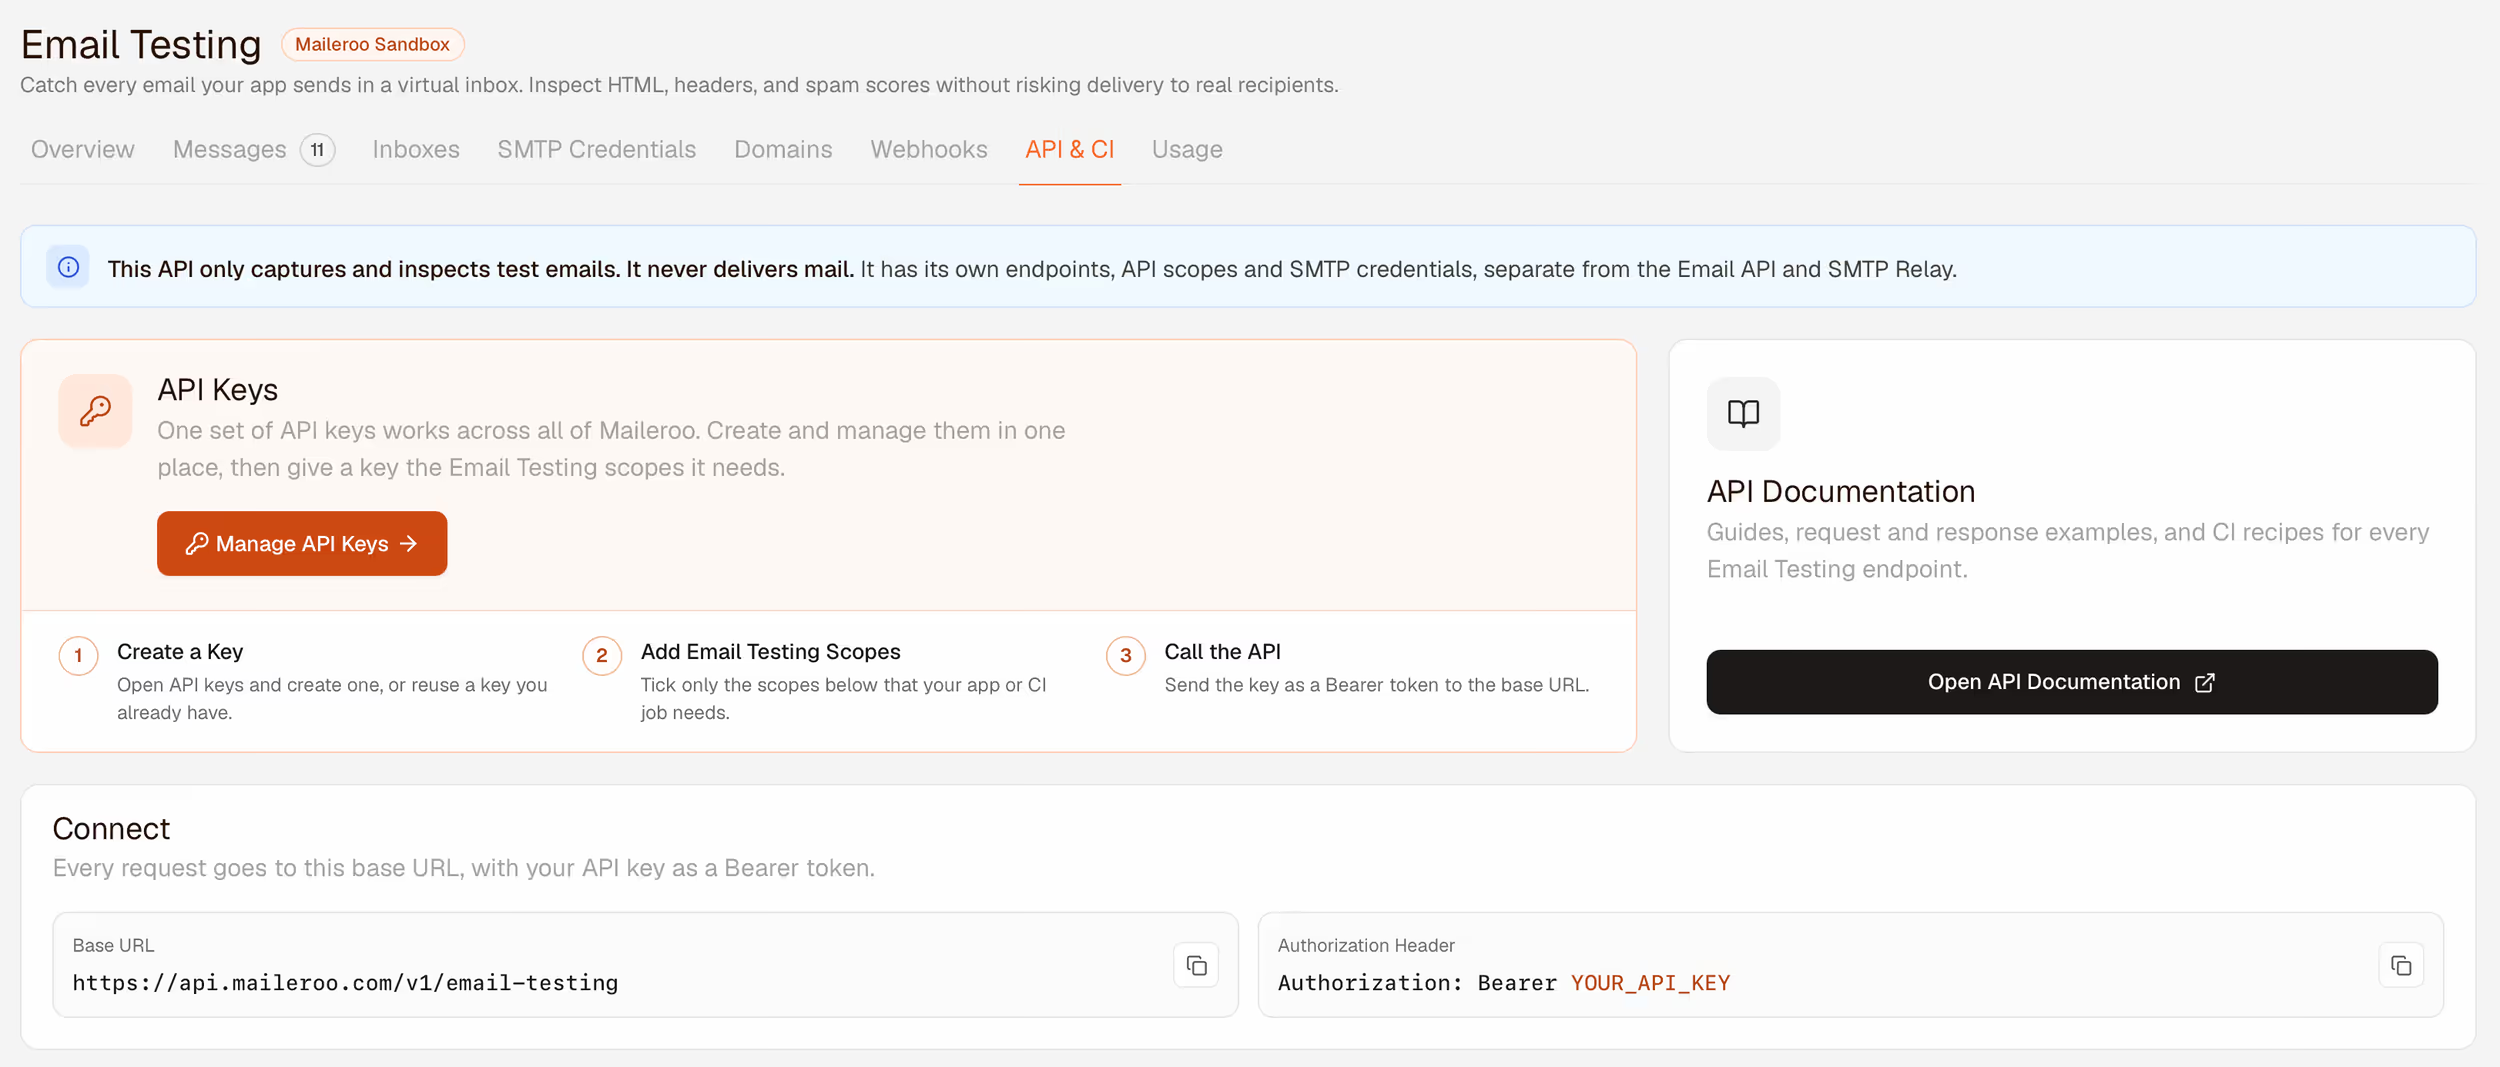
Further down, it lists every endpoint, grouped the same way as the dashboard: credentials, domains, inboxes, messages, analysis and previews, actions and webhooks. Anything you can do in the dashboard, you can script.
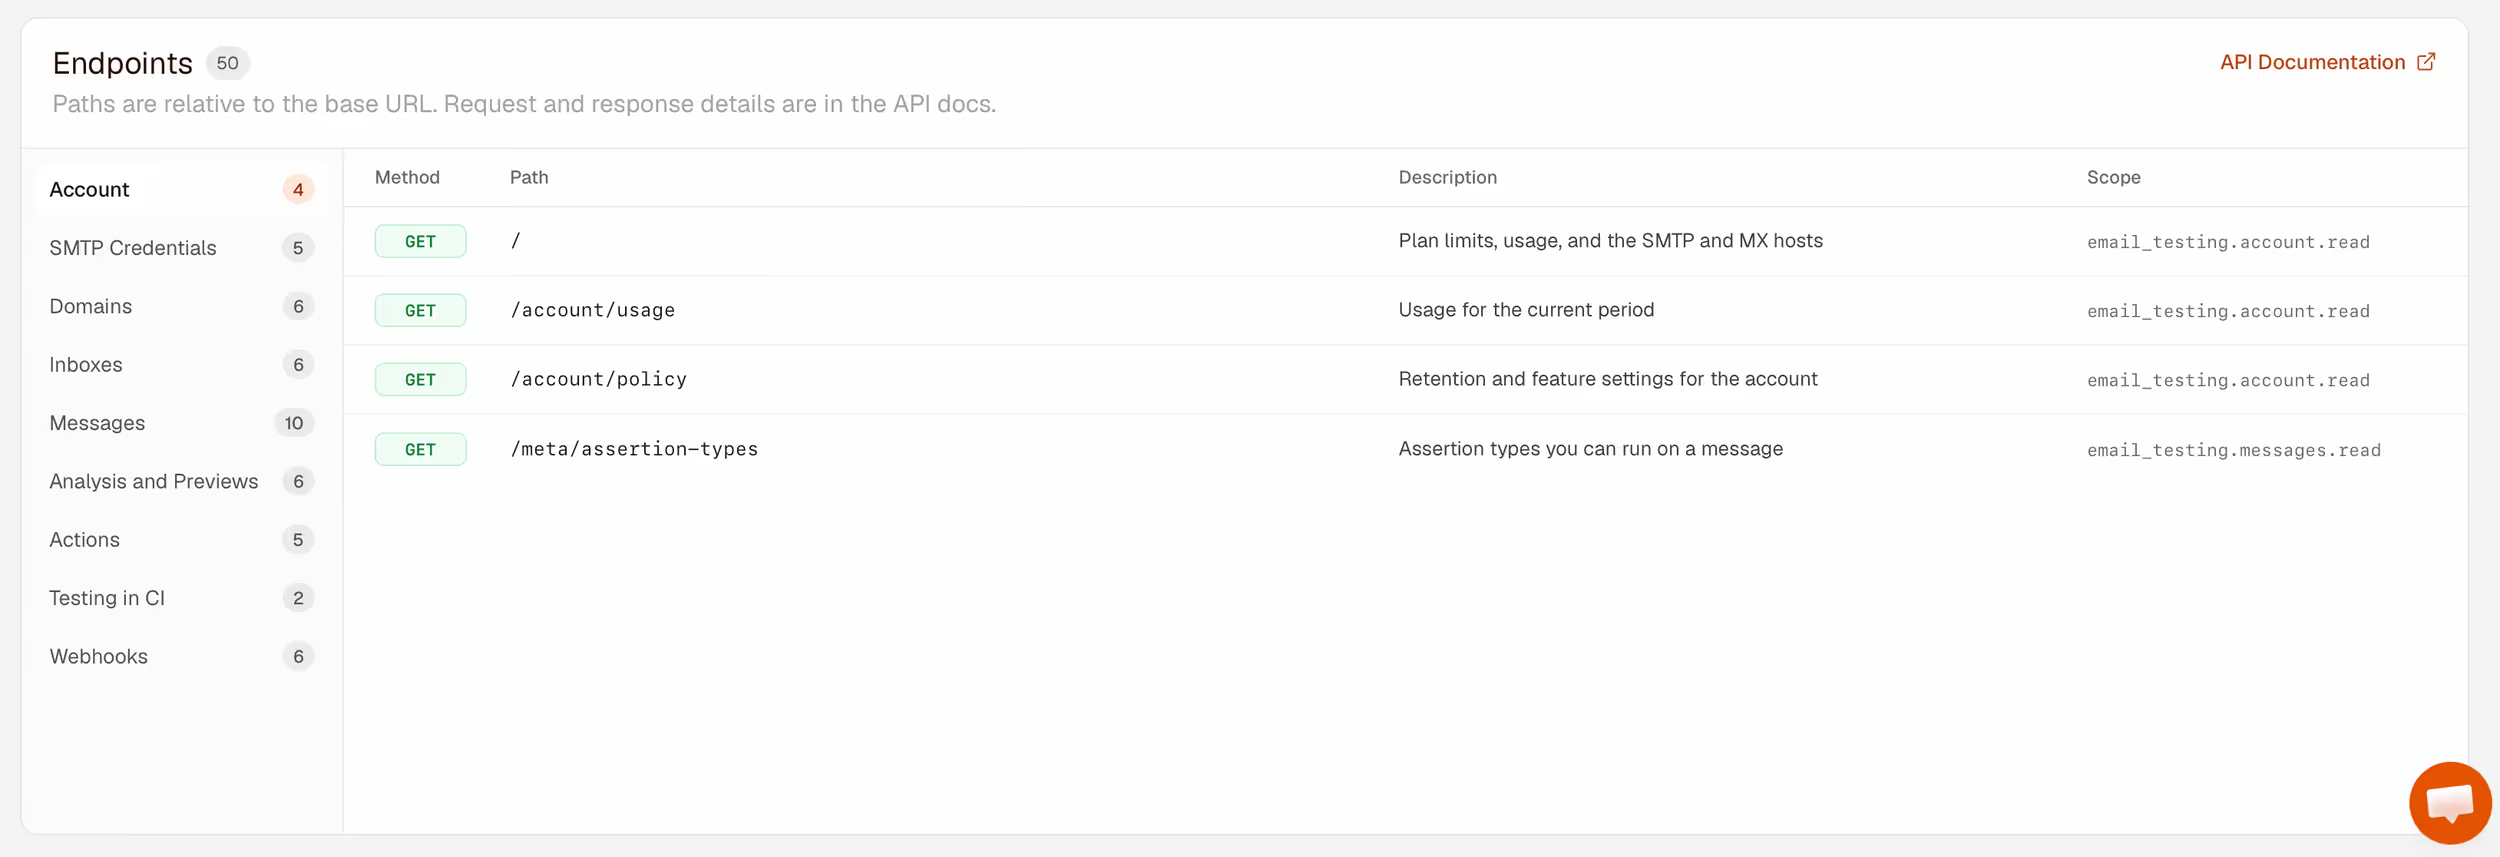
A test only needs the two endpoints under Testing in CI:
POST /wait/messageswaits until an email matching your filters arrives, for up to 40 seconds, and returns it.POST /messages/{id}/assertionsruns a list of checks on that email and returns pass or fail for each one.
The test sends through the SMTP sink, so the email never reaches anyone. It adds a unique X-Test-Run header to the email and waits for that header, so parallel test jobs never pick up each other's mail.
Create an API key
The test calls the API with an API key. Click Manage API Keys on the API & CI tab, then Create API Key. Maileroo uses one set of API keys for the whole account, so you choose what each key is allowed to do by ticking its scopes.
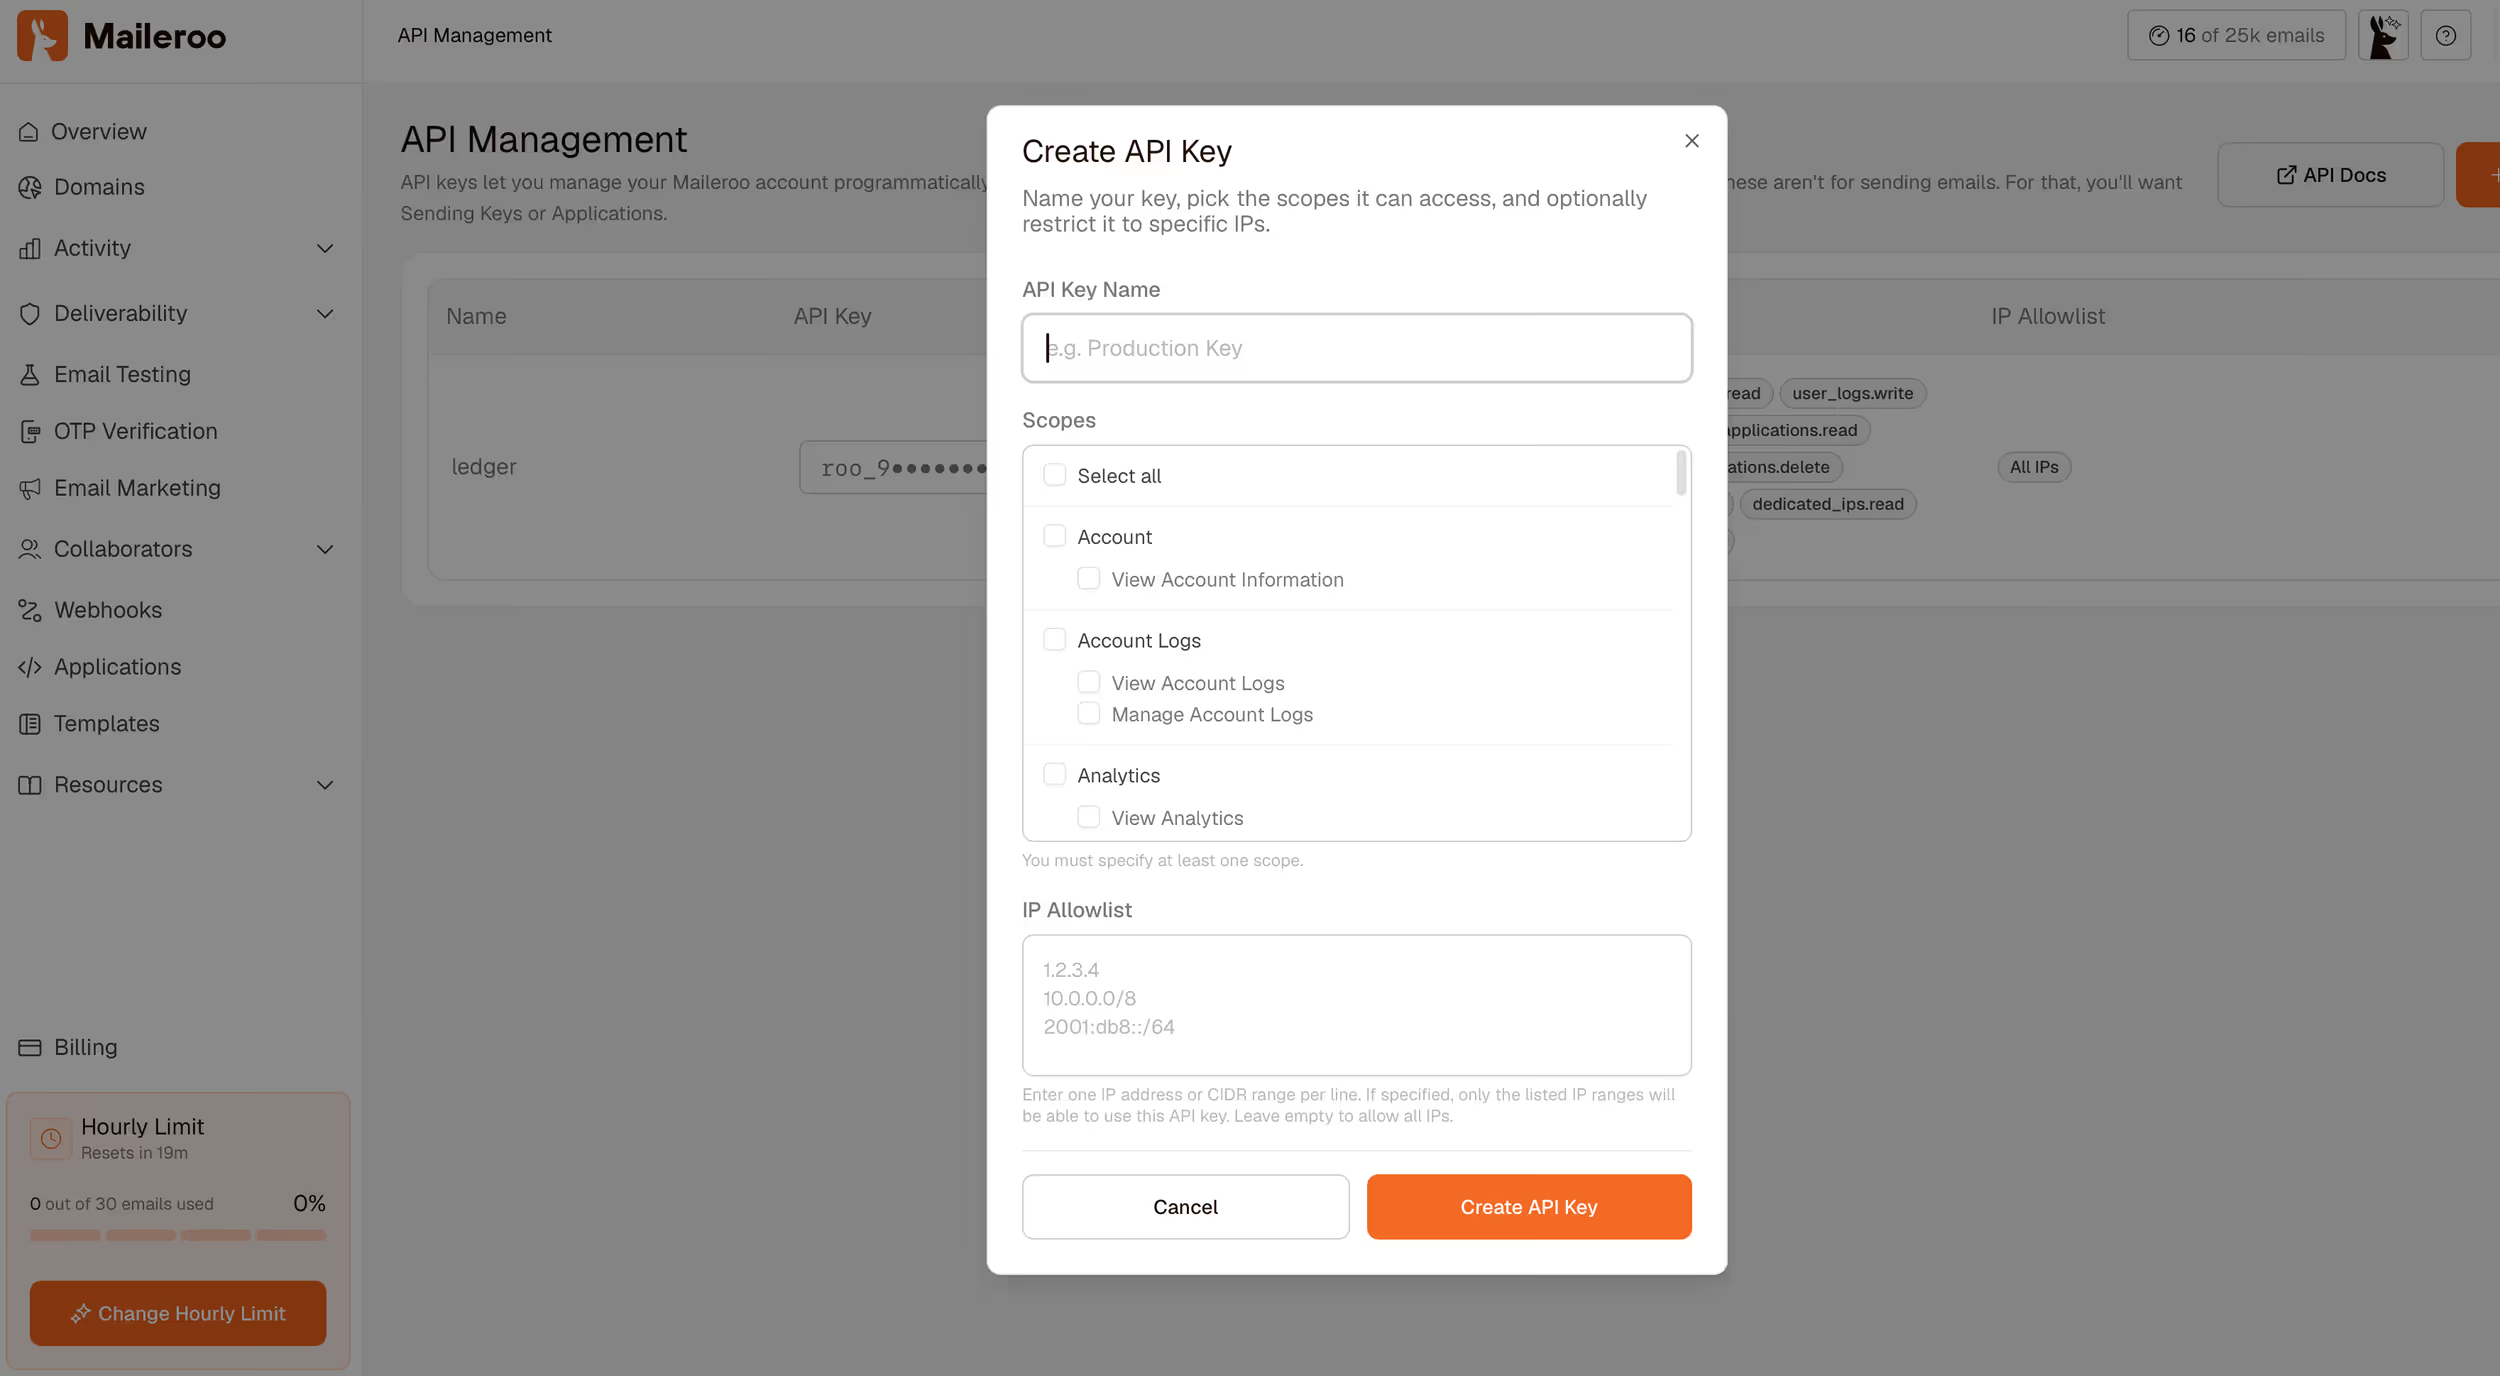
The Email Testing scopes are listed on the API & CI tab. Each area has read, write and delete scopes, and write and delete include read:
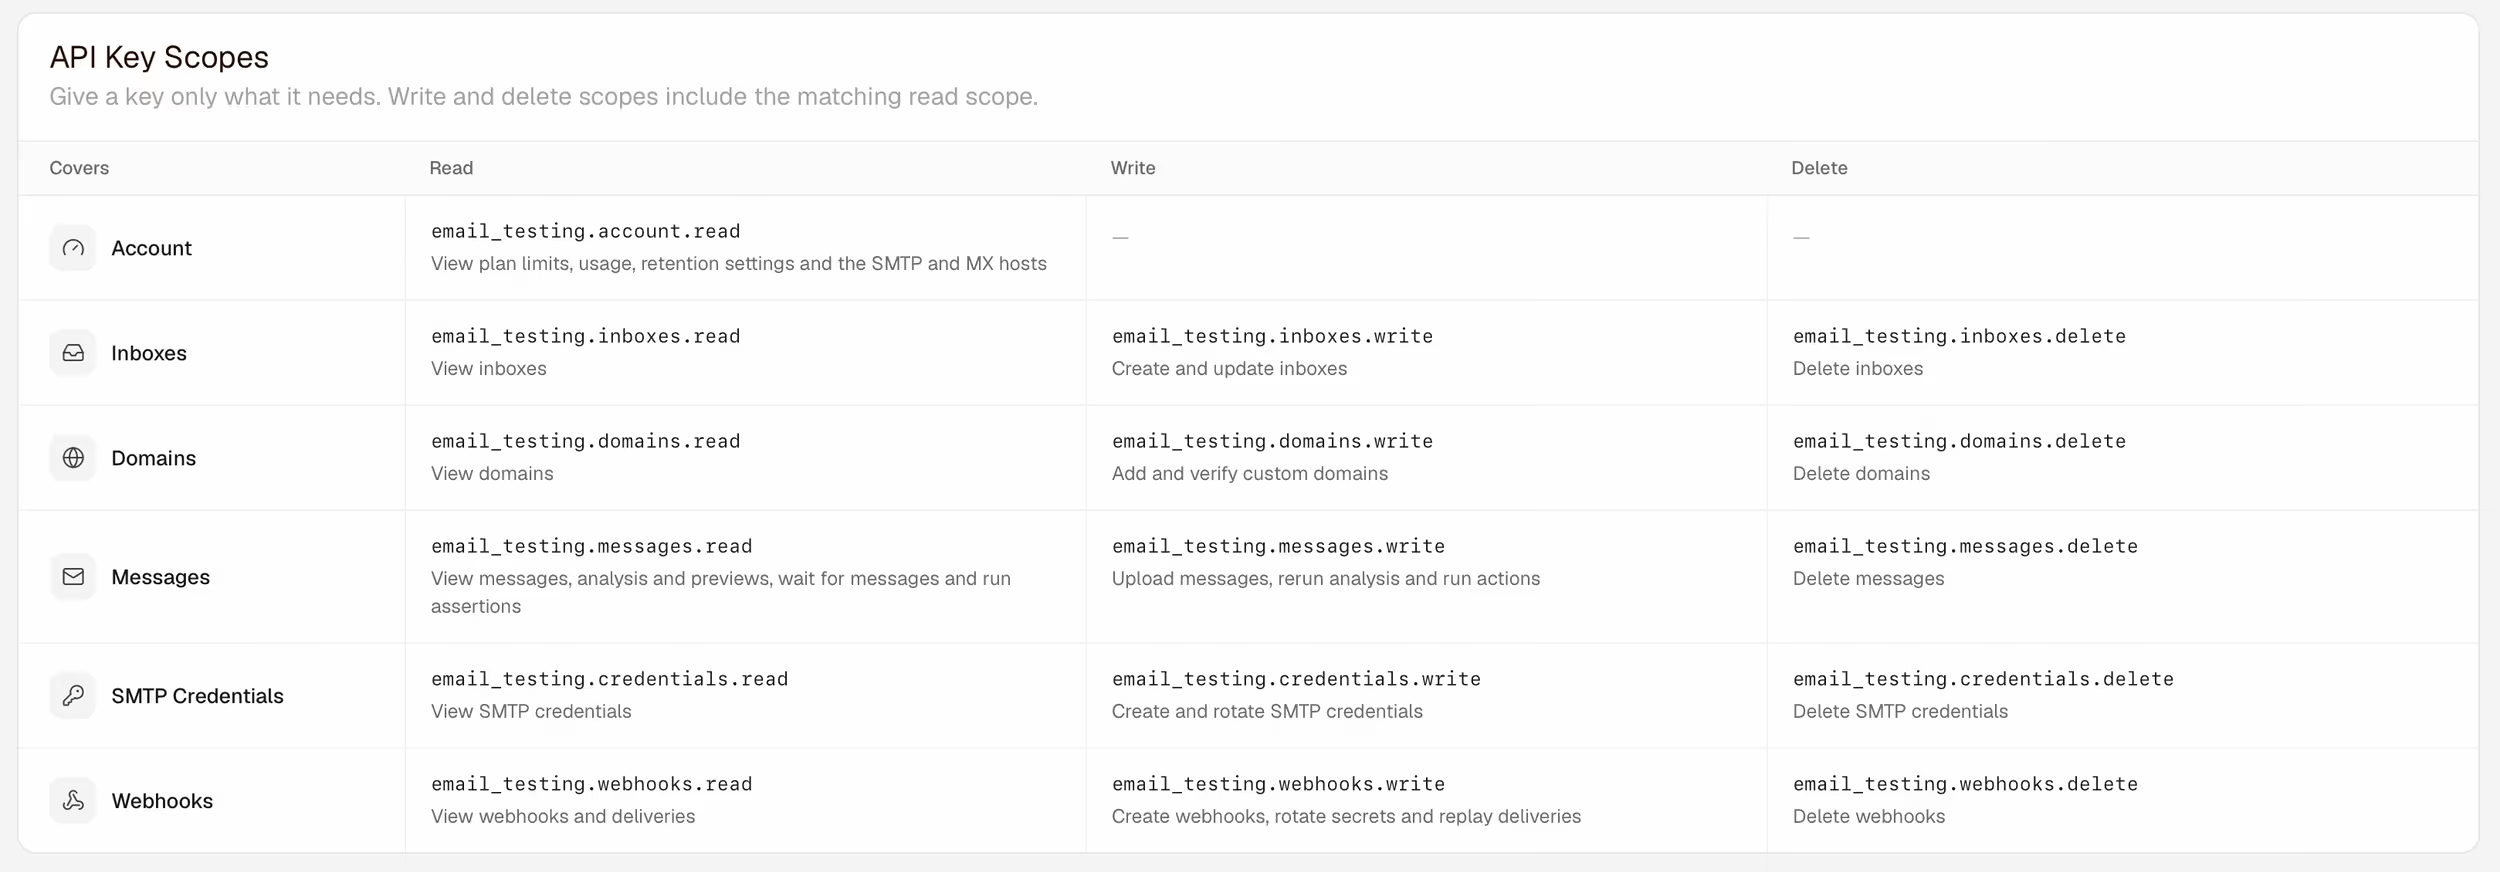
A key for these tests needs only email_testing.messages.read, which covers waiting for messages and running assertions. You can also restrict a key to a list of IP addresses, which suits a key used from fixed servers.
Add the key to .env as MAILEROO_API_KEY, and to config/services.php:
'maileroo' => [ 'key' => env('MAILEROO_API_KEY'),],Write the test
The test needs two things from the API: wait for the email, then check it. The small class below wraps both calls, and you can put it anywhere your tests can load it. After the email arrives, it also waits for our checks to finish, so the assertions see complete results:
namespace Tests\Support; use Illuminate\Support\Facades\Http;use RuntimeException; class MailerooTesting{ private static function api() { return Http::baseUrl('https://api.maileroo.com/v1/email-testing') ->withToken(config('services.maileroo.key')) ->acceptJson() ->timeout(60); } public static function waitFor(array $filters): array { $response = self::api()->post('/wait/messages', $filters + ['timeout_ms' => 40000]); if ($response->status() === 204) { throw new RuntimeException('No matching email arrived within 40 seconds.'); } $message = $response->throw()->json('data'); for ($i = 0; $i < 20 && $message['analysis_status'] !== 'complete'; $i++) { sleep(1); $message = self::api()->get("/messages/{$message['id']}")->throw()->json('data'); } return $message; } public static function assert(string $messageId, array $assertions): array { return self::api() ->post("/messages/{$messageId}/assertions", ['assertions' => $assertions]) ->throw() ->json('data'); }}The test sends Ledgerly's receipt, waits for it, and checks its subject, size, Gmail clipping, accessibility and links:
use App\Mail\InvoicePaid;use Illuminate\Support\Facades\Mail;use Illuminate\Support\Str;use Symfony\Component\Mime\Email;use Tests\Support\MailerooTesting; it('sends a payment receipt that every inbox shows in full', function () { $runId = (string) Str::uuid(); $startedAt = now()->subSeconds(5)->toIso8601ZuluString(); $mail = new InvoicePaid( name: 'Jack', invoice: sampleInvoice(), // number, client and line items invoiceUrl: 'https://ledgerly.maileroo.app/invoices/INV-2026-0142', ); $mail->withSymfonyMessage( fn (Email $message) => $message->getHeaders()->addTextHeader('X-Test-Run', $runId) ); Mail::mailer('smtp')->to('jack@sandbox.maileroo.io')->send($mail); $message = MailerooTesting::waitFor([ 'header_name' => 'X-Test-Run', 'header_value' => $runId, 'received_after' => $startedAt, ]); $report = MailerooTesting::assert($message['id'], [ ['type' => 'subject_contains', 'value' => 'INV-2026-0142'], ['type' => 'size_lte', 'value' => 100_000], ['type' => 'gmail_clip_eq', 'value' => false], ['type' => 'accessibility_score_gte', 'value' => 90], ['type' => 'links_rbl_clean', 'value' => true], ]); expect($report['pass'])->toBeTrue(json_encode($report['results']));});Mail::mailer('smtp') is there because Laravel's default phpunit.xml sets the mailer to array, which keeps email inside the test process.
The test passes in about 20 seconds. If someone puts the heavy font back into the PDF template, the size_lte check fails, and the failure message says exactly which check failed and by how much:
[{"type":"size_lte","pass":false,"expected":100000,"actual":1220422}]There are 18 types of check, including SPF, DKIM and DMARC results, the spam score, the AI Analysis verdict, blocklists, recipients and unsubscribe headers. GET /meta/assertion-types returns the current list. Leave the authentication checks out of tests that send through the SMTP sink, since they fail there by design.
Run it in GitHub Actions
Store the SMTP credential and the API key as repository secrets, then run the test with them:
name: Email tests on: [push] jobs: email: runs-on: ubuntu-latest steps: - uses: actions/checkout@v4 - uses: shivammathur/setup-php@v2 with: php-version: '8.4' - run: composer install --no-interaction --prefer-dist - run: cp .env.example .env && php artisan key:generate - run: ./vendor/bin/pest tests/Feature/TransactionalEmailTest.php env: MAIL_HOST: smtp.sandbox.maileroo.io MAIL_PORT: 587 MAIL_USERNAME: ${{ secrets.MAILEROO_SINK_USERNAME }} MAIL_PASSWORD: ${{ secrets.MAILEROO_SINK_PASSWORD }} MAILEROO_API_KEY: ${{ secrets.MAILEROO_API_KEY }}Get notified with webhooks
The wait endpoint suits tests, which ask for one email and stop. For everything else, Email Testing can call your app instead, through webhooks on the Webhooks tab.
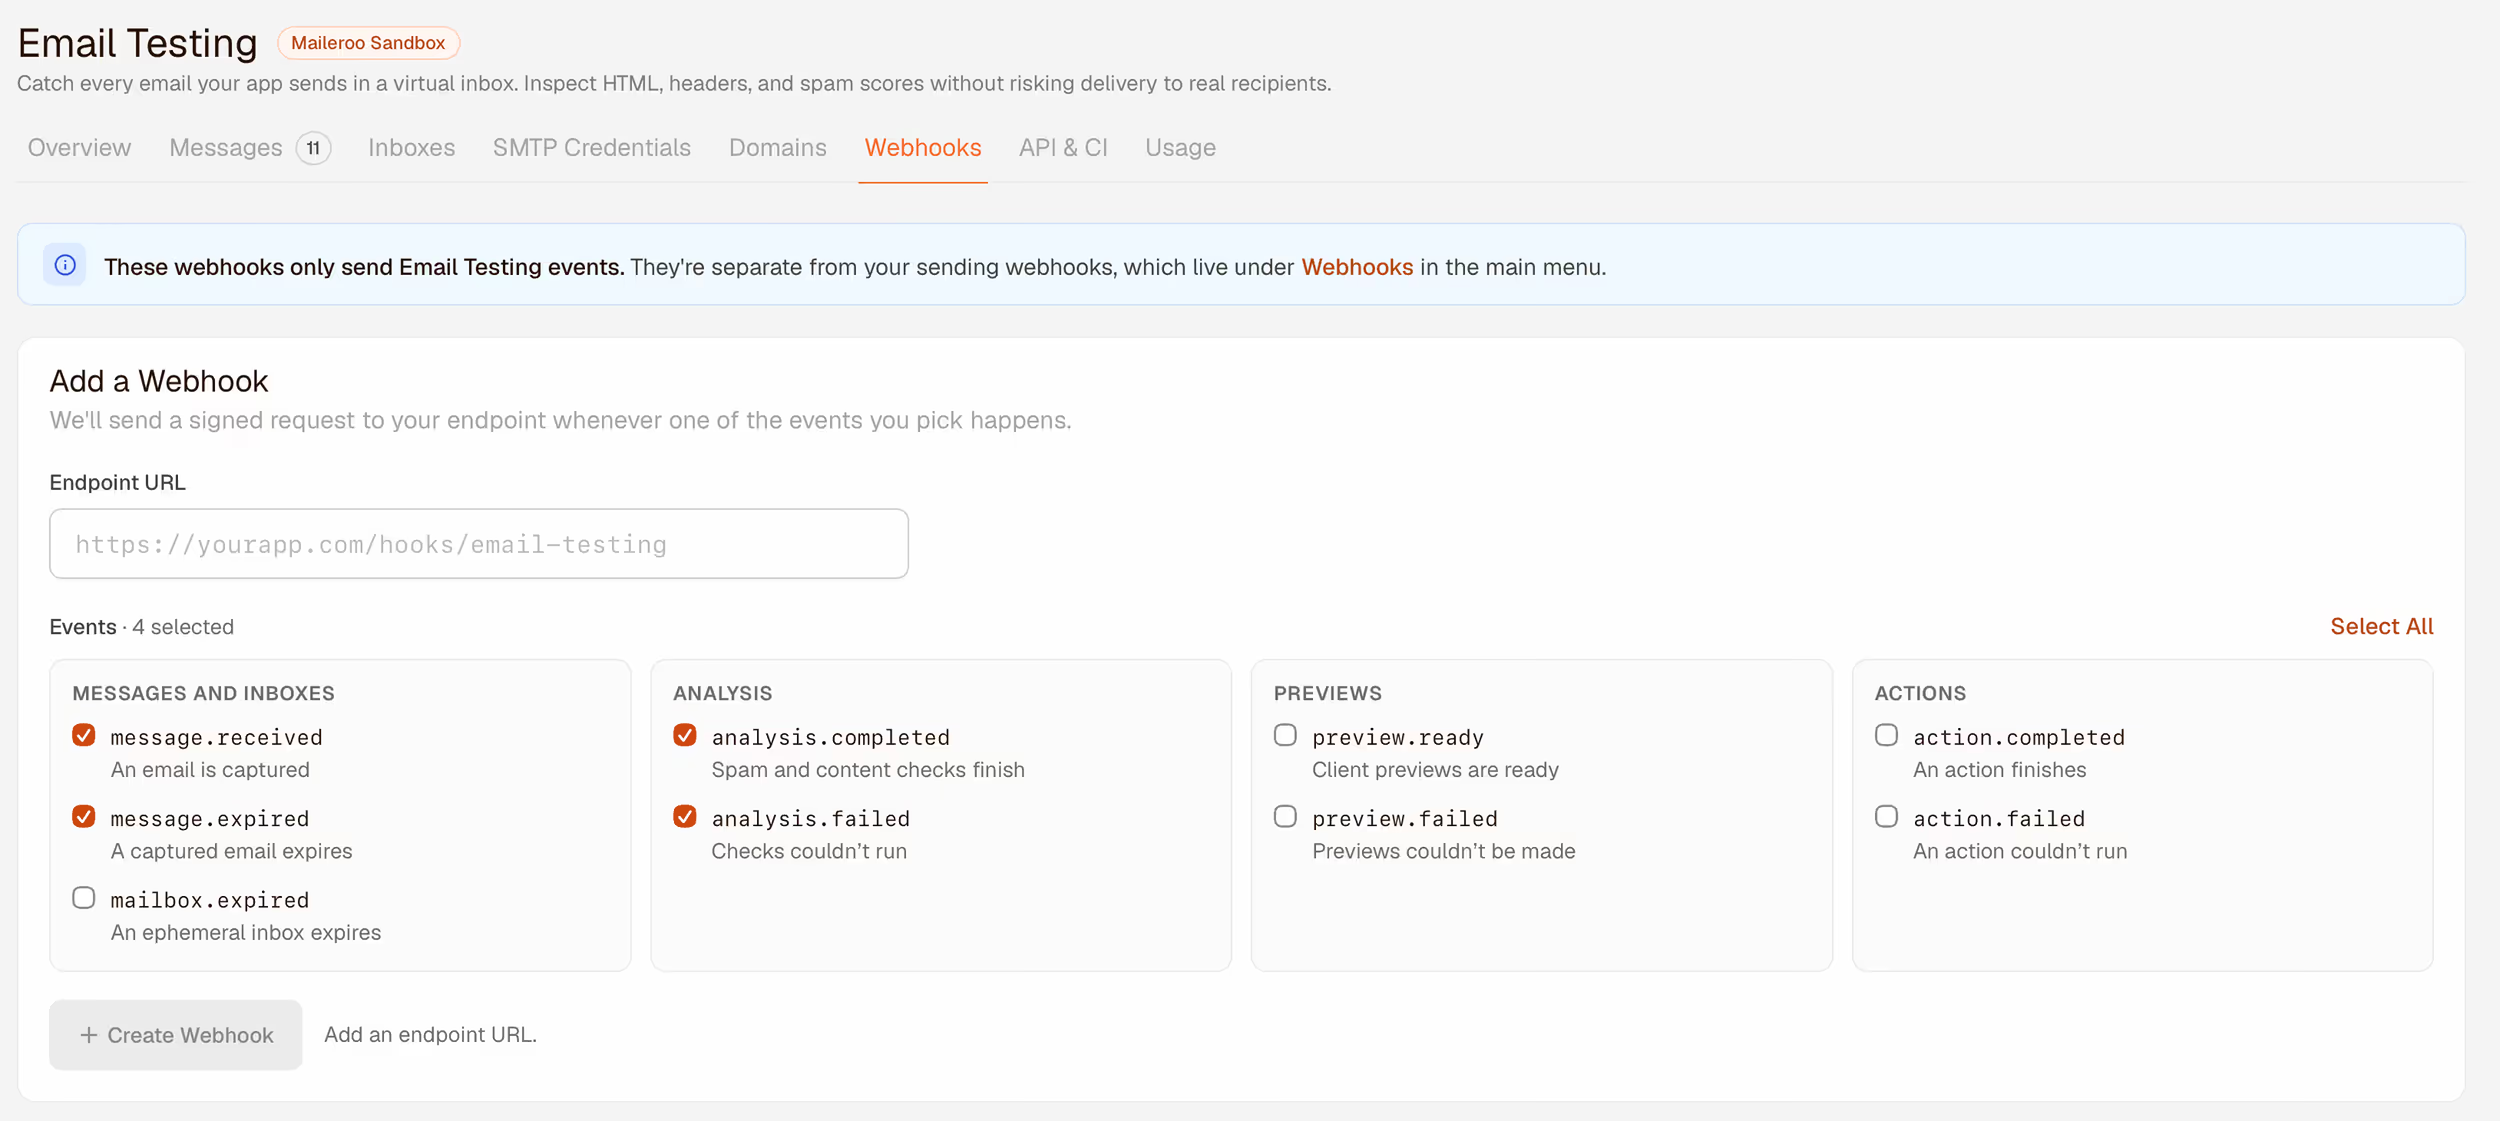
To add one, enter the URL in your app that should receive the events, then tick the events you want. They come in four groups:
- Messages and inboxes: an email is captured (
message.received), a captured email expires (message.expired), or an ephemeral inbox expires (mailbox.expired). - Analysis: our checks on an email finish (
analysis.completed) or couldn't run (analysis.failed). - Previews: the client previews are ready (
preview.ready) or couldn't be made (preview.failed). - Actions: an action such as a click or a release finishes (
action.completed) or couldn't run (action.failed).
We sign every request with a secret, which you get when you create the webhook, so your app can confirm the request came from us. The webhook list keeps each delivery for 24 hours, and you can rotate the secret at any time. A common use is analysis.completed: your app reads the results and posts a message in your team chat when an email from staging fails its checks. The webhooks documentation covers the payloads and how to verify the signature.
These webhooks only send Email Testing events. They're separate from the sending webhooks under Webhooks in the main menu, which report on real deliveries such as the bounces earlier.
Conclusion
Email is part of your product, but it usually gets less testing than any page in your app. Email Testing closes that gap inside the Maileroo account you already send from. The SMTP sink catches what your app sends, test inboxes receive real mail, and every message gets the same checks and previews, whichever way it arrived.
What changes when you use it day to day:
- No test email reaches a real person. With the SMTP sink as the default mailer outside production, a seeded customer address or a forgotten queue job can't email anyone, and every email still shows up in Messages.
- You see emails the way customers do. Previews in light and dark mode, on desktop and mobile, show rendering problems before anyone else does, without sending to a dozen personal accounts.
- You know how filters will judge an email before you send it. Authentication, spam score, blocklists and AI Analysis each answer that from a different angle, and a test inbox shows the result for real production mail.
- You can test what happens after delivery. Tagged addresses produce real bounces and complaints, and Actions open, click and reply on cue, so the code that handles them can be tested like any other code.
- Email stops depending on someone remembering to check it. Assertions in CI fail the build when an email breaks a rule, and webhooks tell your team when a check fails anywhere else.
None of this changes how you write mail in Laravel. Mailables, notifications and queued mail stay the same, and only the mailer settings change between environments.
To start, create a free account, create an SMTP credential under Email Testing, and point your local .env at it. Your next email will show up in Messages a few seconds later. The Email Testing docs cover every check and API endpoint in detail.